
ChevyMan.ru
Mazda Mitsubishi Toyota Land Rover Honda Kia Nissan
English Русский
Български
Беларускі
Український
Српски
Hrvatski
Română
Polski
Slovenský
Magyar
|
Articles | Sitemap | Contacts |


Home   Aveo   Captiva   Cruze   Lacetti   Lanos   Niva   Tahoe   Others  
Orlando 1 (2010-2018) Trailblazer 1 (2001-2008, petrol) Lumina 1 (1989-1994)
  • Home
  • Chevrolet
  • Trailblazer 1
  • Power unit
  • Engine control
  • Crankshaft Position Sensor (CPS) — Replacement

Crankshaft Position Sensor (CPS) — Replacement (Chevrolet Trailblazer 1)

            0

1. The crankshaft position sensor (CPS) sends pulses to the PCM, based on which the position of the crankshaft is determined. Based on the signal received, the ignition sequence is determined in the control unit and a spark is supplied to the spark plug of each cylinder. This pulse also serves as the basis for precise adjustment of ignition phases and determination of engine speed. This signal is used by the on-board diagnostic system to determine the presence of misfires. The magnetic field of the sensor is excited when the sensitive element passes through the cutout of the pulse ring located on the crankshaft. The distance from the sensor's sensitive element to the ring is approximately 1.3 mm. The magnetic field generated when the cutout passes is manifested by an alternating voltage signal sent by the sensor to the PCM. If the electronic unit does not receive a signal from the crankshaft position sensor, the ignition system does not turn on. The sensor is on the right (from the side of the drive belt location) engine, near the timing belt or chain.

Replacement


Note: Every time after removing and installing the CKP sensor, it is necessary to reset the parameters of the options for it. If a reset is not performed, a fault code corresponding to misfire may be registered in the processor memory. If the code has been registered, take the vehicle to a company station to reset the TCR sensor parameters.


2. Disconnect the negative cable from the battery.

3. Raise the vehicle and support it on vertical stands.


4. Disconnect the electrical connector from the sensor (see illustration).
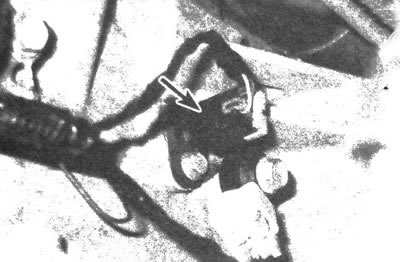
9.4. The crankshaft position sensor (CPS) is located in the left rear corner of the cylinder block

9.4. The crankshaft position sensor (CPS) is located in the left rear corner of the cylinder block


5. Unscrew the mounting bolt and remove the crankshaft position sensor.

6. Installation is carried out in the reverse order of removal.

The article was checked: Vladimir Romannikov
This article is available at russian, bulgarian, belarusian, ukrainian, serbian, croatian, romanian, polish, slovak, hungarian

Share information:

Previous articles
Trailblazer 1: Engine control
Next articles

Coolant Temperature Sensor (ECT) — Replacement
Supply Air Temperature (IAT) Sensor — Replacement
Manifold Absolute Pressure (MAP) Sensor — Replacement
Accelerator Pedal Position Sensor (APP) — Replacement
Throttle Position Sensor (TPS) — Replacement
Camshaft Position Sensor (CPS) — Replacement
Oxygen sensor — replacement
Knock Sensor — Replacement
Vehicle Speed Sensor (VSS) — Replacement
Crankcase ventilation system


See similar articles on the topic of Chevrolet cars:
Engine Crankshaft Position Sensor Chevrolet Aveo T300 (2012-2018)
Crankshaft Position Sensor (CKP) Chevrolet Captiva 1 (2006-2018)
Adjusting the position of the front seats Chevrolet Cruze 1 (2008-2016)
Removal the crankshaft position sensor Chevrolet Lacetti 1 (2002-2009)
Checking the crankshaft position sensor and its circuits Chevrolet Lanos T150 (2002-2009)
Adjusting the position of the steering wheel Chevrolet Niva 1 (2002-2016)
Crankshaft position sensor Chevrolet Tahoe 2 and 3 (2000-2014)
Link in different formats to this page


Visitor comments

No comments yet


How much will 35 + 35 =


Orlando 1 (2010-2018) 
  • General information
  • Introduction to manual
  • User manual
  • Maintenance
  • Troubleshooting
  • Power unit
  • Engine repair
  • Fuel and control system
  • Cooling and lubrication system
  • Ignition system
  • Transmission
  • Clutch
  • Gearbox
  • Drive shafts
  • Chassis
  • Car suspension
  • Steering
  • Brake system
  • Body
  • Exterior (external elements)
  • Doors, locks and windows
  • Electrical equipment
  • Equipment and devices
  • Windscreen wipers
  • Power devices
  • Electrical diagrams


Trailblazer 1 (2001-2008) 
  • General information
  • User manual
  • Troubleshooting
  • Maintenance
  • Power unit
  • Engine in a car
  • Engine overhaul
  • Cooling and heating
  • Fuel and exhaust system
  • Engine electrical equipment
  • Engine control
  • Transmission
  • Automatic gearbox
  • Transfer case
  • Drive shafts and cardan
  • Chassis
  • Brake system
  • Car suspension
  • Steering
  • Body
  • Exterior (external elements)
  • Interior (internal elements)
  • Doors, locks and windows
  • Electrical equipment
  • Equipment and devices
  • Electrical circuits


Lumina 1 (1989-1994) 
  • General information
  • Maintenance
  • Power unit
  • Engine 3.1L V6
  • Engine 3.8L V6
  • Engine overhaul
  • Cooling system
  • Power and exhaust system
  • Fuel injection
  • Engine electrical equipment
  • Reduced exhaust gas toxicity
  • Transmission
  • Automatic gearbox
  • Drive shafts
  • Chassis
  • Brake system
  • Car suspension
  • Steering
  • Body
  • Heating and air conditioning
  • Repair of body elements
  • Doors, covers and windows
  • Interior (internal elements)
  • Electrical equipment
  • Equipment and devices
  • Electrical circuits


ChevyMan.ru © 2017-2026 · Mobile version · Feedback · Site search · Interesting to read · Sitemap: EN BG BY UA RS HR RO PL SK HU

Aveo 2003-2008 · Aveo 2006-2011 · Aveo 2012-2018 · Captiva 2006-2018 · Cruze 2008-2016 · Lacetti 2002-2009 · Lanos 2002-2009 · Niva 2002-2016 · Tahoe 1992-2000 · Tahoe 2000-2014 · Lumina 1 1989-1994 · Trailblazer 1 2001-2008 · Orlando 1 2010-2018 ·
🛡️ For your security and to improve our service, this site uses cookies. You can disable them in your browser.