


Note: All vehicles described are equipped with two oxygen sensors, located in front of and behind the catalytic converter.
1. The oxygen sensor records the amount of oxygen remaining in the exhaust after the fuel-air mixture has burned. The oxygen remaining in the exhaust reacts with the sensor element and thus generates a pulse whose voltage is within 0.1 (high oxygen content, lean mixture) - 0.9 V (low oxygen, rich mixture). The upstream oxygen sensor is located in the exhaust system before the catalytic converter. The RCM continuously monitors the pulses of the upper sensor, based on which the optimum pulse width of the injectors is maintained and, thus, the optimum fuel-air mixture ratio is ensured. The mixture, which has a ratio of 14.7:1, is optimal for ensuring low exhaust toxicity and maximum fuel economy with the highest performance characteristics of the power unit. Thus, the RCM continuously maintains the specified mixture ratio based on the pulses from the oxygen sensor.
2. According to the pulses of the lower oxygen sensor (located in the exhaust system behind the catalytic converter) the RSM does not specify the need to adjust the air-fuel ratio. The operating principle of the lower oxygen sensor is similar to the operating principle of the upper sensor. The signals from the lower sensor in the PCM determine the efficiency of the catalytic converter. The change in the amplitude of the pulse from the lower sensor occurs more slowly than the change in the amplitude of the signal from the upper oxygen sensor, since the exhaust gases that have passed through the catalytic converter contain less oxygen.
3. Without warming up to operating temperature (approximately 318°C), the oxygen sensor does not generate pulses. During the period prior to the sensor heating, the PCM directly controls the fuel supply. However, the sensor signal does not determine the amount of oxygen in the exhaust gases. Fuel supply control in the RSM is performed based on signals from other sensors of the control system according to the built-in program. All oxygen sensors have a heating element that is connected to the battery through a power circuit protected by a fuse. When voltage is applied, the sensor heats up to operating temperature in the shortest possible time.
4. There are four factors that influence the operation of the oxygen sensor:
- a) Electrical - the clarity of the transmission of low voltage pulses depends on the condition of the connectors, which should be inspected first in the event of a malfunction of the oxygen sensor.
- b) Possibility of air circulation - the sensor operates with air circulation in its housing.
- When removing, installing or replacing the sensor, make sure that its air ducts are clear.
- c) Establishing Operating Temperature - The PCM cannot detect a sensor signal until the sensor has reached operating temperature, approximately 318°C. This factor must be taken into account when evaluating the sensor's performance.
- d) Use of unleaded petrol - To ensure proper functioning of the sensors, the vehicle must be fuelled with unleaded petrol only.
5. The PCM can detect several reasons for sensor failure. At the same time, the corresponding diagnostic codes are registered in the microprocessor memory, determining the specifics of the malfunction (see subsection 2). If the sensor fails, its pulses are ignored and the PCM switches to direct fuel supply control mode, as described above.
Replacement
6. Since the exhaust pipe contracts when it cools, it may be difficult to loosen the oxygen sensor tightening torque when the engine is cold. To avoid damaging the sensor when unscrewing, first start the engine and turn it off after two minutes. Be careful not to get burned during the following procedure. Considering the factors listed below, the sensor should be handled with care when exposed to impact.
- a) The oxygen sensor has a tail and connector that should not separate during removal. Damage or separation of the tail or electrical connector may adversely affect the further operation of the sensor.
- b) Keep grease, dirt and other contaminants away from the connector and open end of the sensor.
- c) Do not use solvent when cleaning the oxygen sensor.
- d) Handle the sensor with care and do not allow it to fall.
- e) Do not attempt to repair the sensor wiring - if it is damaged, it must be replaced.
7. When replacing the lower oxygen sensor, it is necessary to raise the vehicle and install vertical supports.
8. The upstream oxygen sensor can be replaced without lifting the vehicle.
9. Disconnect the connector from the sensor (see illustrations).
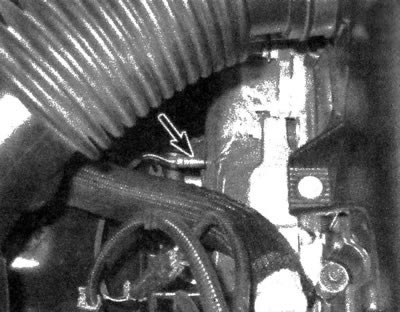
11.9a. Location of the upper oxygen sensor, the signals of which reflect the efficiency of the engine
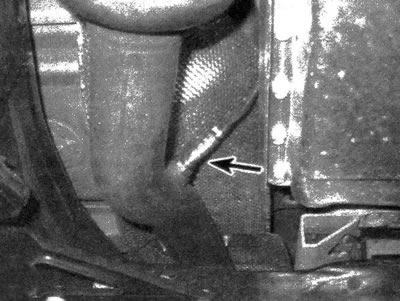
11.9b Location of the downstream oxygen sensor, the signals from which reflect the efficiency of the catalytic converter
10. Using a suitable wrench or special head, unscrew the sensor from the exhaust pipe.
11. To facilitate subsequent unscrewing, it is necessary to apply an anti-seize compound to the sensor thread. Typically, a new sensor comes with anti-seize compound applied to the threads. If this is not the case, coat the threads with the compound.
12. Install and tighten the sensor securely.
13. Connect the connector to the sensor and lower the vehicle.
[The source of the article is available on the website: «chevyman.ru»]