
ChevyMan.ru
Mazda Mitsubishi Toyota Land Rover Honda Kia Nissan
English Русский
Български
Беларускі
Український
Српски
Hrvatski
Română
Polski
Slovenský
Magyar
|
Articles | Sitemap | Contacts |


Home   Aveo   Captiva   Cruze   Lacetti   Lanos   Niva   Tahoe   Others  
Captiva 1 (2006-2018)
  • Home
  • Captiva
  • 1 (2006-2018)
  • Body
  • Exterior (external elements)
  • Rear bumper trim

Rear bumper trim (Chevrolet Captiva 1)

            0

Contents: Removal procedure ↧ Installation procedure ↧

Removal procedure


1. Disconnect the cable from the negative terminal of the battery.
1. Disconnect the cable from the negative terminal of the battery.


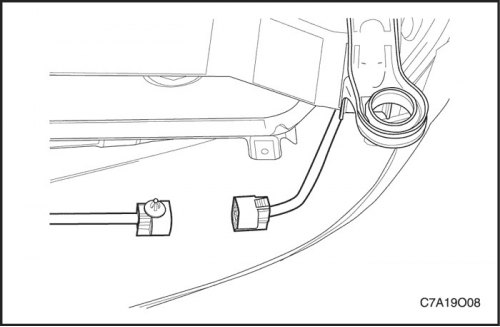
2. Disconnect the rear obstacle sensor connector if equipped.
2. Disconnect the rear obstacle sensor connector if equipped.


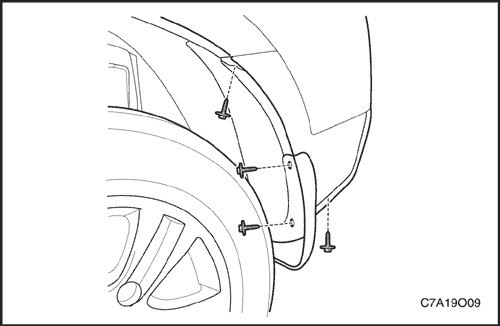
3. Unscrew the trim bolts on the rear wheel arch trim.
3. Unscrew the trim bolts on the rear wheel arch trim.


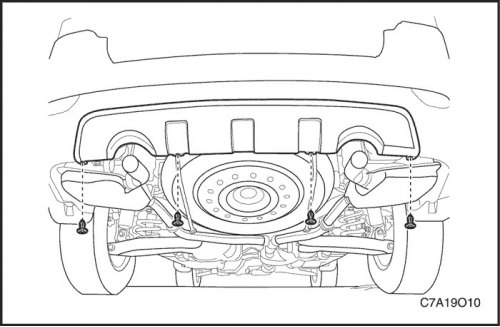
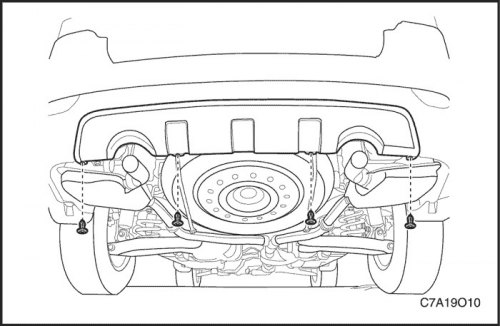
4. Release the lower trim holders.


4. Release the lower trim holders.


5. Remove the rear combination lights. See Section 9B "Lighting systems".

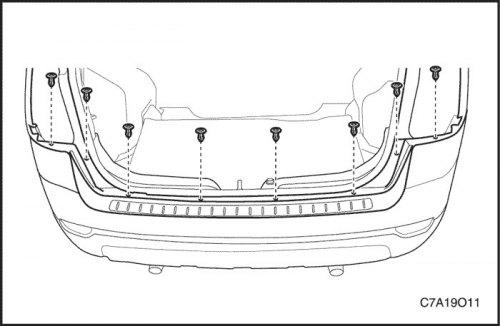
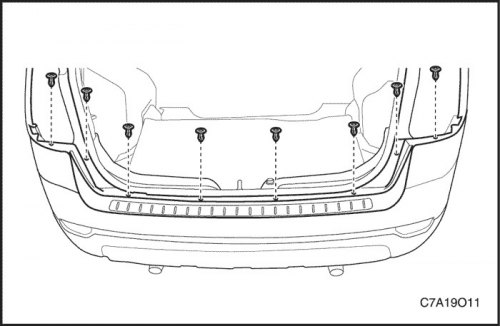
6. Unscrew the upper trim screws and release the holders.
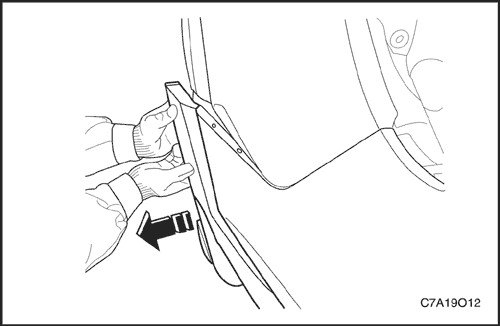
6. Unscrew the upper trim screws and release the holders.


7. Remove the rear bumper trim from the rear fender by pulling the edge of the bumper outward.

8. Remove the rear bumper trim from the vehicle.
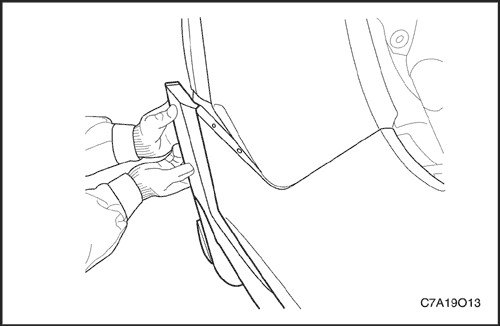
8. Remove the rear bumper trim from the vehicle.


Installation procedure


1. Install the trim on the car.


2. Install the rear bumper trim edge onto the rear fender.

Note: Direct contact of dissimilar metals may result in rapid corrosion. Use proper fasteners to avoid premature corrosion.

Note: Direct contact of dissimilar metals may result in rapid corrosion. Use proper fasteners to…


3. Install the upper trim holders and tighten the screws.

Tighten

Tighten the upper trim screws to 2 Nm (18 lbs.in).

4. Install rear combination lights. Go to Section 9B, Lighting Systems.
4. Install rear combination lights. Go to Section 9B, Lighting Systems.


5. Install the lower trim brackets.
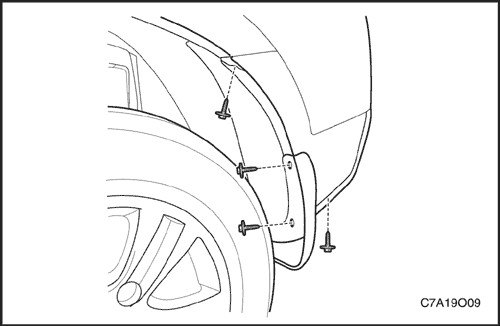
5. Install the lower trim brackets.


6. Tighten the trim bolts on the rear wheel arch trim.


Tighten

Tighten the rear wheel arch lining bolts to 4 Nm (36 lbs.in).
Tighten the rear wheel arch lining bolts to 4 Nm (36 lbs.in).


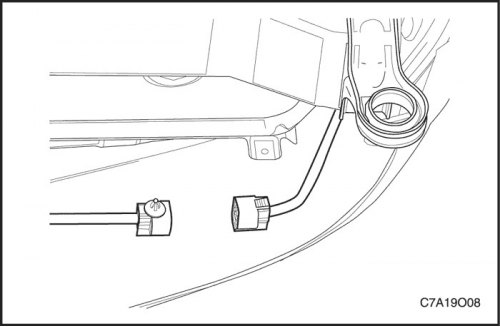
7. Connect the obstacle sensor connector to the rear if available.

8. Connect the cable to the negative terminal of the battery.

The article was checked: Vladimir Romannikov
This article is available at russian, bulgarian, belarusian, ukrainian, serbian, croatian, romanian, polish, slovak, hungarian

Share information:

Previous articles
Captiva 1: Exterior (external elements)
Next articles

Front bumper impact bar
Front Bumper Energy Absorber
Front bumper trim
Parking Assistance System Diagnostics
Schematic diagram of the parking assistance system
Rear bumper impact bar
Rear Cross Traffic Alert Unit
Rear Cross Traffic Alert Controller
Rear Cross Traffic Alert Sensor
General description of the front part of the body


See similar articles on the topic of Chevrolet cars:
Removal and installation the rear bumper Chevrolet Aveo T300 (2012-2018)
Removal and installation the rear bumper Chevrolet Cruze 1 (2008-2016)
Removal the rear bumper Chevrolet Lacetti 1 (2002-2009)
Removal the rear bumper Chevrolet Lanos T150 (2002-2009)
Removal the rear bumper beam for the 55 configuration Chevrolet Niva 1 (2002-2016)
Rear bumper trim panel Chevrolet Tahoe 2 and 3 (2000-2014)
Rear bumper Chevrolet Orlando 1 (2010-2018)
Link in different formats to this page


Visitor comments

No comments yet


How much will 19 + 10 =


Captiva 1 (2006-2018) 
  • Manual
  • Before leaving
  • Keys, doors and windows
  • Seats, protection systems
  • Instruments and controls
  • Lighting system
  • Information and entertainment
  • Navigation system
  • Climate control
  • Driving a car
  • Car care
  • Maintenance
  • Engine 2.0 l (diesel)
  • Engine device
  • Troubleshooting
  • Engine repair
  • Cooling system
  • Engine electrical equipment
  • Control and power systems
  • Exhaust system
  • Engine FAM II 2.4D
  • Engine device
  • Troubleshooting
  • Engine repair
  • Cooling system
  • Engine electrical equipment
  • Control and power systems
  • Exhaust system
  • Engine HFV6 3.2L
  • Engine device
  • Troubleshooting
  • Engine repair
  • Cooling system
  • Engine electrical equipment
  • Control and power systems
  • Exhaust system
  • Transmission
  • Front drive axle
  • Rear drive axle
  • Automatic gearbox - device
  • Automatic gearbox - service
  • Automatic gearbox - repair
  • Manual gearbox - device
  • Manual gearbox - service and repair
  • Clutch
  • Transfer case
  • Chassis
  • Car suspension
  • Brake system
  • Steering
  • Body
  • Heating and ventilation
  • Air conditioning (manual)
  • Air conditioning (automatic)
  • Seat belts
  • Airbags
  • Car seat
  • Interior (internal elements)
  • Exterior (external elements)
  • Doors and windows
  • Electrical equipment
  • Equipment and devices
  • Lighting and lamps
  • Windshield wipers and washers
  • Electrical circuits


ChevyMan.ru © 2017-2026 · Mobile version · Feedback · Site search · Interesting to read · Sitemap: EN BG BY UA RS HR RO PL SK HU

Aveo 2003-2008 · Aveo 2006-2011 · Aveo 2012-2018 · Captiva 2006-2018 · Cruze 2008-2016 · Lacetti 2002-2009 · Lanos 2002-2009 · Niva 2002-2016 · Tahoe 1992-2000 · Tahoe 2000-2014 · Lumina 1 1989-1994 · Trailblazer 1 2001-2008 · Orlando 1 2010-2018 ·
🛡️ For your security and to improve our service, this site uses cookies. You can disable them in your browser.