ChevyMan.ru
Mazda Mitsubishi Toyota Land Rover Honda Kia Nissan
English Русский
Български
Беларускі
Український
Српски
Hrvatski
Română
Polski
Slovenský
Magyar
|
Articles | Sitemap | Contacts |


Home   Aveo   Captiva   Cruze   Lacetti   Lanos   Niva   Tahoe   Others  
Orlando 1 (2010-2018) Trailblazer 1 (2001-2008, petrol) Lumina 1 (1989-1994)
  • Home
  • Chevrolet
  • Orlando 1
  • Body
  • Doors, locks and windows
  • Adjusting door locks

Adjusting door locks (Chevrolet Orlando 1)

            0

Adjusting the door locks is necessary if the doors open and close too tightly or, conversely, if they do not close tightly enough and the rear edge of the door protrudes beyond the outer elements of the body. It should be taken into account that such malfunctions may be associated not only with incorrect adjustment of the door lock, but also with other reasons: play in the door hinges due to wear, deformation of the hinges, deformation of the door itself and even the entire body. To clarify the reasons, it is necessary to remove the lock retainer.

Note: The work is performed similarly on the front and rear doors.


We carry out the work in the following order:

1. We prepare the car for maintenance and repair.

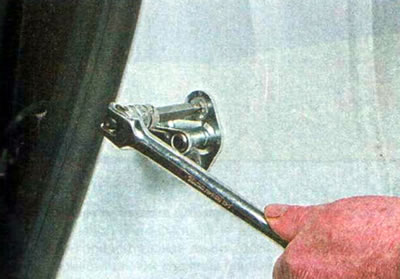
2. Mark the position of the door lock retainer to enable the possibility of returning to the original settings.

2. Mark the position of the door lock retainer to enable the possibility of returning to the…


3. Using a TORX T40 key, unscrew the two mounting screws and remove the retainer.

3. Using a TORX T40 key, unscrew the two mounting screws and remove the retainer.


4. Close the door tightly and check the gaps around its perimeter. If the door has sagged, try to lift its rear part. If the door can be moved upward, the hinges are worn out. The door's skew in the opening is caused either by deformation of the door frame itself or by deformation of the body's power elements. In any case, body repair is required (it may be necessary to contact a specialized service station to fix the problem).


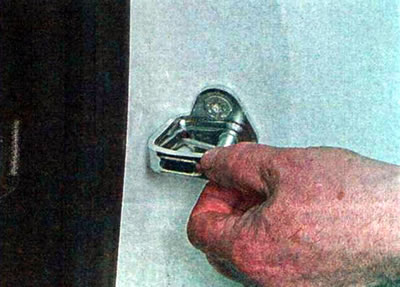
5. If the closed door is positioned evenly in the opening, the gaps along its perimeter are uniform, we install the lock retainer in place and tighten the screws that secure it, without tightening them completely.

6. Applying force, move the lock right-left and up-down, achieving easy and tight closing of the door.

6. Applying force, move the lock right-left and up-down, achieving easy and tight closing of the…


7. After completing the adjustment, tighten the lock retainer mounting screws to the prescribed torque specified in the reference data.

8. Adjust the trunk door lock in the same way.

The article was checked: Vladimir Romannikov
This article is available at russian, bulgarian, belarusian, ukrainian, serbian, croatian, romanian, polish, slovak, hungarian

Share information:

Previous articles
Orlando 1: Doors, locks and windows
Next articles

Rear door and tailgate trim
Front door trim
Door lock
Luggage compartment lock
Lubrication of body locks and hinges
Car windows
Car window lifters
Window lifters — troubleshooting
Replacing the front door window lift mechanism


See similar articles on the topic of Chevrolet cars:
Side door locks Chevrolet Aveo T300 (2012-2018)
Door locks Chevrolet Captiva 1 (2006-2018)
Door locks and window lifters Chevrolet Cruze 1 (2008-2016)
Adjusting the parking brake Chevrolet Lacetti 1 (2002-2009)
Adjusting the parking brake Chevrolet Lanos T150 (2002-2009)
Adjusting the front door lock Chevrolet Niva 1 (2002-2016)
Adjusting the door position Chevrolet Tahoe 2 and 3 (2000-2014)
Link in different formats to this page


Visitor comments

No comments yet


How much will 39 + 26 =


Orlando 1 (2010-2018) 
  • General information
  • Introduction to manual
  • User manual
  • Maintenance
  • Troubleshooting
  • Power unit
  • Engine repair
  • Fuel and control system
  • Cooling and lubrication system
  • Ignition system
  • Transmission
  • Clutch
  • Gearbox
  • Drive shafts
  • Chassis
  • Car suspension
  • Steering
  • Brake system
  • Body
  • Exterior (external elements)
  • Doors, locks and windows
  • Electrical equipment
  • Equipment and devices
  • Windscreen wipers
  • Power devices
  • Electrical diagrams


Trailblazer 1 (2001-2008) 
  • General information
  • User manual
  • Troubleshooting
  • Maintenance
  • Power unit
  • Engine in a car
  • Engine overhaul
  • Cooling and heating
  • Fuel and exhaust system
  • Engine electrical equipment
  • Engine control
  • Transmission
  • Automatic gearbox
  • Transfer case
  • Drive shafts and cardan
  • Chassis
  • Brake system
  • Car suspension
  • Steering
  • Body
  • Exterior (external elements)
  • Interior (internal elements)
  • Doors, locks and windows
  • Electrical equipment
  • Equipment and devices
  • Electrical circuits


Lumina 1 (1989-1994) 
  • General information
  • Maintenance
  • Power unit
  • Engine 3.1L V6
  • Engine 3.8L V6
  • Engine overhaul
  • Cooling system
  • Power and exhaust system
  • Fuel injection
  • Engine electrical equipment
  • Reduced exhaust gas toxicity
  • Transmission
  • Automatic gearbox
  • Drive shafts
  • Chassis
  • Brake system
  • Car suspension
  • Steering
  • Body
  • Heating and air conditioning
  • Repair of body elements
  • Doors, covers and windows
  • Interior (internal elements)
  • Electrical equipment
  • Equipment and devices
  • Electrical circuits


ChevyMan.ru © 2017-2026 · Mobile version · Feedback · Site search · Interesting to read · Sitemap: EN BG BY UA RS HR RO PL SK HU

Aveo 2003-2008 · Aveo 2006-2011 · Aveo 2012-2018 · Captiva 2006-2018 · Cruze 2008-2016 · Lacetti 2002-2009 · Lanos 2002-2009 · Niva 2002-2016 · Tahoe 1992-2000 · Tahoe 2000-2014 · Lumina 1 1989-1994 · Trailblazer 1 2001-2008 · Orlando 1 2010-2018 ·
🛡️ For your security and to improve our service, this site uses cookies. You can disable them in your browser.