ChevyMan.ru
Mazda Mitsubishi Toyota Land Rover Honda Kia Nissan
English Русский
Български
Беларускі
Український
Српски
Hrvatski
Română
Polski
Slovenský
Magyar
|
Articles | Sitemap | Contacts |


Home   Aveo   Captiva   Cruze   Lacetti   Lanos   Niva   Tahoe   Others  
Orlando 1 (2010-2018) Trailblazer 1 (2001-2008, petrol) Lumina 1 (1989-1994)
  • Home
  • Chevrolet
  • Orlando 1
  • General information
  • User manual
  • Anti-skid chains

Anti-skid chains (Chevrolet Orlando 1)

            0

Anti-skid chains are used to increase the vehicle's cross-country ability in snow and mud. Chains stored in advance in the trunk will help you get out of a section of the road that has not been cleared of snow, overcome a dirt road that has suddenly become muddy after rain, and get onto a road with a hard surface. By increasing the traction of the wheels with the road surface, chains will protect the vehicle's transmission parts from damage and, as a result, from subsequent repairs.

Anti-skid chains are installed on the drive wheels.

Anti-skid chains are installed on the drive wheels.


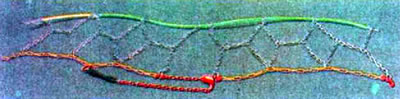
The design of a typical anti-skid chain consists of several interconnected transverse lugs. Lugs can be made from sections of chain with a couple dozen links, or they can be manufactured as a single part, usually from high-strength plastic.

To connect the lugs, pieces of chain or metal cables are used. The chains are attached to the wheels using locks, which come in different types. The design of the lock must allow for adjustment so that the chain fits tightly on the wheel and does not slip when the vehicle is moving. Chains are selected depending on the size of the wheels; as a rule, one chain can be installed on several types of wheels with similar dimensions.


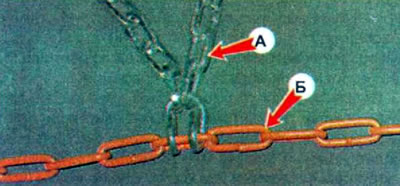
Note: It is recommended to install chains on wheels with link sizes such that link B of the side chain has a wire diameter of 3 mm, a length of 30 mm and a width of 10 mm, and lug link A (cross chain) has a wire diameter of 4 mm, a length of 25 mm and a width of 14 mm.


Note: It is recommended to install chains on wheels with link sizes such that link B of the side…


Most chain designs involve mounting the chain onto the wheel by running it over it. To avoid having to jack up a stuck vehicle, put on chains before attempting to cross a difficult section.

Since chains differ in design, to avoid unexpected difficulties, practice putting on the chain in good weather and in a convenient place in advance.

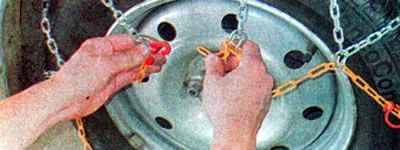
The installation of a typical snow chain is shown below. We put on the chain according to the instructions. Before starting work, remove any decorative caps from the wheel to avoid damaging them.

1. Place the car on a level surface. We open the lock and place part of the chain behind the inner surface of the wheel (or depending on the design, we run over sections of chains 30-40 cm long) so that the locks are on the outside.

1. Place the car on a level surface. We open the lock and place part of the chain behind the inner…


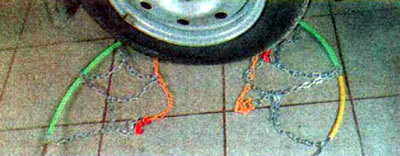
2. Place the chain on the wheel, distributing it evenly, making sure that the chain does not twist or get tangled, and fasten the locks.


2. Place the chain on the wheel, distributing it evenly, making sure that the chain does not twist…


3. Install the chain on the second wheel in the same way.

Note: If your vehicle has a stability control system, turn it off before driving.


4. After driving 50-100 m at a speed of no more than 50 km/h, check the fastening of the chains, tighten their locks if necessary and continue driving.

Note: Do not use snow chains on roads with hard, non-slip surfaces. This will lead to rapid wear of both the chains and the tires.


(The material was created based on information from the website: «chevyman.ru»)

The article was checked: Vladimir Romannikov
This article is available at russian, bulgarian, belarusian, ukrainian, serbian, croatian, romanian, polish, slovak, hungarian

Share information:

Previous articles
Orlando 1: User manual
Next articles

Car storage
Car maintenance
Car theft
Traction device
Glass tinting
Instrument panel
Operation of the car in winter


See similar articles on the topic of Chevrolet cars:
Replacement of anti-roll bar components Chevrolet Aveo T300 (2012-2018)
Anti-theft alarm Chevrolet Captiva 1 (2006-2018)
Features of the anti-lock braking system (ABS) Chevrolet Cruze 1 (2008-2016)
Removal the anti-roll bar Chevrolet Lacetti 1 (2002-2009)
Replacement of anti-roll bar elements Chevrolet Lanos T150 (2002-2009)
Electronic anti-theft system Chevrolet Niva 1 (2002-2016)
Anti-lock braking system (ABS) — general information Chevrolet Tahoe 1 (1992-2000)
Link in different formats to this page


Visitor comments

No comments yet


How much will 24 + 30 =


Orlando 1 (2010-2018) 
  • General information
  • Introduction to manual
  • User manual
  • Maintenance
  • Troubleshooting
  • Power unit
  • Engine repair
  • Fuel and control system
  • Cooling and lubrication system
  • Ignition system
  • Transmission
  • Clutch
  • Gearbox
  • Drive shafts
  • Chassis
  • Car suspension
  • Steering
  • Brake system
  • Body
  • Exterior (external elements)
  • Doors, locks and windows
  • Electrical equipment
  • Equipment and devices
  • Windscreen wipers
  • Power devices
  • Electrical diagrams


Trailblazer 1 (2001-2008) 
  • General information
  • User manual
  • Troubleshooting
  • Maintenance
  • Power unit
  • Engine in a car
  • Engine overhaul
  • Cooling and heating
  • Fuel and exhaust system
  • Engine electrical equipment
  • Engine control
  • Transmission
  • Automatic gearbox
  • Transfer case
  • Drive shafts and cardan
  • Chassis
  • Brake system
  • Car suspension
  • Steering
  • Body
  • Exterior (external elements)
  • Interior (internal elements)
  • Doors, locks and windows
  • Electrical equipment
  • Equipment and devices
  • Electrical circuits


Lumina 1 (1989-1994) 
  • General information
  • Maintenance
  • Power unit
  • Engine 3.1L V6
  • Engine 3.8L V6
  • Engine overhaul
  • Cooling system
  • Power and exhaust system
  • Fuel injection
  • Engine electrical equipment
  • Reduced exhaust gas toxicity
  • Transmission
  • Automatic gearbox
  • Drive shafts
  • Chassis
  • Brake system
  • Car suspension
  • Steering
  • Body
  • Heating and air conditioning
  • Repair of body elements
  • Doors, covers and windows
  • Interior (internal elements)
  • Electrical equipment
  • Equipment and devices
  • Electrical circuits


ChevyMan.ru © 2017-2026 · Mobile version · Feedback · Site search · Interesting to read · Sitemap: EN BG BY UA RS HR RO PL SK HU

Aveo 2003-2008 · Aveo 2006-2011 · Aveo 2012-2018 · Captiva 2006-2018 · Cruze 2008-2016 · Lacetti 2002-2009 · Lanos 2002-2009 · Niva 2002-2016 · Tahoe 1992-2000 · Tahoe 2000-2014 · Lumina 1 1989-1994 · Trailblazer 1 2001-2008 · Orlando 1 2010-2018 ·
🛡️ For your security and to improve our service, this site uses cookies. You can disable them in your browser.