
ChevyMan.ru
Mazda Mitsubishi Toyota Land Rover Honda Kia Nissan
English Русский
Български
Беларускі
Український
Српски
Hrvatski
Română
Polski
Slovenský
Magyar
|
Articles | Sitemap | Contacts |


Home   Aveo   Captiva   Cruze   Lacetti   Lanos   Niva   Tahoe   Others  
Orlando 1 (2010-2018) Trailblazer 1 (2001-2008, petrol) Lumina 1 (1989-1994)
  • Home
  • Chevrolet
  • Trailblazer 1
  • Power unit
  • Engine in a car
  • Intake manifold — removal and installation

Intake manifold — removal and installation (Chevrolet Trailblazer 1)

            0

Contents: Removal ↧ Installation ↧

Removal


1. Disconnect the negative battery cable.

2. Remove the throttle body (see chapter 4).

3. Remove the PCM electronic unit (see chapter 6).

4. Disconnect the wiring harnesses from their brackets and from the MAP sensor connector.

5. If necessary, disconnect the front differential vent hose from the clamp.

6. Disconnect the crankcase ventilation hose from the manifold fitting (see illustration).
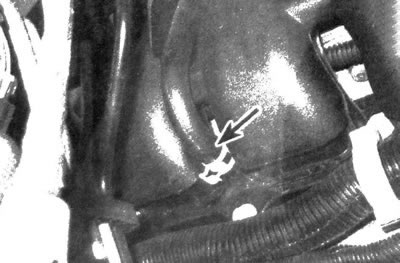
3.6. Disconnect the crankcase ventilation hose from the manifold

3.6. Disconnect the crankcase ventilation hose from the manifold


7. Remove the engine wiring harness bracket.

8. Remove the generator (see chapter 5).

9. Disconnect the vacuum hose from the brake booster.

10. Unscrew the bolts and remove the intake manifold (see illustration).
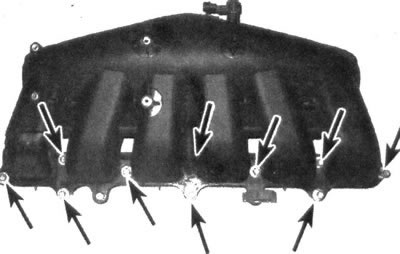
3.10. Intake Manifold Bolt Locations

3.10. Intake Manifold Bolt Locations


11. Remove the gasket and inspect the manifold for signs of damage, cracking or warping.

Installation


12. Install a new gasket (do not apply sealant to the joint).

13. Installation is carried out in the reverse order of removal. Tighten the manifold bolts to the specified torque, tightening in several steps with small torque increments.

Original version of the article on the website: ChevyMan.ru

The article was checked: Vladimir Romannikov
This article is available at russian, bulgarian, belarusian, ukrainian, serbian, croatian, romanian, polish, slovak, hungarian

Share information:

Previous articles
Trailblazer 1: Engine in a car
Next articles

Carrying out repairs without removing the engine from the engine compartment
General information about engines
Inline Six Engine — Specifications
Valve Cover — Removal and Installation
Exhaust manifold — removal and installation
Front casing — removal and installation
Drive chain, sprockets and tensioner — replacement
Camshafts, rocker arms and clearance compensators — removal and installation


See similar articles on the topic of Chevrolet cars:
Replacing the intake manifold gasket Chevrolet Aveo T300 (2012-2018)
Intake manifold — removal and installation Chevrolet Captiva 1 (2006-2018)
Replacing the intake manifold gasket Chevrolet Cruze 1 (2008-2016)
Removal the absolute air pressure sensor in the intake manifold Chevrolet Lacetti 1 (2002-2009)
Checking the intake manifold air temperature sensor Chevrolet Lanos T150 (2002-2009)
Intake manifold — removal and installation Chevrolet Tahoe 1 (1992-2000)
Link in different formats to this page


Visitor comments

No comments yet


How much will 37 + 36 =


Orlando 1 (2010-2018) 
  • General information
  • Introduction to manual
  • User manual
  • Maintenance
  • Troubleshooting
  • Power unit
  • Engine repair
  • Fuel and control system
  • Cooling and lubrication system
  • Ignition system
  • Transmission
  • Clutch
  • Gearbox
  • Drive shafts
  • Chassis
  • Car suspension
  • Steering
  • Brake system
  • Body
  • Exterior (external elements)
  • Doors, locks and windows
  • Electrical equipment
  • Equipment and devices
  • Windscreen wipers
  • Power devices
  • Electrical diagrams


Trailblazer 1 (2001-2008) 
  • General information
  • User manual
  • Troubleshooting
  • Maintenance
  • Power unit
  • Engine in a car
  • Engine overhaul
  • Cooling and heating
  • Fuel and exhaust system
  • Engine electrical equipment
  • Engine control
  • Transmission
  • Automatic gearbox
  • Transfer case
  • Drive shafts and cardan
  • Chassis
  • Brake system
  • Car suspension
  • Steering
  • Body
  • Exterior (external elements)
  • Interior (internal elements)
  • Doors, locks and windows
  • Electrical equipment
  • Equipment and devices
  • Electrical circuits


Lumina 1 (1989-1994) 
  • General information
  • Maintenance
  • Power unit
  • Engine 3.1L V6
  • Engine 3.8L V6
  • Engine overhaul
  • Cooling system
  • Power and exhaust system
  • Fuel injection
  • Engine electrical equipment
  • Reduced exhaust gas toxicity
  • Transmission
  • Automatic gearbox
  • Drive shafts
  • Chassis
  • Brake system
  • Car suspension
  • Steering
  • Body
  • Heating and air conditioning
  • Repair of body elements
  • Doors, covers and windows
  • Interior (internal elements)
  • Electrical equipment
  • Equipment and devices
  • Electrical circuits


ChevyMan.ru © 2017-2026 · Mobile version · Feedback · Site search · Interesting to read · Sitemap: EN BG BY UA RS HR RO PL SK HU

Aveo 2003-2008 · Aveo 2006-2011 · Aveo 2012-2018 · Captiva 2006-2018 · Cruze 2008-2016 · Lacetti 2002-2009 · Lanos 2002-2009 · Niva 2002-2016 · Tahoe 1992-2000 · Tahoe 2000-2014 · Lumina 1 1989-1994 · Trailblazer 1 2001-2008 · Orlando 1 2010-2018 ·
🛡️ For your security and to improve our service, this site uses cookies. You can disable them in your browser.