
Note: This procedure requires the GM4J-44221 camshaft locking tool or equivalent
Removal
Note: Do not turn the crankshaft after removing the camshaft sprocket, as this may cause the valve timing to fail and the engine to fail.
1. Remove the valve cover (see subsection 4). Also, remove the spark plugs (this will make it easier to turn the crankshaft; see chapter 1).
2. Turn the crankshaft so that the sprocket mark aligns with the dark link of the drive chain (see illustration), and also the location of the grooves on the camshaft tails at the top (see illustration 7.12).
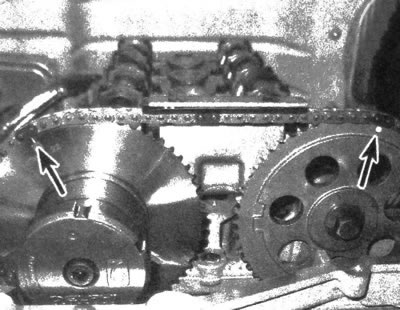
8.2. Before removing the sprockets, it is necessary to align the valve timing marks
3. Perform the operations as described in p. 4 and 5 of subsection 7, unscrew the mounting bolts and carefully remove the sprockets from the camshafts.
Caution: Do not remove the chain from the camshaft sprockets - hang the sprockets and chain so that the bottom of the chain does not jump off the crankshaft sprocket.
4. Make sure the camshaft caps are marked, if necessary, apply marks with paint so that the caps can be installed in their original locations during subsequent assembly.
5. Unscrew and remove the camshaft cover bolts in several stages. Remove the camshafts. Store shafts separately to avoid confusion. If necessary, remove the rocker arms and hydraulic clearance compensators. If the removed parts are intended for subsequent use, also store them separately, as they too must be installed in their original locations during subsequent assembly.
Inspection
6. After removing the camshafts, clean them with solvent, dry them and inspect them for the following damage.
- a) Production of metal on the necks.
- b) Thermal damage, metal wear, chipping, pitting or uneven cam wear.
- c) Damage to the grooves for the sprocket mounting pin.
- d) Damage to the thread.
7. Assess the degree of wear and out-of-roundness of the camshaft journals by measuring with a micrometer.
Installation
8. If necessary, after immersing in clean engine oil, install the rocker arms and clearance compensators in their original locations.
9. Completely coat the camshaft with clean engine oil. Place the camshaft in its correct original location in the cylinder head.
10. Install the camshaft locking device.
11. Install all camshaft caps in their original locations and finger tighten.
12. Starting from the center elements and moving towards the edges, tighten the camshaft caps to the specified torque.
13. Remove the locking device.
14. Place the sprockets on the camshafts and tighten the bolts to the specified torque.
15. Using a socket on the extension arm, rotate the crankshaft 720° (two full turns) and check the alignment of the sprockets with the chain. The dark links must be aligned with the sprocket marks (see illustration 8.2). If you feel resistance when turning the crankshaft, stop turning it immediately and determine the cause of the problem.
16. Install the spark plugs (chapter 1) and valve cover (subsection 4).