ChevyMan.ru
Mazda Mitsubishi Toyota Land Rover Honda Kia Nissan
English Русский
Български
Беларускі
Український
Српски
Hrvatski
Română
Polski
Slovenský
Magyar
|
Articles | Sitemap | Contacts |


Home   Aveo   Captiva   Cruze   Lacetti   Lanos   Niva   Tahoe   Others  
Orlando 1 (2010-2018) Trailblazer 1 (2001-2008, petrol) Lumina 1 (1989-1994)
  • Home
  • Chevrolet
  • Trailblazer 1
  • Power unit
  • Engine in a car
  • Front Crankshaft Oil Seal — Replacement

Front Crankshaft Oil Seal — Replacement (Chevrolet Trailblazer 1)

            0

Contents: Removal ↧ Installation ↧
Caution: Do not damage the crankshaft threads. If using alternative tools as described below does not allow the pulley to be removed easily, STOP performing the procedure. Purchase a special device or contact a specialist who has one at his disposal. Avoid damaging the end surface of the crankshaft or the front engine cover.


Note 1: When performing the procedure, it is necessary to use the following special tools: puller (GM# J-44226 or equivalent), crankshaft end face protector (GM# J-41816-2 or equivalent), pulley installation tool (J-44218 or equivalent). Instead of the listed devices, you can use a puller with three jaws, a deep socket head, which should be installed in the crankshaft tailpiece and protrude with its lower part from the hole (for supporting the puller screw) and a pressing device that screws into the crankshaft end and presses the pulley.


Note 2: The pulley does not have a C, - J keyway on the crankshaft and can be correctly installed in any position. The pulley washer must be replaced at each installation.


Removal


1. Remove the radiator (see chapter 3).

2. Remove the drive belt (see chapter 1).

3. Remove the torque converter service plate. located in the engine sump (see illustration); when the tightening force of the pulley bolt is weakened, it is necessary for an assistant to fix the flywheel motionless by wedging the ring gear tooth with a large screwdriver.

11.3. To lock the crankshaft when unscrewing the pulley mounting bolt, remove the indicated plug…

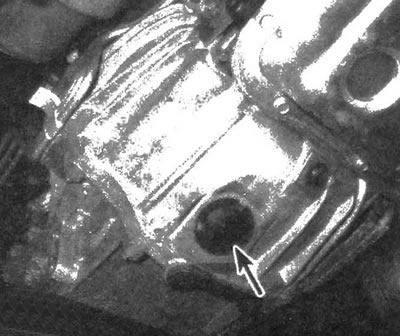
11.3. To lock the crankshaft when unscrewing the pulley mounting bolt, remove the indicated plug and wedge the toothed ring of the drive disk with a screwdriver


4. Remove the crankshaft pulley bolt and install the shaft end face protector.

5. Connect the puller and remove the pulley and its washer.

Caution: When removing a pulley using a three-jaw puller, grip the pulley bushing, being careful not to grip the outer circumference. It is also necessary to introduce, for example, a socket head, which will have a blind fit in the hole of the crankshaft tailpiece, and at the same time protrude as a base in the hole - this is necessary for the stop of the puller screw. Do not attempt to remove the pulley with the puller screw resting against the tailstock, as this will most likely damage the threads of the crankshaft tailstock.


6. Using the appropriate tool, pry up and remove the crankshaft oil seal (the housing has grooves through which access to the outer edge of the seal is provided).

Installation


7. Inspect the pulley for chips and grooves on the contact surface with the seal. Also inspect the drive belt contact surface, which is located on the outer circumference of the pulley.

8. Lubricate the outer surface of the seal.

Note: unless specifically stated in the manufacturer's instructions, do not lubricate the inner surface of the seal that contacts the crankshaft - the seal is installed dry. Failure to comply with this requirement may result in the seal leaking after assembly.


9. Using the installation tool, insert the oil seal into the front housing until it stops.

10. Install and press the new pulley washer onto the crankshaft.

11. Raise the vehicle and place vertical supports underneath it.


12. Place the pulley on the crankshaft and drive it into its original position using the installation tool.

Caution: Do not drive the pulley in by hitting it with a hammer.


13. Remove the installation tool and install the pulley bolt together with the washer. Tighten the bolt to the required torque, using the help of an assistant who will at this time wedge the toothed ring of the drive disk with a large screwdriver.

14. The rest of the assembly is carried out in the reverse order of removal.

(The text of the article was obtained from the website: «CHEVYMAN.ru»)

The article was checked: Vladimir Romannikov
This article is available at russian, bulgarian, belarusian, ukrainian, serbian, croatian, romanian, polish, slovak, hungarian

Share information:

Previous articles
Trailblazer 1: Engine in a car
Next articles

Valves — Maintenance
Cylinder head — removal and installation
Camshafts, rocker arms and clearance compensators — removal and installation
Drive chain, sprockets and tensioner — replacement
Front casing — removal and installation
Oil pump and bypass valve — replacement
Drive Disc — Removal and Installation
Rear Crankshaft Oil Seal — Replacement
Oil level tube — removal and installation
Engine sump — removal and installation


See similar articles on the topic of Chevrolet cars:
Adjusting the position of the front seats Chevrolet Aveo T300 (2012-2018)
Front door glass seal Chevrolet Captiva 1 (2006-2018)
Adjusting the position of the front seats Chevrolet Cruze 1 (2008-2016)
Replacing the front crankshaft oil seal Chevrolet Lacetti 1 (2002-2009)
Replacing the front crankshaft oil seal Chevrolet Lanos T150 (2002-2009)
Crankshaft and flywheel Chevrolet Niva 1 (2002-2016)
Front crankshaft oil seal Chevrolet Tahoe 2 and 3 (2000-2014)
Link in different formats to this page


Visitor comments

No comments yet


How much will 28 + 28 =


Orlando 1 (2010-2018) 
  • General information
  • Introduction to manual
  • User manual
  • Maintenance
  • Troubleshooting
  • Power unit
  • Engine repair
  • Fuel and control system
  • Cooling and lubrication system
  • Ignition system
  • Transmission
  • Clutch
  • Gearbox
  • Drive shafts
  • Chassis
  • Car suspension
  • Steering
  • Brake system
  • Body
  • Exterior (external elements)
  • Doors, locks and windows
  • Electrical equipment
  • Equipment and devices
  • Windscreen wipers
  • Power devices
  • Electrical diagrams


Trailblazer 1 (2001-2008) 
  • General information
  • User manual
  • Troubleshooting
  • Maintenance
  • Power unit
  • Engine in a car
  • Engine overhaul
  • Cooling and heating
  • Fuel and exhaust system
  • Engine electrical equipment
  • Engine control
  • Transmission
  • Automatic gearbox
  • Transfer case
  • Drive shafts and cardan
  • Chassis
  • Brake system
  • Car suspension
  • Steering
  • Body
  • Exterior (external elements)
  • Interior (internal elements)
  • Doors, locks and windows
  • Electrical equipment
  • Equipment and devices
  • Electrical circuits


Lumina 1 (1989-1994) 
  • General information
  • Maintenance
  • Power unit
  • Engine 3.1L V6
  • Engine 3.8L V6
  • Engine overhaul
  • Cooling system
  • Power and exhaust system
  • Fuel injection
  • Engine electrical equipment
  • Reduced exhaust gas toxicity
  • Transmission
  • Automatic gearbox
  • Drive shafts
  • Chassis
  • Brake system
  • Car suspension
  • Steering
  • Body
  • Heating and air conditioning
  • Repair of body elements
  • Doors, covers and windows
  • Interior (internal elements)
  • Electrical equipment
  • Equipment and devices
  • Electrical circuits


ChevyMan.ru © 2017-2026 · Mobile version · Feedback · Site search · Interesting to read · Sitemap: EN BG BY UA RS HR RO PL SK HU

Aveo 2003-2008 · Aveo 2006-2011 · Aveo 2012-2018 · Captiva 2006-2018 · Cruze 2008-2016 · Lacetti 2002-2009 · Lanos 2002-2009 · Niva 2002-2016 · Tahoe 1992-2000 · Tahoe 2000-2014 · Lumina 1 1989-1994 · Trailblazer 1 2001-2008 · Orlando 1 2010-2018 ·
🛡️ For your security and to improve our service, this site uses cookies. You can disable them in your browser.