
Contents: Removal ↧ Installation ↧
Warning: Allow the engine to cool completely before performing this procedure.
Removal
1. Drain the coolant (see chapter 1).
2. Remove the valve cover (see subsection 4).
3. Remove the exhaust manifold (see subsection 5).
4. Remove the drive chain and sprockets (see subsection 7).
5. Remove the seventeen cylinder head bolts in the reverse order of tightening sequence (see illustration 9.13).
6. Remove the cylinder head from the engine.
Caution: The cylinder head is a heavy component. When removing, enlist the help of an assistant. If the head is attached to the block, do not insert fixtures or tools between the mating surfaces. Instead, pry the head up by the ledge of the cast body or tap it using a wooden block and strike it with a hammer.
7. Remove the cylinder head gasket.
8. Clean the mating surfaces of the cylinder head and block. Avoid damaging aluminum alloy parts. Don't lose the two locating pins.
9. Inspect the block and head surfaces using a straight edge and feeler gauges to determine clearances. Compare the results obtained with the values given in the specifications of this chapter.
Installation
Note 1: A mandatory condition for performing the procedure is that the first piston is at TDC.
Note 2: The cylinder head bolts must be replaced.
10. After ensuring that the dowel pins are correctly positioned, place the gasket on the cylinder head.
11. Place the head on the cylinder block.
12. Install and finger tighten the new cylinder head bolts.
13. Tighten the bolts to the required torque, following the sequence given (see illustration).
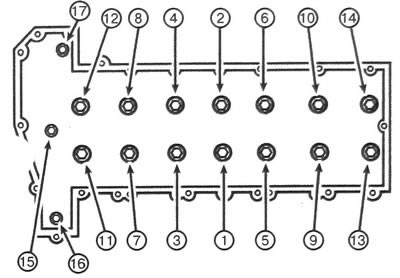
9.13. Cylinder head bolt tightening sequence
14. The rest of the assembly is carried out in the reverse order of removal.
15. Change the engine oil and filter, as well as the coolant (see chapter 1).
(The original material is located on the website «ChevyMan»)