ChevyMan.ru
Mazda Mitsubishi Toyota Land Rover Honda Kia Nissan
English Русский
Български
Беларускі
Український
Српски
Hrvatski
Română
Polski
Slovenský
Magyar
|
Articles | Sitemap | Contacts |


Home   Aveo   Captiva   Cruze   Lacetti   Lanos   Niva   Tahoe   Others  
Cruze 1 (2008-2016)
  • Home
  • Cruze
  • J300 (2008-2016)
  • Power unit
  • Engine repair
  • Replacing the intake manifold gasket

Replacing the intake manifold gasket (Chevrolet Cruze J300)

            0

There are rubber seals between the flanges of the cylinder head and the intake manifold. If the seals are not tight, the engine runs unevenly (runs rough). If the problem cannot be fixed by tightening the intake manifold, replace the seals.

You will need a 12 mm wrench.

1. Drain the engine cooling system (see "Replacing the coolant").

2. Remove the two bolts securing the support bracket (see "Replacing the cylinder head gasket").

3. Remove the throttle assembly (see "Removal and installation the throttle assembly").

4. Disconnect the wiring harness connectors from the injectors, the absolute pressure sensor in the intake manifold and the air temperature sensor in the intake manifold (see "Removal and installation the fuel rail").

5. Remove the fuel rail (see "Removal and installation the fuel rail").

6. Disconnect the hose from the intake manifold geometry change valve fitting (see "Checking and replacing the pneumatic chamber of the intake manifold flap drive").
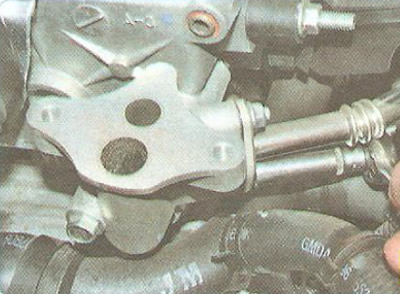
6. Disconnect the hose from the intake manifold geometry change valve fitting (see «Checking and…


7. Unscrew the two nuts of the mounting studs and disconnect the tube from the exhaust gas recirculation valve (for clarity, the valve has been removed).
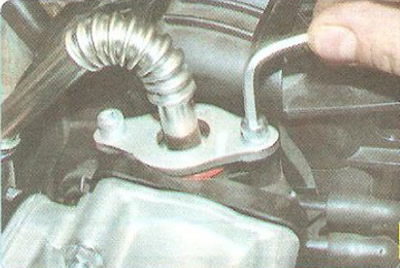


7. Unscrew the two nuts of the mounting studs and disconnect the tube from the exhaust gas…


8. Unscrew the two bolts securing the recirculation valve tube to the intake manifold, move the tube to the side...
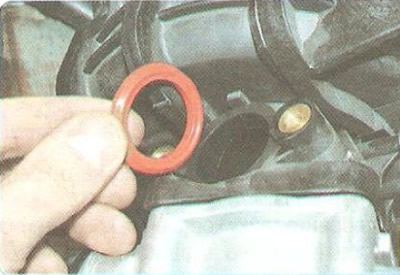
8. Unscrew the two bolts securing the recirculation valve tube to the intake manifold, move the…


9. ...and replace the tube gasket.

9. ...and replace the tube gasket.


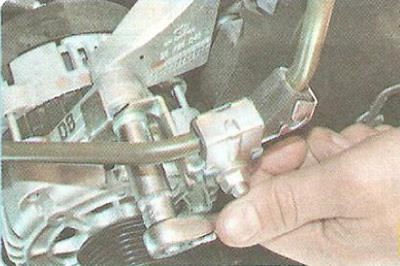
10. Loosen the power steering pipe bracket mounting nut...
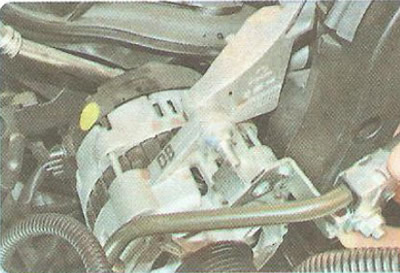
10. Loosen the power steering pipe bracket mounting nut...


11. ...move the bracket to the side..
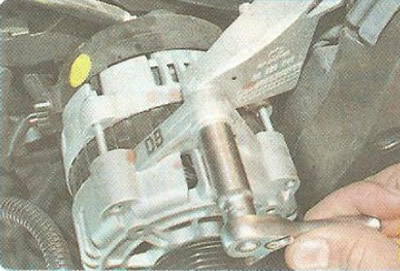


11. ...move the bracket to the side..


12. ...and unscrew the stud of the upper generator mount.

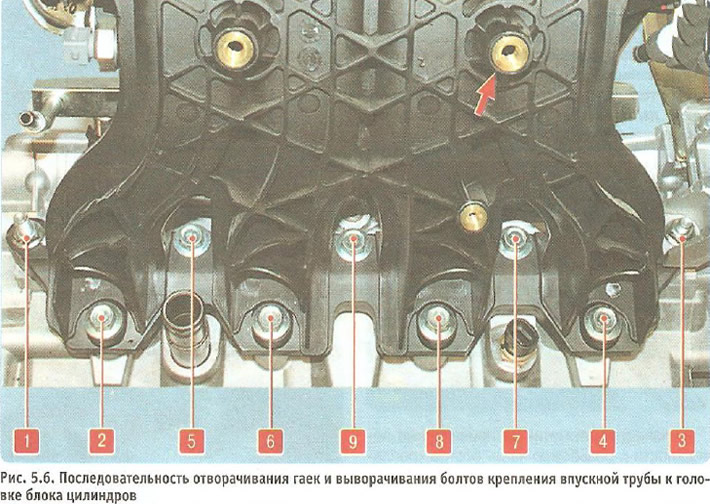
13. Unscrew the generator bracket mounting nut (shown by arrow), two stud nuts and seven bolts securing the intake pipe to the cylinder head in the order shown in Fig. 5.6 (for clarity, this operation is shown on a removed cylinder head). Remove the upper generator mount bracket and intake pipe from the vehicle.
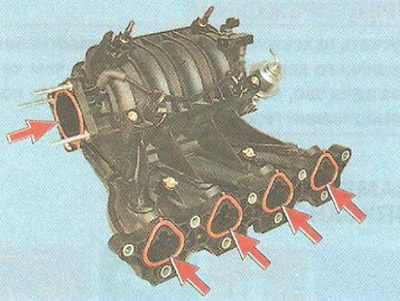
13. Unscrew the generator bracket mounting nut (shown by arrow), two stud nuts and seven bolts…


14. Remove the throttle body and intake manifold flange gaskets and replace them with new ones.

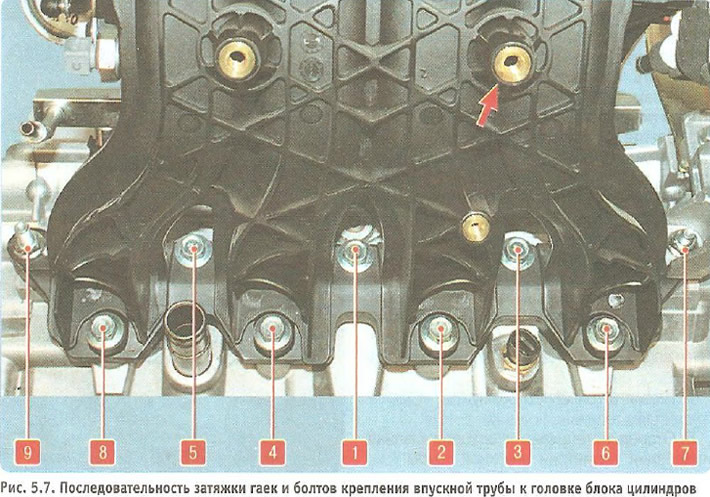
15. Tighten the bolts and nuts securing the intake manifold to the cylinder head in the order shown in Fig. 5.7 to a torque of 25 Nm.

16. Install all removed parts in reverse order.
16. Install all removed parts in reverse order.

16. Install all removed parts in reverse order.


(The source of the article is available on the website ChevyMan)

The article was checked: Vladimir Romannikov
This article is available at russian, bulgarian, belarusian, ukrainian, serbian, croatian, romanian, polish, slovak, hungarian

Share information:

Previous articles
Cruze 1: Engine repair
Next articles

Replacing the oil pan seal
Replacing crankshaft seals
Replacing camshaft seals
Replacing valve stem seals
Replacing the cylinder head gasket
Replacing the exhaust manifold gasket
Removal, inspection and installation of camshafts
Replacing hydraulic compensators
Disassembly, repair and assembly of the cylinder head
Lapping valves


See similar articles on the topic of Chevrolet cars:
Replacing the intake manifold gasket Chevrolet Aveo T300 (2012-2018)
Intake manifold assembly Chevrolet Captiva 1 (2006-2018)
Replacing the cylinder head cover gasket Chevrolet Lacetti 1 (2002-2009)
Checking the intake manifold air temperature sensor Chevrolet Lanos T150 (2002-2009)
Replacing fuses Chevrolet Niva 1 (2002-2016)
Intake manifold — removal and installation Chevrolet Tahoe 1 (1992-2000)
Replacing the absolute pressure sensor in the intake manifold Chevrolet Orlando 1 (2010-2018)
Link in different formats to this page


Visitor comments

No comments yet


How much will 41 + 12 =


Cruze 1 (2008-2016) 
  • General information
  • User manual
  • Troubleshooting
  • Maintenance
  • Power unit
  • Engine repair
  • Lubrication system
  • Cooling system
  • Exhaust system
  • Supply system
  • Control system
  • Transmission
  • Clutch
  • Car gearbox
  • Front wheel drives
  • Chassis
  • Front suspension
  • Rear suspension
  • Steering
  • Brake system
  • Body
  • Exterior (external elements)
  • Interior (internal elements)
  • Doors, covers and windows
  • Heating and air conditioning
  • Security systems
  • Electrical equipment
  • Equipment and devices
  • Power devices
  • Lighting and signaling
  • Electrical circuits


ChevyMan.ru © 2017-2026 · Mobile version · Feedback · Site search · Interesting to read · Sitemap: EN BG BY UA RS HR RO PL SK HU

Aveo 2003-2008 · Aveo 2006-2011 · Aveo 2012-2018 · Captiva 2006-2018 · Cruze 2008-2016 · Lacetti 2002-2009 · Lanos 2002-2009 · Niva 2002-2016 · Tahoe 1992-2000 · Tahoe 2000-2014 · Lumina 1 1989-1994 · Trailblazer 1 2001-2008 · Orlando 1 2010-2018 ·
🛡️ For your security and to improve our service, this site uses cookies. You can disable them in your browser.