
ChevyMan.ru
Mazda Mitsubishi Toyota Land Rover Honda Kia Nissan
English Русский
Български
Беларускі
Український
Српски
Hrvatski
Română
Polski
Slovenský
Magyar
|
Articles | Sitemap | Contacts |


Home   Aveo   Captiva   Cruze   Lacetti   Lanos   Niva   Tahoe   Others  
Cruze 1 (2008-2016)
  • Home
  • Cruze
  • J300 (2008-2016)
  • Power unit
  • Engine repair
  • Replacing the oil pan seal

Replacing the oil pan seal (Chevrolet Cruze J300)

            0

The oil pan is installed on a sealant, there is no gasket in the seal, therefore, in the event of an oil leak, tightening the crankcase mounting bolts will not lead to the desired result. It is necessary to remove the oil pan and reinstall it on the sealant.

Perform work on an inspection pit, overpass or, if possible, on a lift.

You will need: keys "10", key "14" (preferably a cap).

1. Drain the engine oil (see "Changing engine oil and oil filter").

2. Remove the exhaust pipe (see "Replacing the inlet pipe").
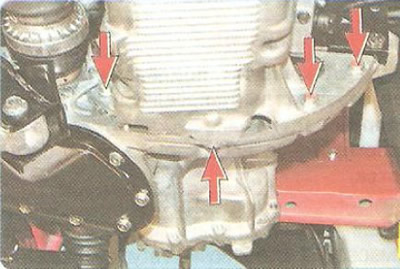
2. Remove the exhaust pipe (see «Replacing the inlet pipe»).


3. Remove the four bolts securing the gearbox housing to the oil pan.
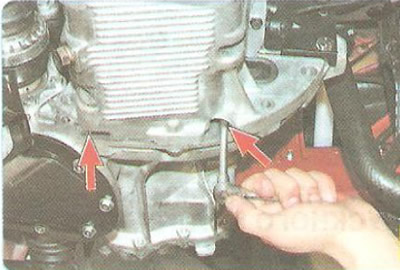
3. Remove the four bolts securing the gearbox housing to the oil pan.


4. Remove the two oil pan mounting bolts located in the wells at its rear...
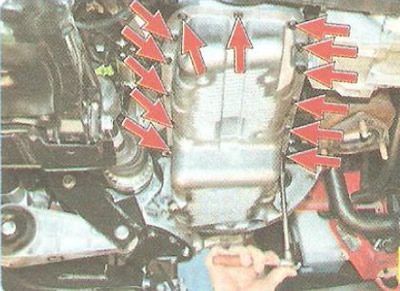
4. Remove the two oil pan mounting bolts located in the wells at its rear...


5. ...and thirteen bolts located on the outside.


5. ...and thirteen bolts located on the outside.


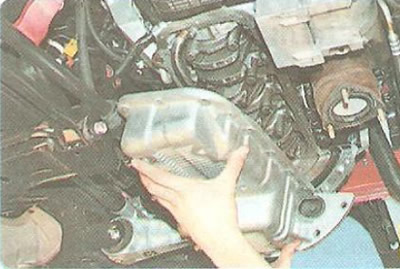
6. Separate the oil pan from the cylinder block using a screwdriver inserted into the gap between the pan and the block bracket and remove the pan.
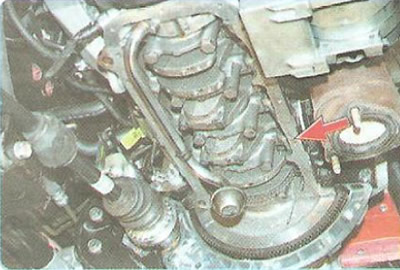
6. Separate the oil pan from the cylinder block using a screwdriver inserted into the gap between…


7. Remove old sealant from the mating surfaces of the cylinder block...
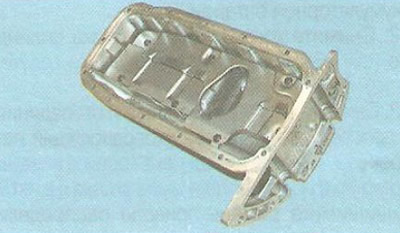
7. Remove old sealant from the mating surfaces of the cylinder block...


8. ...and the oil pan. Carefully wipe the oil off the mating surfaces with a rag.

Helpful advice: Do not degrease the mating surfaces of the block and crankcase before applying the sealant, just thoroughly remove the oil from them. This will ensure easy disassembly of the connection later.
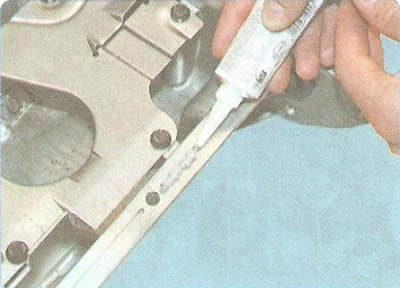


Helpful advice: Do not degrease the mating surfaces of the block and crankcase before applying the…


9. Apply sealant to the mating surfaces and threaded portion of the oil pan mounting bolts.

10. Install the oil pan and tighten the bolts evenly in a crisscross pattern to the torque specified in Appendix 1.

11. Install all removed parts and assemblies in the reverse order of removal.

12. Fill the engine with oil.

Warning: The engine may be started no earlier than one hour after replacing the oil pan seal; this time is required for the sealant to polymerize.

The article was checked: Vladimir Romannikov
This article is available at russian, bulgarian, belarusian, ukrainian, serbian, croatian, romanian, polish, slovak, hungarian

Share information:

Previous articles
Cruze 1: Engine repair
Next articles

Replacing crankshaft seals
Replacing camshaft seals
Replacing valve stem seals
Replacing the cylinder head gasket
Replacing the cylinder head cover gasket
Replacing the intake manifold gasket
Replacing the exhaust manifold gasket
Removal, inspection and installation of camshafts
Replacing hydraulic compensators
Disassembly, repair and assembly of the cylinder head


See similar articles on the topic of Chevrolet cars:
Replacing the oil pan seal Chevrolet Aveo T300 (2012-2018)
Replacing the right input shaft seal Chevrolet Captiva 1 (2006-2018)
Replacing the camshaft seal Chevrolet Lacetti 1 (2002-2009)
Replacing the camshaft seal Chevrolet Lanos T150 (2002-2009)
Replacing the gearbox pinion seal Chevrolet Niva 1 (2002-2016)
Replacing the oil seal Chevrolet Tahoe 1 (1992-2000)
Replacing the front crankshaft oil seal Chevrolet Lumina 1 (1989-1994)
Link in different formats to this page


Visitor comments

No comments yet


How much will 49 + 24 =


Cruze 1 (2008-2016) 
  • General information
  • User manual
  • Troubleshooting
  • Maintenance
  • Power unit
  • Engine repair
  • Lubrication system
  • Cooling system
  • Exhaust system
  • Supply system
  • Control system
  • Transmission
  • Clutch
  • Car gearbox
  • Front wheel drives
  • Chassis
  • Front suspension
  • Rear suspension
  • Steering
  • Brake system
  • Body
  • Exterior (external elements)
  • Interior (internal elements)
  • Doors, covers and windows
  • Heating and air conditioning
  • Security systems
  • Electrical equipment
  • Equipment and devices
  • Power devices
  • Lighting and signaling
  • Electrical circuits


ChevyMan.ru © 2017-2026 · Mobile version · Feedback · Site search · Interesting to read · Sitemap: EN BG BY UA RS HR RO PL SK HU

Aveo 2003-2008 · Aveo 2006-2011 · Aveo 2012-2018 · Captiva 2006-2018 · Cruze 2008-2016 · Lacetti 2002-2009 · Lanos 2002-2009 · Niva 2002-2016 · Tahoe 1992-2000 · Tahoe 2000-2014 · Lumina 1 1989-1994 · Trailblazer 1 2001-2008 · Orlando 1 2010-2018 ·
🛡️ For your security and to improve our service, this site uses cookies. You can disable them in your browser.