ChevyMan.ru
Mazda Mitsubishi Toyota Land Rover Honda Kia Nissan
English Русский
Български
Беларускі
Український
Српски
Hrvatski
Română
Polski
Slovenský
Magyar
|
Articles | Sitemap | Contacts |


Home   Aveo   Captiva   Cruze   Lacetti   Lanos   Niva   Tahoe   Others  
Cruze 1 (2008-2016)
  • Home
  • Cruze
  • J300 (2008-2016)
  • Transmission
  • Car gearbox
  • Gearbox synchronizer repair

Gearbox synchronizer repair (Chevrolet Cruze J300)

            0

If the gear engages unclearly or with great effort or does not engage at all, before disassembling the secondary shaft, check the operation of the synchronizer: the synchronizer clutch should move manually with little effort. If the clutch is difficult to move (does not move or moves with great effort), repair the synchronizer or replace it as an assembly.

Spontaneous gear disengagement indicates wear or damage to the synchronizer clutch teeth and gear rings.

Synchronizers of I and II, as well as III and IV gears are identical in design, so they are repaired using the same techniques.

You will need a screwdriver.
You will need a screwdriver.


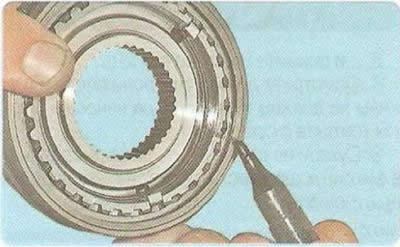
1. Before disassembling, mark the position of the coupling relative to the hub.
1. Before disassembling, mark the position of the coupling relative to the hub.


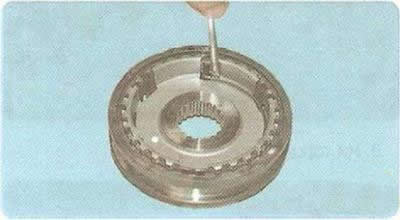
2. Pry it up with a screwdriver.


2. Pry it up with a screwdriver.


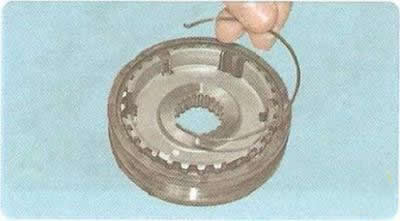
3. ...and remove the two springs.

Note: The second spring is not visible in the photo, as it is located on the back side of the synchronizer.
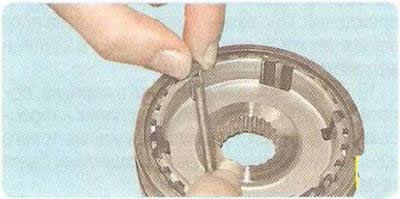

Note: The second spring is not visible in the photo, as it is located on the back side of the…


4. Using a screwdriver, pry...

4. Using a screwdriver, pry...


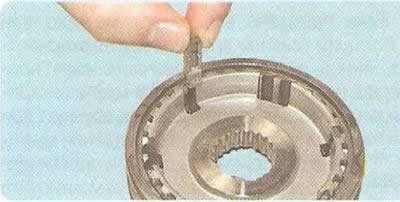
5. ... remove three crackers from the hub grooves.
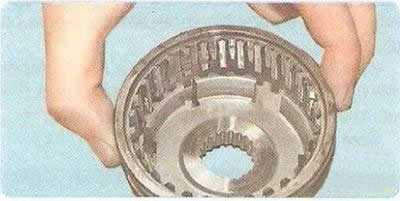
5. ... remove three crackers from the hub grooves.


6. ...and remove the coupling from the hub.


7. Inspect the synchronizer parts. The springs should not have any signs of wear where they contact the crackers.

8. The crackers should not be deformed, and the locking protrusions of the crackers should not be significantly worn.
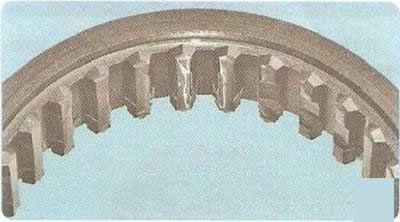
8. The crackers should not be deformed, and the locking protrusions of the crackers should not be…


9. On the ends of the coupling splines.
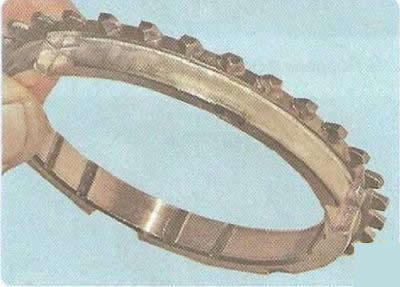
9. On the ends of the coupling splines.


10. ...and the blocking rings should not have any chipping or creasing.
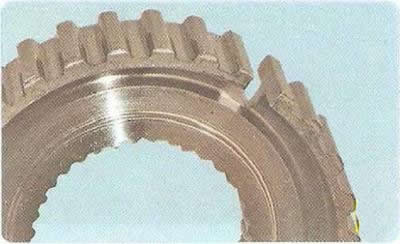
10. ...and the blocking rings should not have any chipping or creasing.


11. The hub should not have any nicks in the splines or signs of wear.
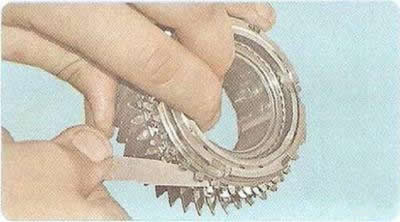


11. The hub should not have any nicks in the splines or signs of wear.


12. When installing the locking ring on the cone of the corresponding gear, the gap between the ends of the ring and gear rims must be at least 1 mm, otherwise replace the locking ring.

13. Assemble the synchronizer in the reverse order of disassembly, installing the coupling on the hub in accordance with the marks applied before disassembly.

(The article is based on data from the website «ChevyMan»)

The article was checked: Vladimir Romannikov
This article is available at russian, bulgarian, belarusian, ukrainian, serbian, croatian, romanian, polish, slovak, hungarian

Share information:

Previous articles
Cruze 1: Car gearbox
Next articles

Primary shaft repair
Secondary shaft repair
Disassembly, assembly of gearbox, defect detection of parts
Removal and installation of a manual gearbox
Replacing gearbox drive seals
Gearbox differential repair
Replacing manual transmission control cables
Removal and installation the gearbox control lever joint


See similar articles on the topic of Chevrolet cars:
Gearbox control Chevrolet Aveo T300 (2012-2018)
Gearbox fluids Chevrolet Captiva 1 (2006-2018)
Mechanical gearbox device Chevrolet Lacetti 1 (2002-2009)
Safety precautions during maintenance and repair Chevrolet Lanos T150 (2002-2009)
Engine running-in after repair Chevrolet Niva 1 (2002-2016)
Checking the oil level in the rear axle gearbox Chevrolet Tahoe 1 (1992-2000)
General information about engine repair Chevrolet Lumina 1 (1989-1994)
Link in different formats to this page


Visitor comments

No comments yet


How much will 31 + 22 =


Cruze 1 (2008-2016) 
  • General information
  • User manual
  • Troubleshooting
  • Maintenance
  • Power unit
  • Engine repair
  • Lubrication system
  • Cooling system
  • Exhaust system
  • Supply system
  • Control system
  • Transmission
  • Clutch
  • Car gearbox
  • Front wheel drives
  • Chassis
  • Front suspension
  • Rear suspension
  • Steering
  • Brake system
  • Body
  • Exterior (external elements)
  • Interior (internal elements)
  • Doors, covers and windows
  • Heating and air conditioning
  • Security systems
  • Electrical equipment
  • Equipment and devices
  • Power devices
  • Lighting and signaling
  • Electrical circuits


ChevyMan.ru © 2017-2026 · Mobile version · Feedback · Site search · Interesting to read · Sitemap: EN BG BY UA RS HR RO PL SK HU

Aveo 2003-2008 · Aveo 2006-2011 · Aveo 2012-2018 · Captiva 2006-2018 · Cruze 2008-2016 · Lacetti 2002-2009 · Lanos 2002-2009 · Niva 2002-2016 · Tahoe 1992-2000 · Tahoe 2000-2014 · Lumina 1 1989-1994 · Trailblazer 1 2001-2008 · Orlando 1 2010-2018 ·
🛡️ For your security and to improve our service, this site uses cookies. You can disable them in your browser.