
ChevyMan.ru
Mazda Mitsubishi Toyota Land Rover Honda Kia Nissan
English Русский
Български
Беларускі
Український
Српски
Hrvatski
Română
Polski
Slovenský
Magyar
|
Articles | Sitemap | Contacts |


Home   Aveo   Captiva   Cruze   Lacetti   Lanos   Niva   Tahoe   Others  
Orlando 1 (2010-2018) Trailblazer 1 (2001-2008, petrol) Lumina 1 (1989-1994)
  • Home
  • Chevrolet
  • Lumina 1
  • Power unit
  • Power and exhaust system
  • Fuel pressure relief

Fuel pressure relief (Chevrolet Lumina 1)

            0

Contents: Engine 3.1 l (tBI system model 220) ↧ Engine 3.8 l (pFI system) ↧
Warning 1: Gasoline is extremely flammable and extra precautions are required when working around any part of the fuel system.


Warning 2: After relieving fuel pressure, wrap a rag around any fuel connection you will be disconnecting. It will absorb any remaining fuel that may leak out. This will reduce the risk of fire and prevent fuel from coming into contact with your skin.


1. Before servicing any fuel system component, relieve fuel pressure to minimize the risk of fire or injury.

2. Remove the cap from the tank neck; this will relieve any pressure remaining in the tank.

Engine 3.1 l (tBI system model 220)


3. Vehicles with the TBI system have a fuel pressure regulator, the peculiarity of which is to ensure constant circulation of fuel, which leads to automatic pressure relief. Therefore, there is no need to perform a special fuel pressure relief procedure. After turning off the ignition, it takes about 10 minutes for the fuel pressure to release.

Engine 3.8 l (pFI system)


4. On PFI models, use one of the following two methods to relieve fuel pressure:
  • a) Disconnect the fuel pump electrical connector at the fuel tank (lower the tank if necessary). Start the engine and wait until it stops, then crank the starter for another three seconds. With the ignition switched off (turning the key to the "OFF" position), reconnect the fuel tank electrical connector, then disconnect the wire from the negative battery terminal.
  • b) Remove the cap from the filler neck of the tank. Connect a fuel pressure gauge (J34730-1) or equivalent to the valve on the fuel rail (see illustration). Place the bleed hose on the pressure gauge into a special container with fuel. Open the valve on the gauge to relieve pressure, then disconnect the cable from the negative battery terminal.
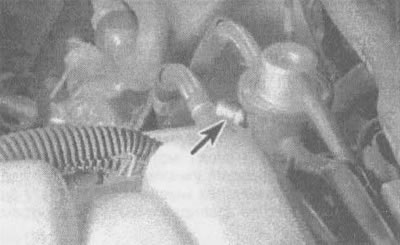
2.4. Unscrew the lid (indicated by the arrow) from the pressure regulator and connect the fuel…

2.4. Unscrew the lid (indicated by the arrow) from the pressure regulator and connect the fuel pressure sensor


5. If this work is not performed before servicing fuel lines or connections, fuel splashing may occur and personal injury may occur.

The article is reprinted from the website: «ChevyMan.ru»

The article was checked: Vladimir Romannikov
This article is available at russian, bulgarian, belarusian, ukrainian, serbian, croatian, romanian, polish, slovak, hungarian

Share information:

Previous articles
Lumina 1: Power and exhaust system
Next articles

General information about the fuel and exhaust system
Technical data of the fuel system
Checking the fuel pump and fuel pressure
Repair and replacement of fuel lines and pipes
Removal and installation the fuel tank
Fuel tank cleaning and repair
Removal and installation the fuel pump


See similar articles on the topic of Chevrolet cars:
Checking the pressure in the fuel system Chevrolet Aveo T300 (2012-2018)
Relieving pressure in the fuel supply system Chevrolet Captiva 1 (2006-2018)
Checking the pressure in the fuel system Chevrolet Cruze 1 (2008-2016)
Replacing the fuel filter Chevrolet Lacetti 1 (2002-2009)
Checking the pressure in the engine fuel system Chevrolet Lanos T150 (2002-2009)
Fuel tank cap Chevrolet Niva 1 (2002-2016)
Fuel Pump/Fuel Pressure — Check Chevrolet Tahoe 1 (1992-2000)
Link in different formats to this page


Visitor comments

No comments yet


How much will 14 + 26 =


Orlando 1 (2010-2018) 
  • General information
  • Introduction to manual
  • User manual
  • Maintenance
  • Troubleshooting
  • Power unit
  • Engine repair
  • Fuel and control system
  • Cooling and lubrication system
  • Ignition system
  • Transmission
  • Clutch
  • Gearbox
  • Drive shafts
  • Chassis
  • Car suspension
  • Steering
  • Brake system
  • Body
  • Exterior (external elements)
  • Doors, locks and windows
  • Electrical equipment
  • Equipment and devices
  • Windscreen wipers
  • Power devices
  • Electrical diagrams


Trailblazer 1 (2001-2008) 
  • General information
  • User manual
  • Troubleshooting
  • Maintenance
  • Power unit
  • Engine in a car
  • Engine overhaul
  • Cooling and heating
  • Fuel and exhaust system
  • Engine electrical equipment
  • Engine control
  • Transmission
  • Automatic gearbox
  • Transfer case
  • Drive shafts and cardan
  • Chassis
  • Brake system
  • Car suspension
  • Steering
  • Body
  • Exterior (external elements)
  • Interior (internal elements)
  • Doors, locks and windows
  • Electrical equipment
  • Equipment and devices
  • Electrical circuits


Lumina 1 (1989-1994) 
  • General information
  • Maintenance
  • Power unit
  • Engine 3.1L V6
  • Engine 3.8L V6
  • Engine overhaul
  • Cooling system
  • Power and exhaust system
  • Fuel injection
  • Engine electrical equipment
  • Reduced exhaust gas toxicity
  • Transmission
  • Automatic gearbox
  • Drive shafts
  • Chassis
  • Brake system
  • Car suspension
  • Steering
  • Body
  • Heating and air conditioning
  • Repair of body elements
  • Doors, covers and windows
  • Interior (internal elements)
  • Electrical equipment
  • Equipment and devices
  • Electrical circuits


ChevyMan.ru © 2017-2026 · Mobile version · Feedback · Site search · Interesting to read · Sitemap: EN BG BY UA RS HR RO PL SK HU

Aveo 2003-2008 · Aveo 2006-2011 · Aveo 2012-2018 · Captiva 2006-2018 · Cruze 2008-2016 · Lacetti 2002-2009 · Lanos 2002-2009 · Niva 2002-2016 · Tahoe 1992-2000 · Tahoe 2000-2014 · Lumina 1 1989-1994 · Trailblazer 1 2001-2008 · Orlando 1 2010-2018 ·
🛡️ For your security and to improve our service, this site uses cookies. You can disable them in your browser.