
ChevyMan.ru
Mazda Mitsubishi Toyota Land Rover Honda Kia Nissan
English Русский
Български
Беларускі
Український
Српски
Hrvatski
Română
Polski
Slovenský
Magyar
|
Articles | Sitemap | Contacts |


Home   Aveo   Captiva   Cruze   Lacetti   Lanos   Niva   Tahoe   Others  
Orlando 1 (2010-2018) Trailblazer 1 (2001-2008, petrol) Lumina 1 (1989-1994)
  • Home
  • Chevrolet
  • Lumina 1
  • Power unit
  • Power and exhaust system
  • Repair and replacement of fuel lines and pipes

Repair and replacement of fuel lines and pipes (Chevrolet Lumina 1)

            0

Contents: Steel pipelines ↧ Rubber hoses ↧ Removal and installation ↧ Repair ↧
1. Always relieve pressure before servicing fuel lines and fittings (see section 2).

2. The feed, drain and vent pipes run from the fuel tank to the engine compartment. The pipes are attached to the bottom with clamps and screws. These pipes should be inspected from time to time for leaks, kinks, pinches and dents.

3. If dirt is found in the system or fuel filter during disassembly, the line must be disconnected and blown out. Check the coarse fuel filter on the appliance for damage and wear (see section 7).

Steel pipelines


4. If replacement of fuel line or tube is required, use welded steel tubes that meet GM specification 124-M or equivalent.

5. Do not use copper or aluminum tubes to replace steel ones. These materials cannot withstand normal vehicle vibration.

6. Since fuel lines are used on vehicles with high pressure fuel injection, they require special attention.

7. Most fuel lines have threaded fittings with sealing rings. If the fasteners become loose, perform the following maintenance and replacement operations:
  • a) When disassembling the connections, use an auxiliary wrench to avoid twisting the pipes.
  • b) Check all O-rings for cuts, cracks and excessive wear. Replace any that are worn or damaged.
  • c) If fuel lines are replaced, always use genuine parts or parts that meet GM standards as specified in this section.

Rubber hoses


Attention! For vehicles equipped with a distributed fuel injection system, use only original hoses or their equivalents for replacement. Other hoses may fail due to high pressure in this system.


8. If a rubber hose is used to replace a metal line, use reinforced, fuel-resistant hoses (technical conditions GM 6163-M) with the inscription "Fluoroelastomer". A hose that does not have this label may fail prematurely or may not meet U.S. Federal Emission Control Standards. The inside diameter of the hose must match the outside diameter of the tube.

9. Do not install rubber hoses closer than four inches from exhaust system components or within ten inches from the catalytic converter. Metal tubes and rubber hoses should never rub against the frame. A minimum of 1/4-inch clearance must be maintained around the tube or hose to prevent contact with the frame.

Removal and installation


Note: Quick release (threadless) clean the fasteners before disconnecting to prevent dirt from getting into the fasteners. After disconnecting, clean the fasteners with compressed air and apply a few drops of oil.


10. Relieve the fuel pressure (see section 2) and disconnect the feed, drain or vent lines from the fuel tank (see illustration).
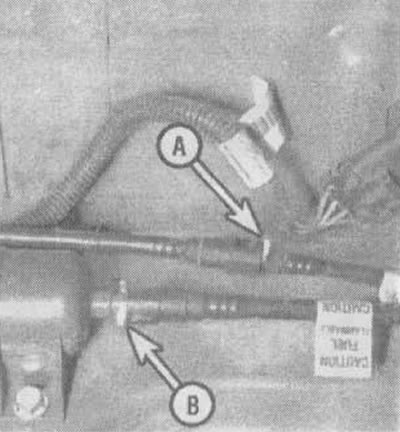
4.10. The drain (A) and feed (B) tubes are easily removed by squeezing the tabs and separating each…

4.10. The drain (A) and feed (B) tubes are easily removed by squeezing the tabs and separating each connector (the engine shown is a 3.1L engine)


Note: Some fuel line connections may be threaded. To prevent twisting, use an auxiliary wrench when disconnecting the connectors.


11. Remove all parts securing the fuel lines to the vehicle body.

12. Disconnect the fasteners that attach the fuel hoses to the metal pipes in the engine compartment (see illustration).
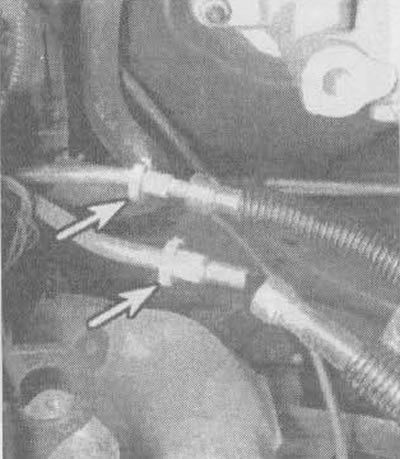
4.12. Use special tools to disconnect fuel lines (J37088-A or similar) and put them on the…

4.12. Use special tools to disconnect fuel lines (J37088-A or similar) and put them on the connectors (indicated by arrows), to disconnect the tubes (the engine shown is a 3.1L engine)


13. Installation is carried out in reverse order. Make sure new O-rings are installed on the threaded connections (see illustration). Apply a thin layer of clean motor oil to the O-rings.
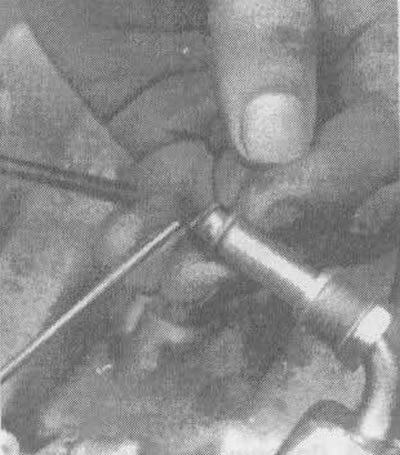
4.13 Always replace fuel line seals (if they exist)

4.13 Always replace fuel line seals (if they exist)


Repair


14. At repair locations, cut the fuel hose four inches longer than the length of the pipe being replaced. If replacing a pipe longer than six inches, use a combination of steel pipe and hose so that the hose length does not exceed ten inches. Always route the pipeline in the same location.

15. Cut the ends of the tube with an appropriate tool. Use a flaring tool to flare both ends of the tube. If the tube is too heavily corroded to withstand the flaring operation without failure, it should be replaced.

16. Use a screw clamp on the hose. Slide the clamp down the tube and push the hose through it. Tighten the clamps on each section of the repaired line.

17. Fix the pipes to the frame properly to prevent friction.

The article was checked: Vladimir Romannikov
This article is available at russian, bulgarian, belarusian, ukrainian, serbian, croatian, romanian, polish, slovak, hungarian

Share information:

Previous articles
Lumina 1: Power and exhaust system
Next articles

Checking the fuel pump and fuel pressure
Fuel pressure relief
General information about the fuel and exhaust system
Technical data of the fuel system
Removal and installation the fuel tank
Fuel tank cleaning and repair
Removal and installation the fuel pump
Removal and installation the air filter housing
Throttle cable


See similar articles on the topic of Chevrolet cars:
Tubeless tire repair Chevrolet Aveo T300 (2012-2018)
High pressure fuel supply lines Chevrolet Captiva 1 (2006-2018)
Checking the tightness of fuel lines Chevrolet Cruze 1 (2008-2016)
Replacing the fuel filter Chevrolet Lacetti 1 (2002-2009)
Safety precautions during maintenance and repair Chevrolet Lanos T150 (2002-2009)
Fuel tank cap Chevrolet Niva 1 (2002-2016)
Fuel lines and fittings — repair and replacement Chevrolet Tahoe 1 (1992-2000)
Link in different formats to this page


Visitor comments

No comments yet


How much will 29 + 50 =


Orlando 1 (2010-2018) 
  • General information
  • Introduction to manual
  • User manual
  • Maintenance
  • Troubleshooting
  • Power unit
  • Engine repair
  • Fuel and control system
  • Cooling and lubrication system
  • Ignition system
  • Transmission
  • Clutch
  • Gearbox
  • Drive shafts
  • Chassis
  • Car suspension
  • Steering
  • Brake system
  • Body
  • Exterior (external elements)
  • Doors, locks and windows
  • Electrical equipment
  • Equipment and devices
  • Windscreen wipers
  • Power devices
  • Electrical diagrams


Trailblazer 1 (2001-2008) 
  • General information
  • User manual
  • Troubleshooting
  • Maintenance
  • Power unit
  • Engine in a car
  • Engine overhaul
  • Cooling and heating
  • Fuel and exhaust system
  • Engine electrical equipment
  • Engine control
  • Transmission
  • Automatic gearbox
  • Transfer case
  • Drive shafts and cardan
  • Chassis
  • Brake system
  • Car suspension
  • Steering
  • Body
  • Exterior (external elements)
  • Interior (internal elements)
  • Doors, locks and windows
  • Electrical equipment
  • Equipment and devices
  • Electrical circuits


Lumina 1 (1989-1994) 
  • General information
  • Maintenance
  • Power unit
  • Engine 3.1L V6
  • Engine 3.8L V6
  • Engine overhaul
  • Cooling system
  • Power and exhaust system
  • Fuel injection
  • Engine electrical equipment
  • Reduced exhaust gas toxicity
  • Transmission
  • Automatic gearbox
  • Drive shafts
  • Chassis
  • Brake system
  • Car suspension
  • Steering
  • Body
  • Heating and air conditioning
  • Repair of body elements
  • Doors, covers and windows
  • Interior (internal elements)
  • Electrical equipment
  • Equipment and devices
  • Electrical circuits


ChevyMan.ru © 2017-2026 · Mobile version · Feedback · Site search · Interesting to read · Sitemap: EN BG BY UA RS HR RO PL SK HU

Aveo 2003-2008 · Aveo 2006-2011 · Aveo 2012-2018 · Captiva 2006-2018 · Cruze 2008-2016 · Lacetti 2002-2009 · Lanos 2002-2009 · Niva 2002-2016 · Tahoe 1992-2000 · Tahoe 2000-2014 · Lumina 1 1989-1994 · Trailblazer 1 2001-2008 · Orlando 1 2010-2018 ·
🛡️ For your security and to improve our service, this site uses cookies. You can disable them in your browser.