
ChevyMan.ru
Mazda Mitsubishi Toyota Land Rover Honda Kia Nissan
English Русский
Български
Беларускі
Український
Српски
Hrvatski
Română
Polski
Slovenský
Magyar
|
Articles | Sitemap | Contacts |


Home   Aveo   Captiva   Cruze   Lacetti   Lanos   Niva   Tahoe   Others  
Tahoe 2 and 3 (2000-2014) Tahoe 1 (1992-2000)
  • Home
  • Tahoe
  • 1 (1992-2000)
  • Power unit
  • Fuel and exhaust systems
  • Fuel lines and fittings — repair and replacement

Fuel lines and fittings — repair and replacement (Chevrolet Tahoe 1)

            0

Contents: Steel tubes ↧ Rubber hoses ↧ Nylon tubes ↧
1. Decompress the fuel system.

2. The fuel lines are attached to the bottom of the body with brackets and screws.

Steel tubes


3. For fuel lines, welded steel tubes meeting GM Technical Standard 124 or equivalent shall be used.

4. It is prohibited to install copper and aluminum tubes.

Rubber hoses


5. The section of metal main line can be replaced with a reinforced rubber hose (gM 6163-M standard.) with the inscription "Fluoroelastomer".

6. It is prohibited to use a rubber hose if the length of the fuel line section near the exhaust system exceeds 100 mm, and near the neutralizer - 250 mm. The gap between the car frame and the fuel line must be at least 6 mm.

Nylon tubes


10. Nylon fuel lines are used on later models. If any damage is found, (cuts, scratches, kinks) replace the nylon tubes. These tubes cannot be repaired.

11. To replace the fuel line, first disconnect it at the tank, remove the fuel line brackets from the frame, unscrew the union nuts and remove the fuel line. Replace the union seals and install the new fuel line in the reverse order (see photo).
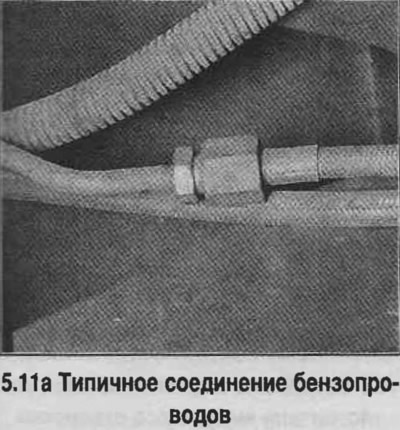
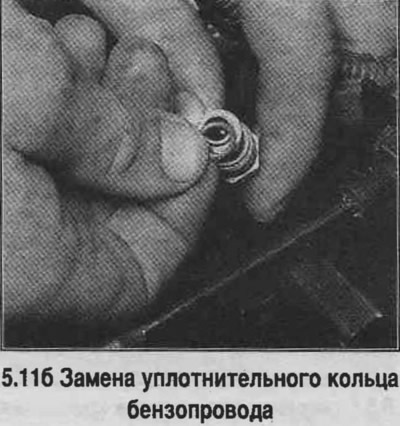
11. To replace the fuel line, first disconnect it at the tank, remove the fuel line brackets from…


11. To replace the fuel line, first disconnect it at the tank, remove the fuel line brackets from…


12. Later models use quick-release tube connections


13. Turn the connection parts in opposite directions, loosening the connection.

14. Press the latches and disconnect the tubes (see photo).
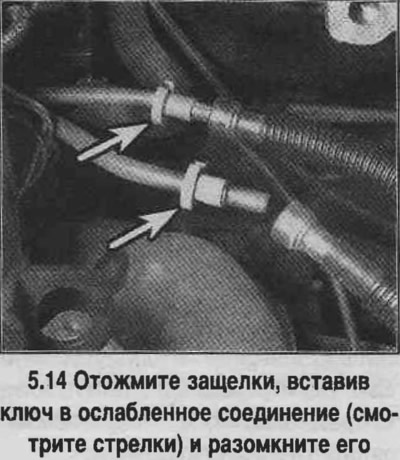
14. Press the latches and disconnect the tubes (see photo).


15. If only part of the metal tube is damaged, it can be cut out and replaced with a rubber hose 100 mm longer than the part being removed. Secure both ends of the hose with clamps.

16. If the length of the removed part of the metal tube exceeds 150 mm, then a metal tube with sections of hoses put on the ends should be used for the connection. The total length of the hoses should not exceed 250 mm.

17. After repair, start the engine and check for leaks.

[The original article is on the website «chevyman.ru»]

The article was checked: Vladimir Romannikov
This article is available at russian, bulgarian, belarusian, ukrainian, serbian, croatian, romanian, polish, slovak, hungarian

Share information:

Previous articles
Tahoe 1: Fuel and exhaust systems
Next articles

Fuel pump — removal and installation
Fuel Pump/Fuel Pressure — Check
Fuel system decompression
General information about the fuel and exhaust system
Technical data of the fuel system
Throttle body (TBI system) — general information
Throttle body (TBI module) — removal and installation
Throttle body (TBI module) — replacement of parts
Sequential Fuel Injection System — General Information
Fuel injection module (Central SFI system) — removal and installation


See similar articles on the topic of Chevrolet cars:
Tubeless tire repair Chevrolet Aveo T300 (2012-2018)
High pressure fuel supply lines Chevrolet Captiva 1 (2006-2018)
Checking the tightness of fuel lines Chevrolet Cruze 1 (2008-2016)
Replacing the fuel filter Chevrolet Lacetti 1 (2002-2009)
Safety precautions during maintenance and repair Chevrolet Lanos T150 (2002-2009)
Fuel tank cap Chevrolet Niva 1 (2002-2016)
Repair and replacement of fuel lines and pipes Chevrolet Lumina 1 (1989-1994)
Link in different formats to this page


Visitor comments

No comments yet


How much will 11 + 45 =


Tahoe 2 and 3 (2000-2014) 
  • General information
  • Vehicle characteristics
  • Vehicle device
  • Manual
  • Maintenance
  • Power unit
  • Engine repair
  • Engine overhaul
  • Cooling system
  • Injection and control system
  • Exhaust system
  • Engine electrical equipment
  • Transmission
  • Automatic gearbox 4L60, 4L65, 4L70
  • Automatic gearbox 6L50, 6L80, 6L90
  • Transfer case
  • Drive shafts and cardan
  • Front drive axle
  • Rear drive axle
  • Chassis
  • Car suspension
  • Steering
  • Brake system
  • Body (until 2007)
  • Exterior (external elements)
  • Interior (internal elements)
  • Doors, locks and windows
  • Heating and air conditioning
  • Security System (SRS)
  • Body (since 2007)
  • Exterior (external elements)
  • Doors, locks and windows
  • Interior (internal elements)
  • Electrical equipment
  • Electrical appliances (until 2007)
  • Lighting and lamps (until 2007)
  • Audio system (until 2007)
  • Electrical appliances (since 2007)
  • Lighting and lamps (since 2007)
  • Audio system (since 2007)
  • Wiring diagrams (2000-2005)
  • Wiring diagrams (2005-2007)
  • Wiring diagrams (since 2007)


Tahoe 1 (1992-2000) 
  • General information
  • User manual
  • Maintenance
  • Power unit
  • Engine in a car
  • Engine removed
  • Cooling system
  • Heating and air conditioning
  • Fuel and exhaust systems
  • Decreased toxicity
  • Transmission
  • Manual gearbox
  • Automatic gearbox
  • Transfer case
  • Clutch and drive shafts
  • Chassis
  • Brake system
  • Car suspension
  • Steering
  • Body
  • Repair of body elements
  • Electrical equipment
  • Engine electrics
  • Equipment and devices
  • Electrical circuits


ChevyMan.ru © 2017-2026 · Mobile version · Feedback · Site search · Interesting to read · Sitemap: EN BG BY UA RS HR RO PL SK HU

Aveo 2003-2008 · Aveo 2006-2011 · Aveo 2012-2018 · Captiva 2006-2018 · Cruze 2008-2016 · Lacetti 2002-2009 · Lanos 2002-2009 · Niva 2002-2016 · Tahoe 1992-2000 · Tahoe 2000-2014 · Lumina 1 1989-1994 · Trailblazer 1 2001-2008 · Orlando 1 2010-2018 ·
🛡️ For your security and to improve our service, this site uses cookies. You can disable them in your browser.