
ChevyMan.ru
Mazda Mitsubishi Toyota Land Rover Honda Kia Nissan
English Русский
Български
Беларускі
Український
Српски
Hrvatski
Română
Polski
Slovenský
Magyar
|
Articles | Sitemap | Contacts |


Home   Aveo   Captiva   Cruze   Lacetti   Lanos   Niva   Tahoe   Others  
Orlando 1 (2010-2018) Trailblazer 1 (2001-2008, petrol) Lumina 1 (1989-1994)
  • Home
  • Chevrolet
  • Orlando 1
  • Chassis
  • Brake system
  • Replacing the front brake discs

Replacing the front brake discs (Chevrolet Orlando 1)

            0

The need to replace brake discs is determined during the inspection of their technical condition (see above).

Warning!
  • Brake discs should only be replaced as a pair and with a new set of brake pads installed at the same time. Never change the brake disc and pads on only one side of the vehicle. This can lead to uneven braking of the wheels, causing the car to pull to the side and even skidding during emergency braking.
  • The first few hundred kilometers after installing new discs and brake pads, braking efficiency (due to grinding of parts) will be reduced, be careful!


To complete the job, you will need new brake shoe guide mounting bolts. We replace the front brake discs in the following order:

1. We prepare the car for maintenance and repair.

2. Remove the front wheel.

3. Using a 10 mm wrench, unscrew the two caliper mounting bolts, holding the guide pins from turning with an 18 mm wrench.
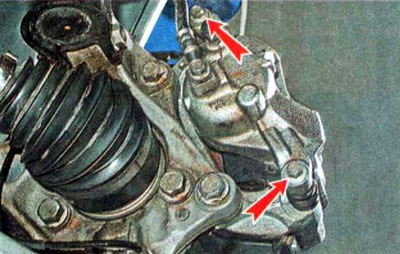
3. Using a 10 mm wrench, unscrew the two caliper mounting bolts, holding the guide pins from…


4. Remove the brake hose from the bracket.

5. Hang the brake caliper on a cord (or wire), without disconnecting the hose from it.
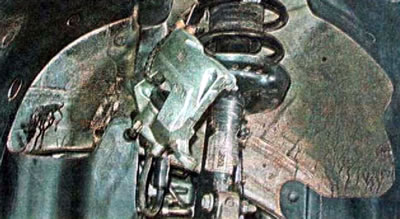
5. Hang the brake caliper on a cord (or wire), without disconnecting the hose from it.


6. Remove the front brake pads


7. Using an 18 mm open-end or socket wrench, unscrew the two bolts securing the brake shoe guide to the steering knuckle.
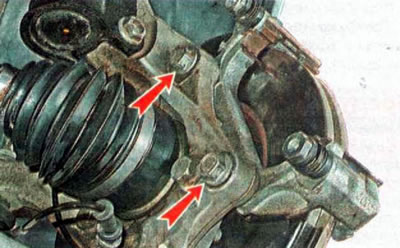
7. Using an 18 mm open-end or socket wrench, unscrew the two bolts securing the brake shoe guide to…


8. Remove the brake shoe guide.

9. Using a TORX T30 key, unscrew the brake disc mounting screw.
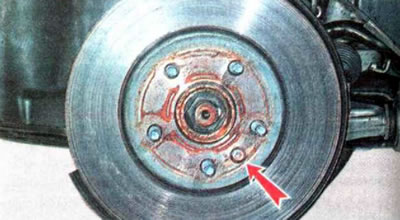
9. Using a TORX T30 key, unscrew the brake disc mounting screw.


10. Treat the brake disc seat on the hub with penetrating lubricant.

Recommendation. When performing the following operation, to prevent the brake disc from accidentally falling off, tighten one wheel nut a couple of turns.


11. If the brake disc does not come off, tap its mating surface with a hammer or knock it off from the back side using a wooden block.
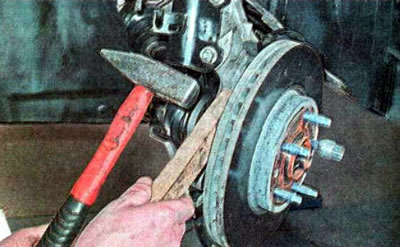
11. If the brake disc does not come off, tap its mating surface with a hammer or knock it off from…


12. After unscrewing the nut, remove the disk from the hub.
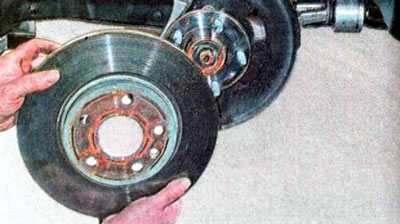


12. After unscrewing the nut, remove the disk from the hub.


13. Before installing a new brake disc, use a metal brush to clean the seat on the hub and coat it with a special heat-resistant grease for brake mechanisms.

14. Install the brake disc on the hub.

15. Fasten the brake shoe guide with new bolts. We tighten the bolts in three stages: first with a torque of 100 Nm, then turn them at an angle of 60° and then another 15°.

16. Next, we install new brake pads and brake caliper.

Recommendation. Before installing the wheel, treat the working surface of the brake disc with a special compound - brake cleaner.


17. Install the front wheel.

18. Replace the second brake disc in the same way.

19. Press the brake pedal several times to bring the pads to the brake discs.

Information taken from the official website «ChevyMan»

The article was checked: Vladimir Romannikov
This article is available at russian, bulgarian, belarusian, ukrainian, serbian, croatian, romanian, polish, slovak, hungarian

Share information:

Previous articles
Orlando 1: Brake system
Next articles

Brake discs
Checking and replacing the rear brake damper
Brake system — description and malfunctions
Replacing brake fluid
Brake fluid
Replacing rear brake discs
Checking brake pads
Replacing the front brake pads
Replacing rear brake pads


See similar articles on the topic of Chevrolet cars:
Replacing the front brake pads Chevrolet Aveo T250 (2006-2011)
Replacing the intermediate shaft seal of the front drive axle Chevrolet Captiva 1 (2006-2018)
Replacing the brake pads of the front wheel brake mechanism Chevrolet Cruze 1 (2008-2016)
Replacing the front brake pads Chevrolet Lacetti 1 (2002-2009)
Replacing the protective cover and sealing ring of the front wheel brake piston Chevrolet Lanos T150 (2002-2009)
Replacing the front brake pads Chevrolet Niva 1 (2002-2016)
Location of front brake assemblies and units Chevrolet Tahoe 1 (1992-2000)
Link in different formats to this page


Visitor comments

No comments yet


How much will 49 + 36 =


Orlando 1 (2010-2018) 
  • General information
  • Introduction to manual
  • User manual
  • Maintenance
  • Troubleshooting
  • Power unit
  • Engine repair
  • Fuel and control system
  • Cooling and lubrication system
  • Ignition system
  • Transmission
  • Clutch
  • Gearbox
  • Drive shafts
  • Chassis
  • Car suspension
  • Steering
  • Brake system
  • Body
  • Exterior (external elements)
  • Doors, locks and windows
  • Electrical equipment
  • Equipment and devices
  • Windscreen wipers
  • Power devices
  • Electrical diagrams


Trailblazer 1 (2001-2008) 
  • General information
  • User manual
  • Troubleshooting
  • Maintenance
  • Power unit
  • Engine in a car
  • Engine overhaul
  • Cooling and heating
  • Fuel and exhaust system
  • Engine electrical equipment
  • Engine control
  • Transmission
  • Automatic gearbox
  • Transfer case
  • Drive shafts and cardan
  • Chassis
  • Brake system
  • Car suspension
  • Steering
  • Body
  • Exterior (external elements)
  • Interior (internal elements)
  • Doors, locks and windows
  • Electrical equipment
  • Equipment and devices
  • Electrical circuits


Lumina 1 (1989-1994) 
  • General information
  • Maintenance
  • Power unit
  • Engine 3.1L V6
  • Engine 3.8L V6
  • Engine overhaul
  • Cooling system
  • Power and exhaust system
  • Fuel injection
  • Engine electrical equipment
  • Reduced exhaust gas toxicity
  • Transmission
  • Automatic gearbox
  • Drive shafts
  • Chassis
  • Brake system
  • Car suspension
  • Steering
  • Body
  • Heating and air conditioning
  • Repair of body elements
  • Doors, covers and windows
  • Interior (internal elements)
  • Electrical equipment
  • Equipment and devices
  • Electrical circuits


ChevyMan.ru © 2017-2026 · Mobile version · Feedback · Site search · Interesting to read · Sitemap: EN BG BY UA RS HR RO PL SK HU

Aveo 2003-2008 · Aveo 2006-2011 · Aveo 2012-2018 · Captiva 2006-2018 · Cruze 2008-2016 · Lacetti 2002-2009 · Lanos 2002-2009 · Niva 2002-2016 · Tahoe 1992-2000 · Tahoe 2000-2014 · Lumina 1 1989-1994 · Trailblazer 1 2001-2008 · Orlando 1 2010-2018 ·
🛡️ For your security and to improve our service, this site uses cookies. You can disable them in your browser.