
The service brake system is designed to reduce the speed of the vehicle until it comes to a complete stop and to hold the vehicle stationary for a short time.
The working brake system is dual-circuit, diagonal, with hydraulic drive. Each of the vehicle's brake circuits includes brake mechanisms for two wheels: one front and one rear, located diagonally on the vehicle. If one of the circuits fails, the second circuit will provide braking of the car, although with less efficiency.
The brake system consists of a master brake cylinder 1 with a reservoir 3 for brake fluid, a vacuum booster 2 connected by a rod to the brake pedal...
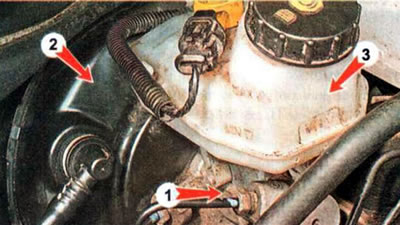
...four wheel brake mechanisms (front - ventilated disc, rear - non-ventilated disc), brake lines and hoses.
In addition, the car is equipped with an anti-lock braking system (ABS).
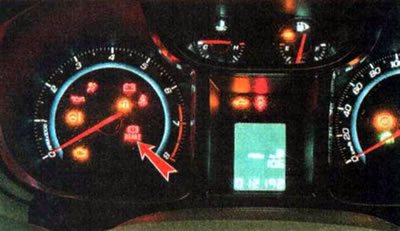
The master brake cylinder (MBC) transmits the force from the brake pedal to the working cylinders of the hydraulic brake system. The brake master cylinder is installed on the vacuum brake booster. Brake fluid enters the cylinder from a reservoir, which is installed on top of it. There is a brake fluid level sensor in the tank body. When the fluid level in the tank drops dangerously, the sensor turns on the control lamp on the instrument panel.
The following can be attributed to the main brake cylinder malfunctions:
- violation of its tightness due to damage to the sealing rings of the tank;
- fluid leaks at the junction of the cylinder and brake pipe fittings. The reason is weak tightening of the fittings or damage to the threaded connection (most likely the cylinder threads). If tightening the fittings does not restore the tightness, it is necessary to replace the brake master cylinder or damaged brake pipes;
- wear of the rear brake master cylinder cuff. As a result of this malfunction, the working stroke of the brake pedal increases. In this case, brake fluid gets into the vacuum booster and disables it. This malfunction can be identified as follows. If the brake fluid level is constantly decreasing, and there are no brake fluid leaks from the working brake cylinders, brake hoses and pipelines, then most likely this indicates wear of the brake master cylinder cuffs. In this case, it is necessary to replace the worn cuffs or replace the brake master cylinder assembly;
- bypass of brake fluid from one circuit to another as a result of damage to the sealing cuffs. In this case, it is necessary to replace the worn cuffs or replace the master brake cylinder (MBC) as an assembly.
Note: To ensure proper operation of the hydraulic drive, use only the brake fluid recommended by the manufacturer.
The vacuum booster is installed in the brake system drive to reduce the force applied by the driver to the brake pedal. It works by creating a vacuum in the intake manifold of a running engine.
Warning! Do not turn off the engine until the car has come to a complete stop, as this will greatly increase the force required to apply to the brake pedal to stop the car.
Front and rear brakes with floating calipers. The support is made as a single element with the body of the working brake cylinder. The rear brake calipers are equipped with dampers to reduce the likelihood of squealing during braking.
The brake pads are equipped with audible wear indicators. When the thickness of the pad lining reaches the minimum permissible value, the wear indicator, in contact with the brake disc, will emit a characteristic squeak, signaling the need to replace the brake pads.
If the caliper piston is jammed in the cylinder due to corrosion and oxide formation, it is advisable to replace the caliper. If a leak occurs from the cylinder due to damage or wear of the piston seal, the caliper can be repaired (replacing the cuffs) or replace as a whole.
Checking the technical condition of the brake system allows you to promptly detect and eliminate problems in the operation of the brake system that arise during the operation of the vehicle, so it is necessary to perform the check in strict accordance with the maintenance plan.
Warning! Even if there are no visible faults in the brake system, it is necessary to check the brake system at each maintenance. Do not neglect this, an unexpected failure of the brake system can be very expensive!
Possible malfunctions of the braking system can be divided into several main types. Depending on the type of malfunction, the testing algorithm and the number of units tested differ.
1. Brake fluid leak. The brake fluid level in the brake master cylinder reservoir is constantly decreasing. The malfunction will most likely be accompanied by increased brake pedal travel. Possible reasons:
- a) malfunction of the front brake caliper;
- b) malfunction of the rear brake caliper;
- c) damage to the brake hose of one of the wheels;
- d) damage to the brake pipe of the brake hydraulic drive.
2. Increased brake pedal travel.
Possible reasons:
- a) brake fluid leak (see above);
- b) air in the brake hydraulic drive;
- c) the master brake cylinder is faulty (see above).
3. Increased force on the brake pedal.
Possible reasons:
- a) vacuum booster malfunction;
- b) oiling of the brake shoe linings and the surface of the brake discs of one axle.
4. Uneven operation of brake mechanisms (the vehicle's deviation from straight-line movement or skidding when braking).
Possible reasons:
- a) jamming of the front or rear brake caliper;
- b) oiling of the brake column linings and the surface of the brake discs of one of the wheels;
- c) the brake line tube is pinched.
5. A loud squealing or grinding noise when braking is most likely caused by extreme wear of the friction linings of the brake pads of the front or rear brake mechanisms.
6. Excessive heating of brake discs (at the same time, the wheel disks become very hot).
Possible reasons:
- a) intensive use of the braking system (prolonged driving downhill in high altitude conditions without using engine braking, aggressive driving style in acceleration-braking mode);
- b) jamming of the front or rear brake caliper;
- c) incomplete release of the brakes due to lack of free travel of the brake pedal.
The parking brake system is designed to prevent spontaneous movement of the vehicle while parked.
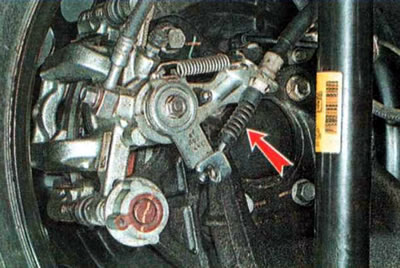
The parking brake lever is mounted on the floor tunnel between the front seats...
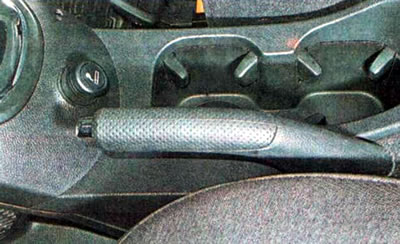
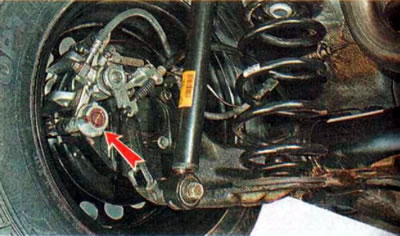
...and is connected by two cables to the brake mechanisms of the rear wheels.
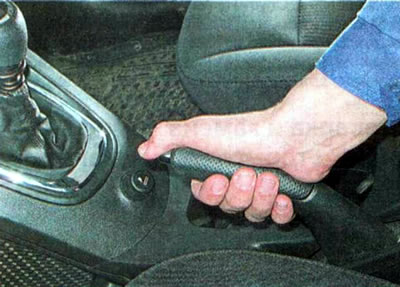
To secure the car with the parking brake, you need to pull the lever handle up. At the same time, the rear wheels of the car will be locked and the parking brake indicator light on the instrument panel will come on (with ignition on). To release the parking brake, first pull the lever up slightly and then, by pressing the button located in the handle, move the lever down.
The parking brake system can be applied when starting off on an incline to prevent the vehicle from rolling. In addition, in a critical situation it can be used as a backup braking system - if for some reason the working (main) braking system fails. However, braking efficiency will be low and there is a high risk of skidding if the rear wheels lock. Therefore, it is necessary to brake smoothly. To do this, while pulling the parking brake lever, you must simultaneously press the lever button so that you can lower the lever at any time and avoid locking the wheels.
Warning: Make sure the parking brake lever is released before driving. Even short-term driving with the parking brake on can lead to overheating and failure of the rear wheel brakes.
The parking brake system is self-adjusting, so there is no need to adjust the parking brake drive during vehicle operation.
Note: According to the Road Traffic Regulations, it is prohibited to operate a vehicle with a faulty parking brake system. The parking brake system is considered to be in good working order if it ensures that the loaded passenger car remains stationary on a 23% slope.
To check the condition of the parking brake, you need to select an asphalt section of the road with a slope of 23% (a slope at which a car will descend slightly more than one meter in 5 meters of travel).
On this slope, the car should be securely fixed with the parking brake, with the lever moving 6-9 clicks.
When the parking brake lever is released, the rear brakes are completely released. To check this, you need to lift the rear wheels, placing reliable stands under the rear of the car. Pull the parking brake lever, counting the number of clicks, which should be at least six. Make sure the rear wheels are blocked. Lower the brake lever. After this, make sure that the rear wheels rotate freely. Otherwise, it is necessary to check the condition of the rear wheel brake mechanisms and the parking brake drive mechanism.
Reference data
| Parameters | Values |
| Brake fluid type | DOT-4 |
| Free travel of brake pedal, mm | 1-8 |
| Parking brake lever travel (at a force of 196 N/ 20 kg) | 6-9 clicks |
| Front brakes, mm: | |
| nominal thickness of the front brake disc | 26 |
| brake disc diameter | 300 |
| minimum permissible thickness of brake disc | 23 |
| maximum permissible runout of the brake disc | 0,05 |
| nominal thickness of the friction lining of the front brake shoe | 12 |
| minimum permissible thickness of the friction lining of the front brake shoe | 2 |
| Rear disc brakes, mm: | |
| nominal thickness of the rear brake disc | 12 |
| brake disc diameter | 262 |
| minimum permissible thickness of brake disc | 10,2 |
| maximum permissible runout of the brake disc | 0,05 |
| nominal thickness of the rear brake shoe friction lining | 10 |
| minimum permissible thickness of the friction lining of the rear brake shoe | 2 |
*Brake fluid should be replaced regularly according to the maintenance schedule
Information taken from the official website ChevyMan.ru