
Sound signals play an important role in ensuring road safety. Therefore, any malfunction in their operation must be identified and eliminated as soon as possible. If the volume of the sound signal has decreased or the tone has changed, there is no need to check their electrical circuits. In this case, most likely, one of the sound signals is faulty: dirt and reagents from the road have disabled it. To figure out which of them is faulty, you will have to disconnect them one by one, disconnecting the wiring harness connectors from them (see below).
To complete the work you will need an assistant and two pieces of wire about half a meter long (one with a built-in 15A fuse) and a multimeter.
1. We prepare the car for maintenance and repair.
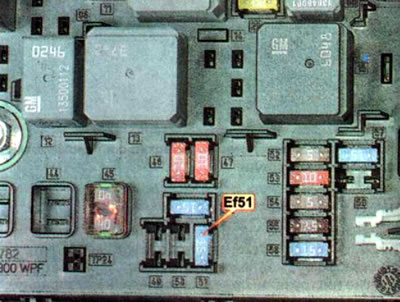
2. Check the serviceability of the Ef51 15 A fuse in the fuse and relay box in the engine compartment. We replace the faulty fuse. If the fuse blows again, look for a short circuit in the electrical circuit.
3. If the fuse is working properly, remove it and check for voltage supply to one of the contacts when the horn switch is pressed (when the ignition is off, the sound signal lasts for 10 seconds). If voltage does not reach any of the contacts, then the horn relay may be faulty (built into the fuse and relay box), horn switch or electrical equipment control unit.
4. To access the sound signals, remove the front bumper cover.
5. Press the lock and disconnect the wiring harness connector from the horn.
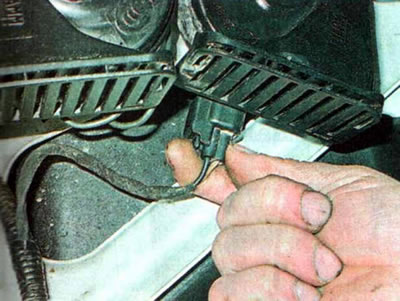
6. Check the connector for dirt and oxidation, and if necessary, treat it with a cleaning agent to protect electrical contacts.
7. Connect to contact 2 of the wiring harness connector (brown-green wire) we connect the positive probe of the multimeter, switched on in the voltage measurement mode, and the negative probe to the ground and measure the voltage with the sound signal switch pressed. The multimeter should show the battery voltage. If there is no voltage, the horn power supply circuit is faulty.

8. Using an ohmmeter, check the connection circuit of pin 1 (black wire) with "mass".
9. To check the horn for a short circuit, connect terminal 1 of the horn to ground with one piece of wire. Using the second piece of wire with a 15 A fuse embedded in it, briefly connect terminal 2 to the positive terminal of the battery. If the fuse blows, the horn has a short circuit and will need to be replaced. If it runs quietly, it also needs to be replaced.
10. We check the second signal in the same way.
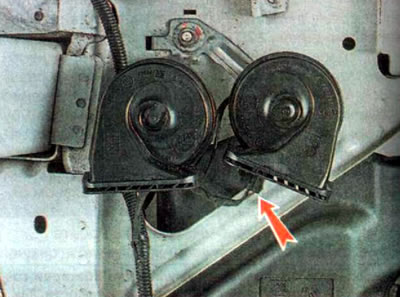
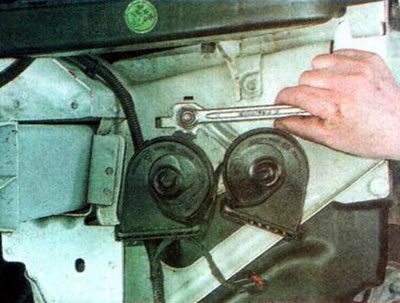
11. To replace a faulty horn, use a 10 mm wrench to unscrew the nut that secures it.
12. Remove the sound signal.
13. If necessary, remove the second sound signal in the same way.
Note: If necessary, both horns can be removed simultaneously by loosening the nut securing their bracket with a 13 mm wrench.
12. Install the parts in reverse order. Tighten the horn mounting nut to 17 Nm. After installation, press the switch and check the horn operation.
The original article can be found on the resource: ChevyMan.ru