ChevyMan.ru
Mazda Mitsubishi Toyota Land Rover Honda Kia Nissan
English Русский
Български
Беларускі
Український
Српски
Hrvatski
Română
Polski
Slovenský
Magyar
|
Articles | Sitemap | Contacts |


Home   Aveo   Captiva   Cruze   Lacetti   Lanos   Niva   Tahoe   Others  
Orlando 1 (2010-2018) Trailblazer 1 (2001-2008, petrol) Lumina 1 (1989-1994)
  • Home
  • Chevrolet
  • Orlando 1
  • Electrical equipment
  • Equipment and devices
  • A multimeter is a combined electrical measuring instrument

A multimeter is a combined electrical measuring instrument (Chevrolet Orlando 1)

            0

A multimeter is used to troubleshoot electrical equipment (or, as it is also called, a tester) — a combined electrical measuring instrument that combines a voltmeter for measuring current, an ohmmeter for measuring electrical resistance, and an ammeter for determining current. Switching between device modes is done by simply turning the switch handle. There are several types of such devices: analog, with a pointer indicator, digital, with a liquid crystal display; universal - having both an arrow indicator and a liquid crystal display. When repairing a car, it is more convenient to use a digital device. It is compact and shows accurate values at any position in space.

Multimeter: 1 - multimeter operating mode switch; 2 - sockets for connecting the terminals of…

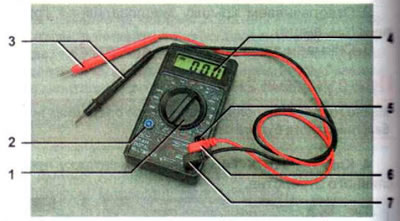
Multimeter: 1 - multimeter operating mode switch; 2 - sockets for connecting the terminals of semiconductor devices during their testing; 3 - feeler gauges,; 4 - liquid crystal display; 5 — socket for connecting a wire with a probe to a multimeter when measuring current; 6 - positive conclusion; 7 - negative output


Some models are equipped with additional functions that are useful when repairing electronic equipment, but they are generally not required for car repairs. Sometimes multimeters are equipped with a thermocouple and have a temperature measurement mode. This is a useful function, it expands the capabilities of the device for checking the engine cooling system.


Multimeter: 1 - feeler gauges; 2 - sockets for connecting probes to a multimeter; 3 - buttons for…

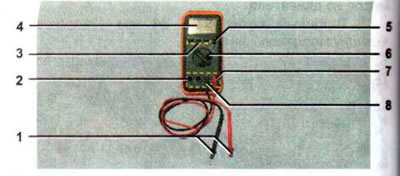
Multimeter: 1 - feeler gauges; 2 - sockets for connecting probes to a multimeter; 3 - buttons for turning on and switching various functions; 4 - liquid crystal display; 5 - sockets for connecting the terminals of semiconductor devices during their testing; 6 — multimeter operating mode switch; 7 - positive conclusion; 8 - negative output


All devices are equipped with red and black wires with probes at the ends. It is generally accepted to connect the red wire to the positive terminal of the device, marked with the symbol "+", and the black wire to the negative terminal, marked with the sign "-" or "". The number of sockets for connecting wires with probes is usually more than two. The connection order depends on the measurement mode. Usually you have to switch the positive terminal to measure current. Some multimeter models have several sockets, depending on the maximum permissible current strength. To avoid damaging the multimeter, do not measure current greater than the values specified on the meter.

To check de-energized circuits, the multimeter is switched to ohmmeter mode. When measuring very low resistance (within a few ohms), it is necessary to introduce a correction - subtract the internal resistance of the multimeter, the electrical resistance of its wires and probes from the obtained value (usually within 0.06-0.08 Ohm). To accurately determine this correction, you should switch the device to the low resistance measurement mode (up to 200 Ohm) and short-circuit the ends of its probes.


To check the electrical circuits of a vehicle under voltage, the multimeter is switched to voltmeter mode with a measurement limit of up to 20 V DC. In the mode with a higher upper voltage range, the measurement accuracy will be lower. Some multimeters (more expensive models) automatically switch to the range with the optimal measurement range.

Warning! Do not use a multimeter to measure the voltage in the high-voltage circuit of the ignition system, as this may damage the device.


The multimeter allows you to measure the current consumed by the vehicle's electrical equipment (usually up to 10 A, less often up to 20 A). Typically, to perform a measurement, you will need to not only switch the multimeter to ammeter mode, but also reconnect one of the probes to the corresponding terminal of the device.

Warning! Do not measure the current in the starter circuit with a multimeter to avoid damage to the device. The current consumed by the starter is very high (300-400 A).

For a car enthusiast, a very useful function is the "circuit test mode". It allows you to identify closed circuits by a sound signal - a buzzer.

Many measurements that a car enthusiast may need to take when repairing a car can be performed using an analog instrument with a pointer indicator. It has several scales, each corresponding to a measured parameter. Sometimes, to measure one parameter, several scales with different ranges of values are made.

Pointer instruments have a special regulator for setting the pointer to "zero" in ohmmeter mode. To adjust the device, the device probes are short-circuited. By rotating the regulator disk, ensure that the arrow is positioned exactly on the "0" mark of the scale . Once the device has been calibrated, measurements can be taken. In this case, no other corrections need to be made to the obtained values. On some older models, when measuring resistance in ohmmeter mode, the polarity may be reversed. This feature is necessarily reflected by the corresponding markings on the device.

Analog multimeter: 1 — regulator disk «0»; 2 — pointer indicator of the device; 3 - adjusting…

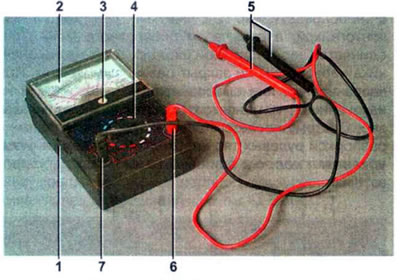
Analog multimeter: 1 — regulator disk "0"; 2 — pointer indicator of the device; 3 - adjusting screw; 4 — device mode switch; 5 - device probes; 6 - positive conclusion; 7 - negative output


As a rule, pointer instruments have a mirror strip on the scale. This is done to ensure that the readings from the device can be taken as accurately as possible. The mirror strip is used in the following way. When looking at the arrow, you need to tilt your head slightly to ensure that the arrow and its reflection in the mirror strip merge into one line. After that, without changing the position of the head, the readings are determined on the corresponding scale of the device.

Despite the difficulty of taking accurate readings, pointer instruments also have advantages over digital ones. The main thing is that they retain their functionality without power supply elements, although not to the full extent - an ohmmeter does not work without power supply.

Pointer instruments are not afraid of frost, which causes liquid crystals to freeze. Despite its high inertia, the pointer indicator allows you to observe rapidly changing processes in dynamics. Therefore, in some cases, the arrow turns out to be more informative than the flashing numbers. For the same reason, the speedometer and tachometer on most modern cars have remained electronic-mechanical, although attempts to introduce purely electronic devices have been made repeatedly.

[The original article can be found on the resource: ChevyMan]

The article was checked: Vladimir Romannikov
This article is available at russian, bulgarian, belarusian, ukrainian, serbian, croatian, romanian, polish, slovak, hungarian

Share information:

Previous articles
Orlando 1: Equipment and devices
Next articles

Lamps used in the car
Sound signal
Rear light
Additional brake light
Side direction indicator
Rear window heating
Parking radar
Interior and luggage compartment lighting lamps
Steering column switches
Headlight adjustment


See similar articles on the topic of Chevrolet cars:
Instrument panel Chevrolet Aveo T300 (2012-2018)
Electrical diagrams of the instrument cluster Chevrolet Captiva 1 (2006-2018)
Instrument cluster Chevrolet Cruze 1 (2008-2016)
Removal the lower instrument panel trim Chevrolet Lacetti 1 (2002-2009)
Instrument cluster Chevrolet Lanos T150 (2002-2009)
Instrument panel Chevrolet Niva 1 (2002-2016)
Combined instrument panel Chevrolet Tahoe 1 (1992-2000)
Link in different formats to this page


Visitor comments

No comments yet


How much will 41 + 12 =


Orlando 1 (2010-2018) 
  • General information
  • Introduction to manual
  • User manual
  • Maintenance
  • Troubleshooting
  • Power unit
  • Engine repair
  • Fuel and control system
  • Cooling and lubrication system
  • Ignition system
  • Transmission
  • Clutch
  • Gearbox
  • Drive shafts
  • Chassis
  • Car suspension
  • Steering
  • Brake system
  • Body
  • Exterior (external elements)
  • Doors, locks and windows
  • Electrical equipment
  • Equipment and devices
  • Windscreen wipers
  • Power devices
  • Electrical diagrams


Trailblazer 1 (2001-2008) 
  • General information
  • User manual
  • Troubleshooting
  • Maintenance
  • Power unit
  • Engine in a car
  • Engine overhaul
  • Cooling and heating
  • Fuel and exhaust system
  • Engine electrical equipment
  • Engine control
  • Transmission
  • Automatic gearbox
  • Transfer case
  • Drive shafts and cardan
  • Chassis
  • Brake system
  • Car suspension
  • Steering
  • Body
  • Exterior (external elements)
  • Interior (internal elements)
  • Doors, locks and windows
  • Electrical equipment
  • Equipment and devices
  • Electrical circuits


Lumina 1 (1989-1994) 
  • General information
  • Maintenance
  • Power unit
  • Engine 3.1L V6
  • Engine 3.8L V6
  • Engine overhaul
  • Cooling system
  • Power and exhaust system
  • Fuel injection
  • Engine electrical equipment
  • Reduced exhaust gas toxicity
  • Transmission
  • Automatic gearbox
  • Drive shafts
  • Chassis
  • Brake system
  • Car suspension
  • Steering
  • Body
  • Heating and air conditioning
  • Repair of body elements
  • Doors, covers and windows
  • Interior (internal elements)
  • Electrical equipment
  • Equipment and devices
  • Electrical circuits


ChevyMan.ru © 2017-2026 · Mobile version · Feedback · Site search · Interesting to read · Sitemap: EN BG BY UA RS HR RO PL SK HU

Aveo 2003-2008 · Aveo 2006-2011 · Aveo 2012-2018 · Captiva 2006-2018 · Cruze 2008-2016 · Lacetti 2002-2009 · Lanos 2002-2009 · Niva 2002-2016 · Tahoe 1992-2000 · Tahoe 2000-2014 · Lumina 1 1989-1994 · Trailblazer 1 2001-2008 · Orlando 1 2010-2018 ·
🛡️ For your security and to improve our service, this site uses cookies. You can disable them in your browser.