
ChevyMan.ru
Mazda Mitsubishi Toyota Land Rover Honda Kia Nissan
English Русский
Български
Беларускі
Український
Српски
Hrvatski
Română
Polski
Slovenský
Magyar
|
Articles | Sitemap | Contacts |


Home   Aveo   Captiva   Cruze   Lacetti   Lanos   Niva   Tahoe   Others  
Orlando 1 (2010-2018) Trailblazer 1 (2001-2008, petrol) Lumina 1 (1989-1994)
  • Home
  • Chevrolet
  • Orlando 1
  • Power unit
  • Ignition system
  • Ignition module — testing and replacement

Ignition module — testing and replacement (Chevrolet Orlando 1)

            0

Warning! The ignition module generates high voltage (up to 25 kV), which is dangerous to human health. Therefore, when performing any work related to the ignition system, observe safety precautions when servicing and repairing the car.


1. Prepare the car for maintenance and repair, disconnect the wire terminal from the negative terminal of the battery.

2. If the engine does not start, check the fuse Ef9 (IGN COIL) 15 A in the fuse and relay box. We replace the faulty fuse. If the fuse blows again, look for a short circuit in the electrical equipment in the electrical circuit of the ignition system and injectors.
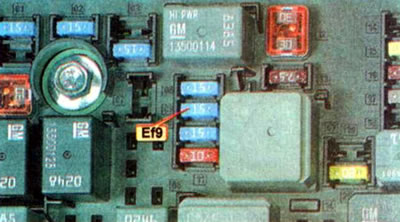
2. If the engine does not start, check the fuse Ef9 (IGN COIL) 15 A in the fuse and relay box. We…


3. Overcoming the resistance of the clamps, remove the ignition module cover.
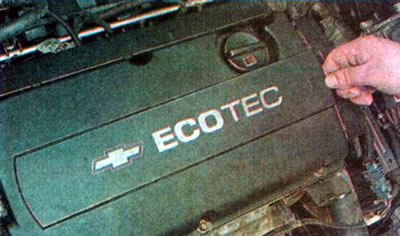
3. Overcoming the resistance of the clamps, remove the ignition module cover.


4. We extend the stopper...
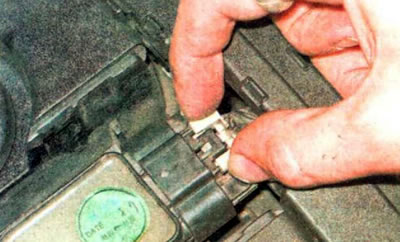


4. We extend the stopper...


...press the lock...
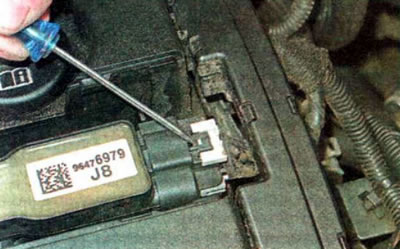
...press the lock...


...and disconnect the wiring harness connector from the ignition module.
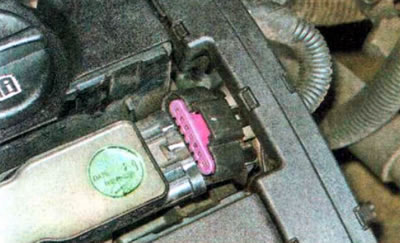
...and disconnect the wiring harness connector from the ignition module.


5. Using a multimeter in ohmmeter mode, check the connection of contact B to the "ground". The circuit resistance should not exceed 5 Ohms. Otherwise, repair the damage.
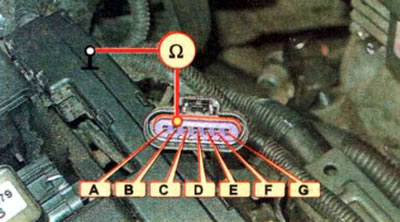
5. Using a multimeter in ohmmeter mode, check the connection of contact B to the «ground». The…


6. To check the power supply circuit, connect the multimeter probes in voltmeter mode to the ground and contact A of the wiring harness connector and turn on the ignition. The multimeter should show the battery voltage. If there is no voltage, we fix the problem.
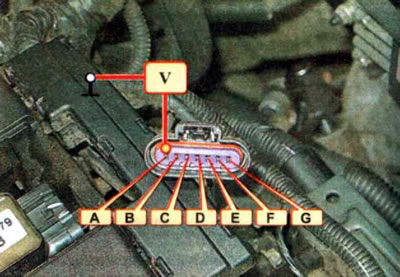


6. To check the power supply circuit, connect the multimeter probes in voltmeter mode to the ground…


7. Using a TORX T40 key, unscrew the two mounting bolts...
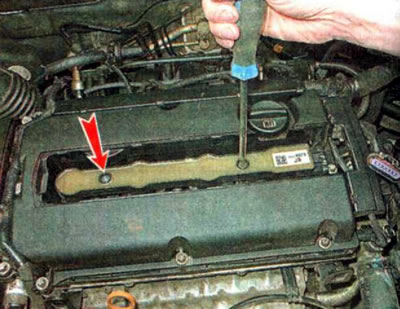
7. Using a TORX T40 key, unscrew the two mounting bolts...


...and remove the module together with the spark plug tips.
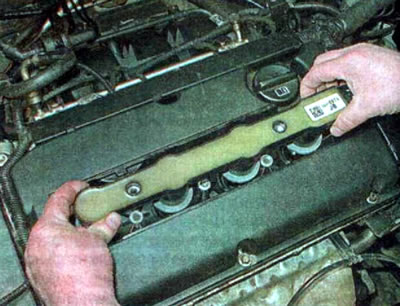
...and remove the module together with the spark plug tips.


8. Inspect the module and spark plug tips; if cracks or other damage are detected, replace the module.

9. Install the parts in reverse order. Before installation, apply technical petroleum jelly to the inner surface of the ignition module tips to a depth of 2 mm. Tighten the module mounting bolts to a torque of 8 Nm.
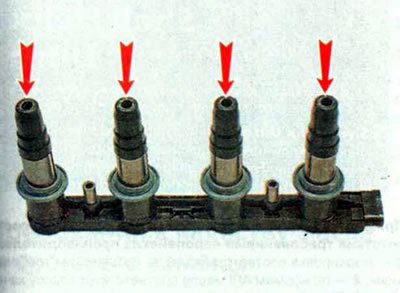
9. Install the parts in reverse order. Before installation, apply technical petroleum jelly to the…

The article was checked: Vladimir Romannikov
This article is available at russian, bulgarian, belarusian, ukrainian, serbian, croatian, romanian, polish, slovak, hungarian

Share information:

Previous articles
Orlando 1: Ignition system
Next articles

Ignition module — design description
Spark plugs
Ignition system — design description


See similar articles on the topic of Chevrolet cars:
Removal and installation the fuel module Chevrolet Aveo T300 (2012-2018)
Ignition switch positions Chevrolet Captiva 1 (2006-2018)
Removal, repair and installation of the fuel module Chevrolet Cruze 1 (2008-2016)
Removal and disassembling the fuel module Chevrolet Lacetti 1 (2002-2009)
Ignition switch (lock) Chevrolet Lanos T150 (2002-2009)
Ignition switch Chevrolet Niva 1 (2002-2016)
Electronic Ignition Module (Pre-1995 Models) — Replacement Chevrolet Tahoe 1 (1992-2000)
Link in different formats to this page


Visitor comments

No comments yet


How much will 47 + 26 =


Orlando 1 (2010-2018) 
  • General information
  • Introduction to manual
  • User manual
  • Maintenance
  • Troubleshooting
  • Power unit
  • Engine repair
  • Fuel and control system
  • Cooling and lubrication system
  • Ignition system
  • Transmission
  • Clutch
  • Gearbox
  • Drive shafts
  • Chassis
  • Car suspension
  • Steering
  • Brake system
  • Body
  • Exterior (external elements)
  • Doors, locks and windows
  • Electrical equipment
  • Equipment and devices
  • Windscreen wipers
  • Power devices
  • Electrical diagrams


Trailblazer 1 (2001-2008) 
  • General information
  • User manual
  • Troubleshooting
  • Maintenance
  • Power unit
  • Engine in a car
  • Engine overhaul
  • Cooling and heating
  • Fuel and exhaust system
  • Engine electrical equipment
  • Engine control
  • Transmission
  • Automatic gearbox
  • Transfer case
  • Drive shafts and cardan
  • Chassis
  • Brake system
  • Car suspension
  • Steering
  • Body
  • Exterior (external elements)
  • Interior (internal elements)
  • Doors, locks and windows
  • Electrical equipment
  • Equipment and devices
  • Electrical circuits


Lumina 1 (1989-1994) 
  • General information
  • Maintenance
  • Power unit
  • Engine 3.1L V6
  • Engine 3.8L V6
  • Engine overhaul
  • Cooling system
  • Power and exhaust system
  • Fuel injection
  • Engine electrical equipment
  • Reduced exhaust gas toxicity
  • Transmission
  • Automatic gearbox
  • Drive shafts
  • Chassis
  • Brake system
  • Car suspension
  • Steering
  • Body
  • Heating and air conditioning
  • Repair of body elements
  • Doors, covers and windows
  • Interior (internal elements)
  • Electrical equipment
  • Equipment and devices
  • Electrical circuits


ChevyMan.ru © 2017-2026 · Mobile version · Feedback · Site search · Interesting to read · Sitemap: EN BG BY UA RS HR RO PL SK HU

Aveo 2003-2008 · Aveo 2006-2011 · Aveo 2012-2018 · Captiva 2006-2018 · Cruze 2008-2016 · Lacetti 2002-2009 · Lanos 2002-2009 · Niva 2002-2016 · Tahoe 1992-2000 · Tahoe 2000-2014 · Lumina 1 1989-1994 · Trailblazer 1 2001-2008 · Orlando 1 2010-2018 ·
🛡️ For your security and to improve our service, this site uses cookies. You can disable them in your browser.