
Reference data
| Spark plug number according to GM catalog | 96 476 119 |
| Type of candle (manufacturer) | ZFR6U-11 (NGK) |
| Spark plug electrode gap, mm | 1,1 |
| Spark plug thread | M14x1.25 |
| Size of hexagonal part of the body, mm | 16 |
| Spark plug tightening torque, Nm | 25 |
The spark plugs are installed on top of the cylinder head under the ignition coils.
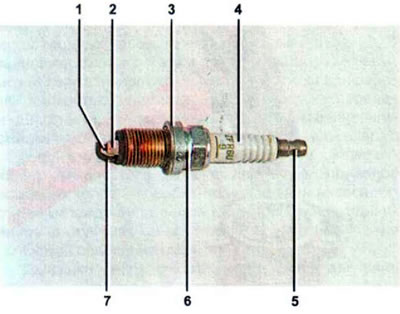
Spark plug: 1 - central electrode; 2 - insulator; 3 - metal sealing ring; 4 - spark plug marking is applied to the insulator; 5 - connecting tip; 6 — spark plug housing
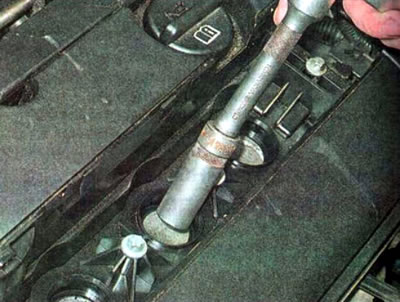
The upper part of the spark plug housing is hexagonal, for a 16 mm wrench. To remove the spark plug from the spark plug well, a special socket wrench is required, inside which a rubber coupling is installed (it allows the key to hold the candle).
The service life of spark plugs can be significantly reduced if the vehicle is filled with low-quality gasoline containing too many additives that increase the octane number of the fuel. These additives, deposited on the electrodes and insulator, impair heat dissipation and cause interruptions in spark formation. Misfiring in cylinders can lead to failure of expensive engine components (oxygen concentration sensors, catalytic converter).
During the operation of the vehicle, there is no need to check the condition of the spark plugs (at least as a preventative measure). The vehicle manufacturer recommends replacing them regularly in accordance with the maintenance schedule. However, to determine the causes of engine malfunctions, sometimes it is necessary to remove the spark plugs and check their condition. Reasons for early replacement of the spark plug will be:
- damage to both the internal and external parts of the insulator:
- rounding of the central electrode;
- increase in gap over 1.1 mm.
Checking, cleaning and replacing spark plugs
To complete the job, you will need a 16 mm spark plug wrench and a set of round feeler gauges.
1. We prepare the car for maintenance and repair.
2. Remove the ignition module.
3. Blow out the spark plug wells with compressed air from a compressor or foot pump.
4. Using a 16 mm spark plug wrench, unscrew the ignition plug.
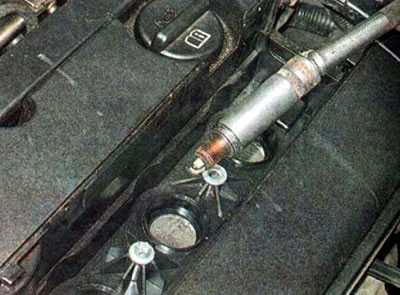
5. Using a wrench, remove the spark plug from the spark plug well.
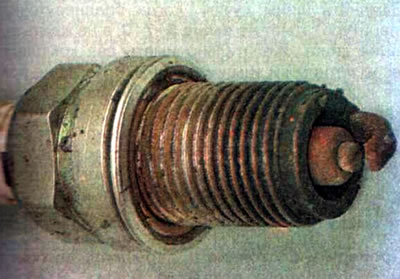
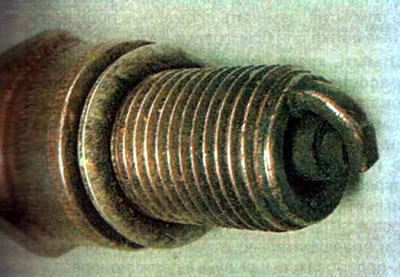
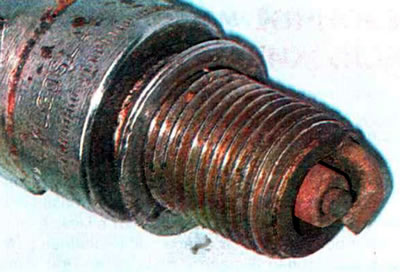
6. Inspect the electrodes and insulator of the spark plug.
Comment.
- The appearance of the spark plug can be used to assess the technical condition of the engine and its systems. In a serviceable engine, the spark plug insulator should have a grey or brownish coating.
- Red or rusty plaque is caused by operating the vehicle on gasoline with a high content of additives.
- Black oily deposits may be caused by oil entering the combustion chamber. A similar defect will occur with a spark plug if it is "colder" than recommended.
- If the spark plug is "hotter" than recommended, the electrodes may burn out. Similar spark plug failures can be caused by a faulty cooling system or ignition system.
- Large deposits on the spark plug may be caused by poor quality gasoline or oil.

7. If there are deposits on the electrodes and insulator, remove them with a stiff non-metallic brush, after soaking them in gasoline or a special solvent for cleaning spark plugs. It is allowed to use a sandblasting machine, but not more than for 20 seconds
Warning! To avoid damaging the threads in the cylinder head, the spark plug should be tightened by hand first, and then tightened by inserting the handle into the wrench extension.
8. Screw the spark plug into the cylinder head and tighten to a torque of 25 Nm.
9. Install the remaining parts in reverse order.
(The original article is on the website: chevyman.ru)