
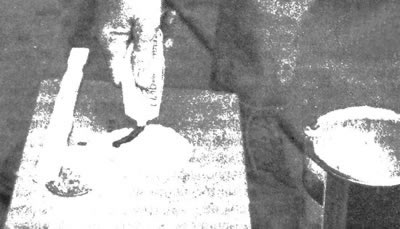
Plastic parts
Below is a description of the procedure for removing minor scratches and chips from the surface of plastic parts. Repair of serious damage should be entrusted to professional specialists of the appropriate profile or representatives of the manufacturer. Below is a list of equipment and materials needed to restore plastic parts. Instead of recommended materials or tools of branded manufacture, it is permissible to use equivalent means of another manufacturer.
- Solvent for removing wax, grease and silicone
- Fabric Backed Adhesive Tape
- Grinding discs
- Electric drill with a holder for a three-inch disk
- Grinding block
- Rubber spatula
- Sandpaper
- Non-porous palette
- Wooden spatula or blunt knife
- Rasp
- Materials from the repair kit for restoring plastic parts
Flexible panels (front and rear bumper trim)
1. Remove the damaged panel if necessary. Often repairs are carried out without removing the panel.
2. Clean the damaged area by applying wax, grease and silicone remover with a cloth dampened with water.
3. If the damage has gone all the way through the panel, also clean the damaged area from the back side. Dry the panel.
4. Sand the back side of the damaged area, extending 15-30 mm beyond the damage.
5. Cut two pieces of fiberglass cloth of such an area that they overlap the damage by 15-30 mm. Do not cut excessively large patches.
6. Mix the adhesive compound from the repair kit according to the instructions for use and apply it to the back of the damaged area in a layer of approximately 3 mm. Cover the damage by at least 15-30 mm.
7. Place one of the pieces of fiberglass fabric on the applied layer and apply the adhesive compound over the fabric. Place the second piece of fabric and immediately cover it with another layer so that the composition completely saturates both fiberglass patches.
8. Wait for the composition to dry for half an hour at a temperature of 15-20°C.
9. If necessary, remove excess material from the edges of the repaired area.
10. Completely remove the paint from the area adjacent to the damage. The restorative material should not cover the paintwork.
11. Using a drill with a grinding disc, cut a V-shaped groove approximately 12 mm wide along the damage. Clean the area to be repaired from dust and particles of material.
12. Displace and apply the restorative composition. First, cover the entire area to be restored with a thin layer, then fill the groove so that the restorative material protrudes slightly above the surface of the part.
13. Wait for the composition to dry for half an hour at a temperature of 15-20°C.
14. Using a file, first give the area to be restored the contour of the part surface. If holes or depressions form on the area, prepare an additional portion of the restorative composition and apply it to the area.
15. Sand the area with a sanding block to precisely match the surface contours of the part being restored.
16. If necessary, temporarily apply several protective layers of filler to the area to be restored. Since painting plastic parts has a number of specific features, it is recommended to contact a paint shop to paint the restored part.
Steel body panels
Follow the sequence as shown in the illustrations provided
Removal minor scratches
17. If only the paintwork is scratched and the metal is not affected, it is very easy to remove the scratch. Rub the scratch area with restorer or very fine sanding compound to remove the thin layer of paint and wax coating around the scratch. Rinse the treated area with clean water.
18. Apply a thin layer of liquid paint to the scratch with a soft brush; repeat this operation several times until the paint surface is level. Allow the new paint to dry for at least two weeks, then polish the area with polishing compound and apply a protective wax coating.
19. If the scratch reaches the metal of the body, it may cause metal corrosion. Remove rust from metal with a pocket knife, then apply an anti-corrosion coating to prevent future corrosion. Using a rubber or nylon spatula, fill the scratch with spackling paste. If necessary, the paste can be diluted with solvent, which makes it possible to fill narrow scratches. Before the putty paste hardens, wrap your finger in a cotton cloth, soak it in solvent, then quickly run it along the scratch. In this case, the surface of the putty paste will be slightly pressed down. Next, the scratch can be painted over as described above.
Restoration of body parts with dents
20. When there are deep dents in the car body, the first task is to pull out the dent to return the body to its original shape. Since complete straightening of the dent is unlikely, it is advisable to straighten the dent to a level that is approximately 3 mm below the level of the undamaged part of the part. If a small dent forms, do not try to pull it out at all.
21. If the dent can be accessed from the inside, it can be carefully straightened out with a hammer with a wooden or plastic head. During the straightening process, it is necessary to press a suitable wooden block on the outside to absorb the blows of the hammer and thus prevent the metal from bulging outward.
22. If the dent is in a part of the body. having a double layer of metal, or if access from the inside is impossible for some other reasons, various techniques are used. Drill several small diameter holes into the damaged area, preferably in the deepest places. After this, screw long self-tapping screws into the holes so that they hold firmly in the metal. Straighten the dent by pulling out the screws with pliers.
23. The next stage of restoration is to remove paint from the damaged area and around it for about 2 cm. This can be done with a wire brush inserted into a drill, or manually, using sandpaper. To finish preparing the surface for the filler, use a screwdriver to make grooves in the metal surface or drill small holes in the damaged area. This will ensure good adhesion of the putty paste to the metal.
For final repair operations, see. section "Putty and painting".
Restoration of body parts with corrosion holes or deep damage
24. Using a metal brush attachment inserted into a drill, remove all paint from the surface to be restored and in the area adjacent to the damaged area at a distance of two centimeters. If such a device is not available, you can sand it manually using sandpaper.
25. After removing the paint, it is necessary to assess the degree of susceptibility to corrosion and decide whether to replace the part (if possible) or restoration of the damaged area. New body parts are not as expensive as most car enthusiasts think, and replacing parts is often a quicker and easier solution than trying to repair a large area of rust.
26. Remove all parts installed in the damaged area except those that will be needed as guides when forming the original surface. Then use metal shears or a hacksaw blade to cut away any metal that is heavily damaged by corrosion. Bend the edges of the hole inward with a hammer to create support when filling with spackle.
27. Use a wire brush to remove powdery rust from the remaining metal. Apply a rust converter to the damaged area; if the inside of the rusty area is accessible, treat that as well.
28. Before filling the damaged area with putty, it is necessary to somehow close the hole.
This can be done using aluminum or plastic mesh, or aluminum foil.
29. Once the hole is closed, you can proceed to puttying and painting the area being restored (see next section).
Putty and painting
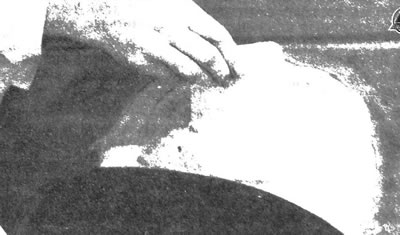
30. There are many types of putty pastes, but the best are considered to be polymerizing compounds, which are sold in kits containing a jar of paste and a tube of hardener. For the job, you will also need a wide, flexible plastic or nylon spatula with smooth, well-processed edges for final finishing of the putty surface. Mix up some putty on a clean piece of cardboard or plywood, carefully following the proportions of paste and hardener according to the manufacturer's instructions, otherwise the putty will harden too quickly, or never harden.
31. Using a spatula, apply the putty to the area to be restored and level it to obtain the required surface. When the contour of the putty surface is close to the required one, take a break from work. Otherwise, the putty will start to stick to the spatula. Continue applying thin layers of filler every twenty minutes until the filler level is equal to the surrounding metal.
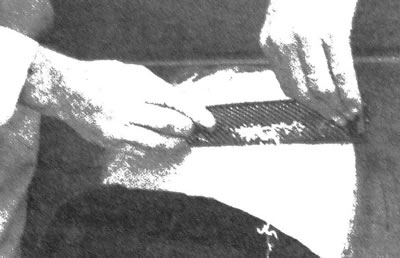
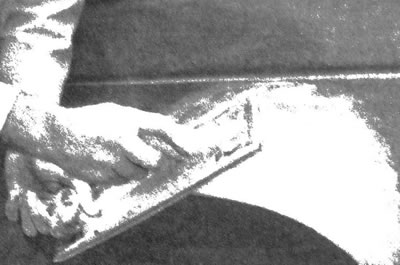
32. After the putty has hardened, you can remove the excess using a metal scraper or file. Further processing is carried out using sandpaper with gradually decreasing grain size: starting with paper of class 40 and ending with waterproof paper of class 400. Always wrap the sandpaper around a piece of flat rubber, cork, or a wooden block - otherwise the surface of the putty will not be smooth. In the process of smoothing the surface of the putty, the sandpaper must be periodically moistened with water.
33. The operation is completed when a ring of pure metal is formed around the restored area, which, in turn, is surrounded by a paint coating. Rinse the area to be repaired with clean water to remove all sanding residue.
34. Spray a thin layer of primer onto the area to be repaired - this will help to identify where the putty surface has defects. Remove these defects with freshly prepared putty and sand the area again with sandpaper. Repeat this procedure until the required quality of the repaired surface is achieved. Wash the surface with water and wait until it dries completely.
The following photos illustrate the restoration of body parts with small dents. The illustrations supplement the "Body Repair - Minor Damage" subsection of this chapter. The photos should not be used as the only guide when restoring body parts of the vehicles described in this manual.
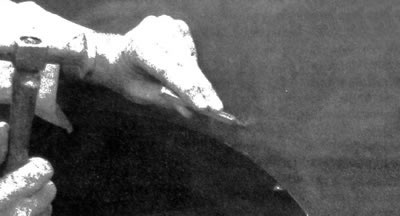
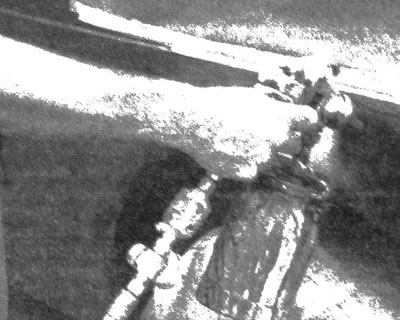
1. If it is not possible to push out the dent from the back side, remove it using a pulling tool. Drill or punch a hole at least 25 mm from the edge of the damaged area in the deepest part of the dent or on its edge...
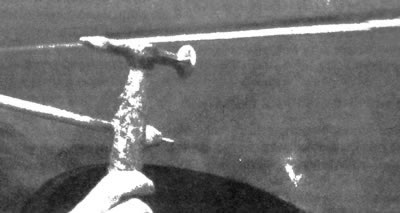
2. ... then insert the fixture's grip into the hole and pull it out. Tap with a hammer in the area of the outer edge of the dent, giving the body part its original shape. The dent should be pulled out until the damaged surface approaches its original contour. The surface of the dent after pulling out should be 3 mm below the level of the nearest undamaged section of the metal body part
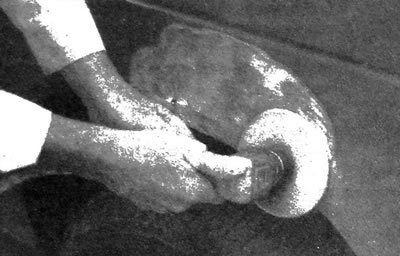
3. Remove the paint from the damaged surface down to the metal using a coarse abrasive grinding wheel or sandpaper. It is preferable to perform the operation using a power grinding device similar to the one shown in the illustration. Using sandpaper with a finer abrasive coating (class 320), remove paint from the area adjacent to the damaged area at a distance of 20 mm
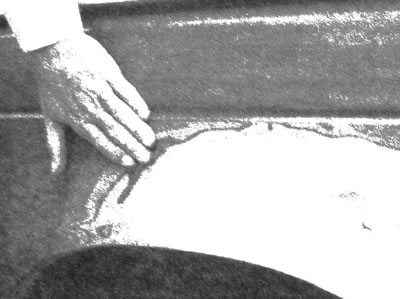
4. After removing the paint, it becomes possible to assess the quality of the dent removal by touch, which is more effective than a visual assessment. If necessary, perform additional pulling or pressing of the dented areas. Clean the area to be repaired with wax or silicone remover
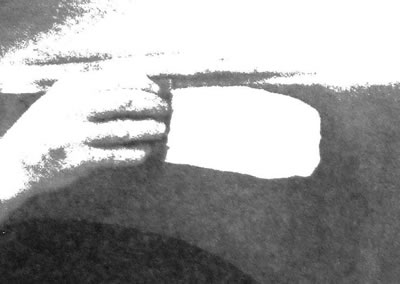
5. After carefully studying the accompanying instructions, prepare a solution of putty and hardener. Be sure to follow the proportions carefully, otherwise the putty will not harden properly or will harden too quickly (until the surface is finished filling and sanding)
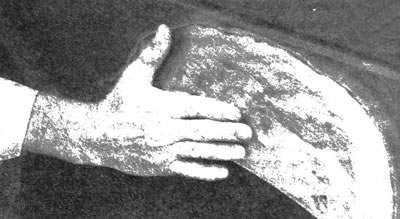
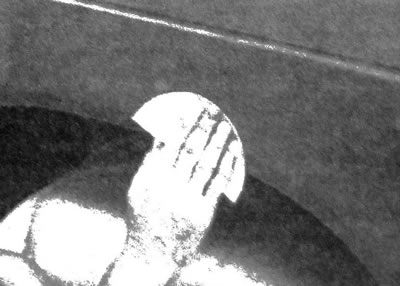
6. When leveling the surface with a plastic spatula, do not allow the plastic putty to harden, apply it tightly to the surface and achieve a strong adhesion. Apply the filler so that the restored surface has a contour similar to the original and slightly over the adjacent surfaces of undamaged metal body parts
7. Wait for the putty to harden. Hardening is considered complete if the putty cannot be pressed through with a fingernail. For rough surface finishing, use a bodywork file or the attachment shown in the illustration
8. Using a sanding block or sanding jig covered with coarse sandpaper, sand the filled surface until it is smooth. Finish sanding using 360 to 400 grit sandpaper or block
9. There should be no noticeable difference in level at the border between the putty and the metal, or the metal and the old paint. Perform final finishing of the treated surface, remove dust and abrasive material from adjacent metal body parts and trim panels
10. Apply several coats of primer to the area to be restored. Do not apply too much primer as this may cause runs. The next layer should be applied only after the previous layer has dried. The illustration shows a professional spray gun, but for this operation it is permissible to use an aerosol primer, which is available in most auto shops
11. Previously invisible defects of the restored surface may appear on the surface treated with primer. Remove them by applying varnish. Follow the accompanying instructions. After the varnish has hardened, sand the surface with fine-grained sandpaper of 360-400 grit. Apply varnish, sand and prime until a perfectly smooth surface is obtained
12. Perform a final sanding of the primed surface with 400 or 600 grit fine sandpaper to remove any unevenness in the primer layer. Rinse the area to be restored with water and wait until it dries completely. Wipe the area with a clean cloth to give it a final clean and apply the paint coat. Do not wax or polish the area to be restored until it is completely dry (at least two weeks)