
Description
1. The PARK/NEUTRAL position switch is an integral part of the gearbox range switch, located on the side of the gearbox, above the shaft of the mechanical gearbox lever (see illustration). The switch is an information sensor of the PCM control unit. One of the functions of the sensor is to prevent the engine from starting if the selector lever is not in the Park position, and to close the reverse signal circuit when the selector lever is moved to the Reverse position.
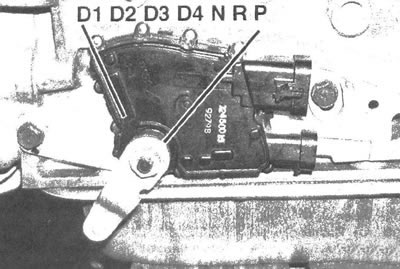
5.1 Position of the mechanical lever
Adjustment
2. Make sure that the engine can only be started when the selector is in the Park or Neutral positions. If this condition is not confirmed, the switch must be adjusted.
3. To do this, loosen the mounting bolts and, turning slightly from side to side, set the sensor in a position in which the engine will only start when the selector is in Park or Neutral. Tighten the mounting bolts.
Replacement
4. Disconnect the negative cable from the battery.
5. Apply the parking brake and move the gearshift lever to the Neutral position.
6. Locate the PARK/NEUTRAL (PNP) switch, which is located on the manual transmission lever (see illustration 5.1).
7. Disconnect the selector cable from the mechanical gearbox lever.
8. Disconnect the electrical connectors from the switch (PNP).
9. Unscrew the nut and remove the mechanical lever (see illustration).
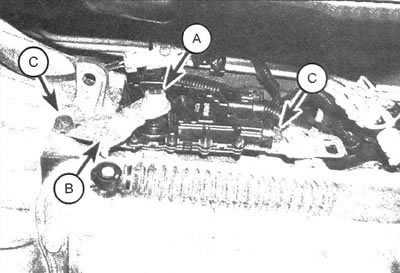
5.9. Unscrew the mechanical lever nut (A), remove the lever (B) and unscrew the sensor bolts (C)
Note: During this operation, the mechanical lever must not be moved from the Neutral position. If it is, place the lever loosely on the shift shaft and set it to the Neutral position before removing the PNP sensor (see illustration 5.1).
10. Unscrew the mounting bolts and disconnect the sensor from the gearbox (see illustration 5.9).
11. When installing a new sensor, it is necessary to align the slots (where the shaft is inserted) with protrusions on the body (see illustration). After this, the sensor can be placed on the shaft.
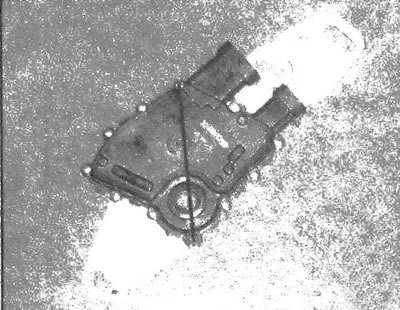
5.11. When installing the sensor, it is necessary to align the slots with the protrusions on the body - this way the sensor will be installed in a neutral position
12. When installing the removed sensor, it is necessary to simply align its planes with the planes on the shaft of the mechanical lever.
13. Install the sensor bolts and tighten them to the specified torque.
14. Install the mechanical lever and tighten its nut to the required torque.
15. Connect the selector cable and electrical connectors.
16. The rest of the assembly is carried out in the reverse order of removal.
[The article was borrowed from the website CHEVYMAN]