
Contents: Removal ↧ Installation ↧
Removal
Caution: It is necessary to remove the box without separating the torque converter from it. Leaving the torque converter connected to the drive plate may result in damage to the torque converter drive plate, pump bushing and seal. The drive plate is not designed to support a load, so care should be taken to ensure that the weight of the transmission is not concentrated on the plate during removal.
1. Disconnect the negative battery cable.
2. Raise the vehicle and support it on vertical stands. If necessary, remove the protective panel and its jumper.
3. Drain the transmission oil (see chapter 1).
4. Disconnect the transmission oil filler tube located on the right side of the engine.
5. Remove all exhaust system components that interfere with removal of the gearbox (see chapter 4). Remove the EVAP canister from its bracket located inside the left frame member and set it aside without disconnecting the hoses. Also remove the fuel tank heat shield.
6. Remove the rear propeller shaft (see chapter 8).
7. Support the engine with a hydraulic jack. Place a wooden block under the pallet.
8. Support the gearbox with a hydraulic jack (it is preferable to use a special jack, which can be rented). Attach the box to the jack with special chains.
9. Unscrew the nuts that secure the gearbox support to the body crossbar (see illustration 7.4a). Lift the box slightly and remove the jumper.
10. Lower the engine and transmission until the top and sides of the transmission are within reach.
11. When performing the procedure on all-wheel drive models, it is necessary to remove the transfer case (see chapter 7B).
12. Disconnect the selector cable from the mechanical lever (see subsection 3).
13. If necessary, remove the gearbox heat shield and disconnect the ventilation hose (see illustration).
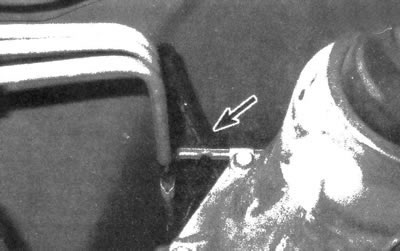
8.13. Disconnect the ventilation hose from the gearbox (marked with an arrow)
14. When performing the procedure on the left side of the transmission, disconnect the Park/Neutral switch electrical connector (see subsection 5), as well as the main wiring connector. Also disconnect the transmission wiring harness from all possible fasteners. Remove the fuel supply line bracket bolt attached to the gearbox on the left.
15. Remove the inspection plug located at the base of the gearbox housing and mark the original relative positions of the torque converter and drive disk (see illustration).
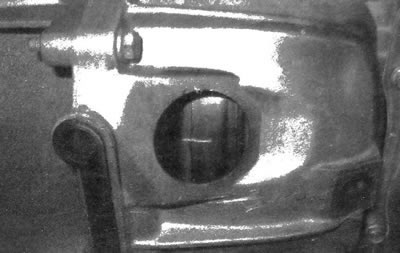
8.15. Pry up and remove the inspection plug and mark the original relative positions of the torque converter and drive disk
16. Unscrew the bolts securing the torque converter to the drive disk. Turn the crankshaft only in a clockwise direction (when viewed from the front).
17. Disconnect the transmission cooler lines connected to the right side of the transmission and engine (see illustrations). To disconnect the coolant line from the transmission, simply remove the plastic ring and pry up on the quick release clamp. Cap the lines to prevent coolant from leaking after disconnection. Inspect transmission cooler line O-rings prior to installation.
8.17a. Disconnect the cooler lines from the transmission...
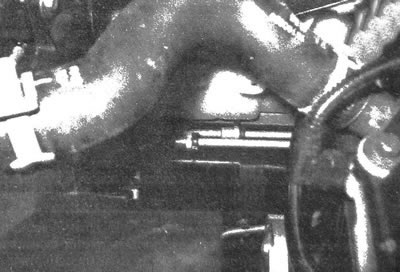
8.17b....and from the engine
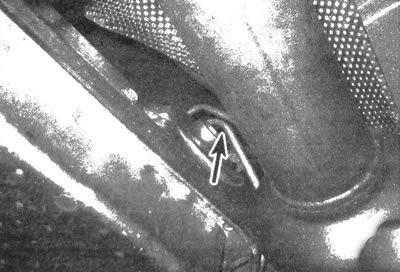
18. Attach the box to the jack with a safety chain and unscrew the bolts securing the box to the engine (see illustration). It is recommended to perform this operation using an articulated extension lever.

8.18. Remove the gearbox casing bolts (the lower left corner of the box is shown)
Note: The top bolts are easier to remove after the box is lowered (see next point).
19. Lower the transmission and engine slightly and remove the oil filler tube/dipstick bracket bolt. Pull the tube out of the gearbox. Don't lose the tube seal (if there is no damage, it can be used for further operation).
20. Attach the clamp to the gearbox housing, passing it through the lower inspection hole. The clamp should pass in front of the torque converter, behind the drive disk. This will prevent the torque converter from falling off when the gearbox is removed. Move the transmission rearward to disengage it from the cylinder block mounting pins and ensure that the torque converter is disengaged from the drive shaft. Lower the box with a jack.
Installation
21. Before installation, make sure that the torque converter is securely connected to the pump. If the fluid coupling was removed, apply a small amount of transmission fluid to the rear hub of the torque converter, on the contact surface with the front transmission seal. Install the torque converter in front of the transmission input shaft. When installing, it is necessary to rotate the torque converter from side to side. Thus, the fluid coupling should connect to the front pump of the automatic transmission. To ensure the reliability of the connection of the torque converter, apply a ruler to the mating surface of the engine with the gearbox. Make sure the torque converter tabs are at least 19 mm below the straight edge. Reinstall the clamp to secure the torque converter in this position.
22. Jack up and place the attached gearbox in its original location.
23. Rotate the torque converter to align its holes with the holes in the drive disc. In this case, the marks, the application of which is described in paragraph, must be aligned. 15.
24. Carefully push the gearbox forward until the mounting pins connect with the torque converter. Make sure of that. that the box fits tightly to the engine without any gap. If there is a gap, make sure that there is no wire or other element pinched between the units. Also make sure the torque converter is securely connected to the front transmission pump. Try turning the torque converter - if it doesn't feel light, the torque converter may not be fully engaged with the pump. If necessary, lower the transmission and install the torque converter correctly.
25. Install the dipstick tube and its seal into the gearbox casing. Install and tighten the engine mounting bolts securely. When tightening the bolts, make sure that the gearbox fits evenly against the power unit. If unevenness in the fit of the units is detected, determine the cause. It is forbidden to pull the gearbox together with the engine when tightening the bolts - this may crack the gearbox casing.
26. Lift the rear of the box and install the load-bearing crossbar.
27. Remove the jacks that were used to support the engine and gearbox from under the car.
28. Install the torque converter mounting bolts to the drive shaft. Tighten the fasteners to the required torque.
Note: All fasteners must be installed before tightening bolts.
29. Install new retaining rings onto the coolant line quick release couplings.
Note: Do not pull the retaining rings onto the couplings. Instead, hook one end of the retainer into the slot in the coupling and rotate the other end of the ring into the other slot. If the retaining ring does not install as described, it may have become loose and is no longer suitable for securely connecting the coolant lines. Connect the lines to the couplings and snap the connectors into place. Place the plastic caps on the couplings.
30. Connect the gearbox electrical connectors and install the heat shield.
31. Connect the selector cable (see subsection 3).
32. Install the torque converter service cover.
33. If necessary, install the transfer case (see chapter 7B).
34. Install the driveshaft (see chapter 8).
35. Adjust the selector cable (see subsection 3).
36. Install and connect all exhaust system components (see chapter 4).
37. Remove the supports and lower the vehicle.
38. Fill the transmission with the correct type of transmission fluid (see chapter 1), start the engine and check for leaks.
The article is reprinted from the website «ChevyMan»