


Signs of a malfunction - roof
Important: If the suspected cause of the sunroof malfunction is a power failure to the sunroof module, the sunroof must be recalibrated.
Important: Before using the symptom charts, you must complete the following steps.
1. View the system operation to become familiar with the system's functions. See "General description and operation of the system" in this section.
Visual inspection / physical control
- Inspect for aftermarket equipment that may affect the operation of the power sunroof system.
- Inspect easily accessible and visible parts of the system for obvious signs of damage or conditions that could lead to malfunction.
Intermittent fault
Faulty electrical connections or wiring may cause intermittent faults. See Section 9A, "Body Wiring Systems".
List of signs of malfunction
How to diagnose the symptom is described in the symptom diagnosis procedure. See "Power sunroof does not work".
Electric sunroof not working
| Step | Operation | Values | Yes | No |
| 1 |
Recalibrate the sunroof.
Is the system working properly?
|
-
|
Go to Step 2
|
|
| 2 |
Is the indicator light on?
|
-
|
Go to Step 3
|
Go to Step 10
|
| 3 |
Is battery voltage present on all switch signal circuits?
|
-
|
Go to Step 8
|
Go to Step 4
|
| 4 |
Is battery voltage present on any of the switch signal circuits?
|
-
|
Go to Step 9
|
Go to Step 5
|
| 5 |
Is the indicator light on?
|
-
|
Go to Step 6
|
Go to Step 11
|
| 6 |
Is the indicator light on?
|
-
|
Go to Step 7
|
Go to Step 12
|
| 7 |
Connect a test lamp between the battery voltage circuit and the ground terminal on the sunroof motor/drive harness connector.
Is the indicator light on?
|
-
|
Go to Step 15
|
Go to Step 13
|
| 8 |
Connect a fused jumper wire between each switch signal circuit at the switch harness connector and ground.
Does the sunroof actuator work when connected to a fuse jumper instead of a switch?
|
-
|
Go to Step 14
|
Go to Step 15
|
| 9 |
Check the faulty switch signal circuit for an open or short to ground.
Has the cause been found and corrected?
|
-
|
Go to Step 18
|
Go to Step 15
|
| 10 |
Repair open or high resistance in sunroof control switch ground circuit.
Is the renovation finished?
|
-
|
Go to Step 18
|
-
|
| 11 |
Repair open or short to ground in sunroof motor/drive battery voltage supply circuit.
Is the renovation finished?
|
-
|
Go to Step 18
|
-
|
| 12 |
Repair open or short to ground in sunroof motor/actuator ignition voltage signal circuit. See. Section 9A, "Testing Circuits and Repairing Wiring".
Is the renovation finished?
|
-
|
Go to Step 18
|
-
|
| 13 |
Repair open or high resistance in sunroof motor/drive ground circuit.
Is the renovation finished?
|
-
|
Go to Step 18
|
-
|
| 14 |
Inspect the sunroof switch harness connector for poor connections.
Has the cause been found and corrected?
|
-
|
Go to Step 18
|
Go to Step 16
|
| 15 |
Inspect the sunroof motor/drive harness connector for poor connections.
Has the cause been found and corrected?
|
-
|
Go to Step 18
|
Go to Step 17
|
| 16 |
Replace Sunroof Switch. Go to "Power sunroof control switch" in this section.
Is the replacement complete?
|
-
|
Go to Step 18
|
-
|
| 17 |
Replace sunroof motor.
Is the replacement complete?
|
-
|
Go to Step 18
|
-
|
| 18 |
Operate the system to check if the problem has been corrected.
Has the cause been eliminated?
|
-
|
The system is normal
|
Go to Step 1
|
Recalibration
Terms and Conditions
Some customers have expressed criticism that the sunroof does not close completely or that once it reaches the closed position it does not stop and continues to operate until it reaches the ventilation position.
Description of recalibration
The sunroof control unit (SCU) is designed to memorize the closing and opening stages. However, the above conditions may occur due to the loss of the stored position data. The stored position data may be lost when the operating current greatly exceeds the set operating current value, 3.5 ~ 4.0 amperes, because a foreign body has entered the sunroof guide or an object is blocking the closing of the sunroof during its operation.
SCU recalibration procedures
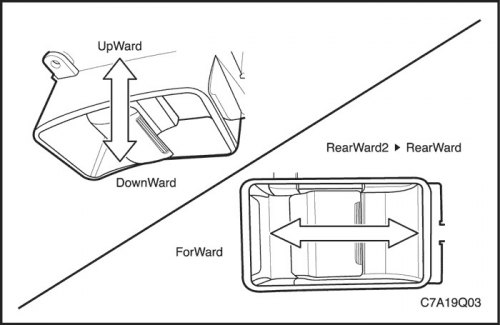
1. Press and hold the switch in the rear direction until the sunroof opens at an angle. When the sunroof is fully open, release the switch.
1. Press and hold the switch in the rear direction until the sunroof opens at an angle. When the sunroof is fully open, release the switch.
Important: If the sunroof opens slightly and stops, release, then press and hold the switch again. Repeat this action until the sunroof opens completely.
2. If the sunroof stops while closing, push the switch forward and hold it until the sunroof is completely closed.
3. Press the switch in the rear direction until the sunroof is fully open within 15 seconds.
4. Confirm the recalibration operations by performing the sunroof opening and closing processes.
[The original text can be found on the website: «ChevyMan.ru»]