
ChevyMan.ru
Mazda Mitsubishi Toyota Land Rover Honda Kia Nissan
English Русский
Български
Беларускі
Український
Српски
Hrvatski
Română
Polski
Slovenský
Magyar
|
Articles | Sitemap | Contacts |


Home   Aveo   Captiva   Cruze   Lacetti   Lanos   Niva   Tahoe   Others  
Orlando 1 (2010-2018) Trailblazer 1 (2001-2008, petrol) Lumina 1 (1989-1994)
  • Home
  • Chevrolet
  • Lumina 1
  • Transmission
  • Automatic gearbox
  • Replacing and adjusting the neutral switch

Replacing and adjusting the neutral switch (Chevrolet Lumina 1)

            0

Contents: Replacement ↧ Adjustment ↧

Replacement


1. Disconnect the cable from the negative terminal of the battery.

2. Set the gearbox to neutral.

3. Raise the hood. Disconnect the electrical and vacuum connectors of the "cruise control" system (if there is one on the car). Remove the system to gain access to the neutral switch.

4. Locate the wiring harness from the neutral switch and disconnect it.

5. Unscrew the nut and disconnect the selector from the gearbox (see illustration).
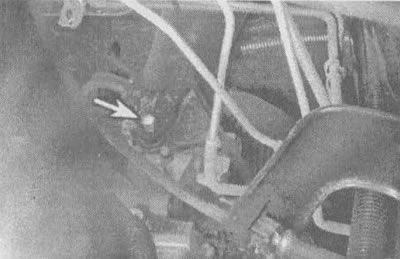
4.5. Unscrew the nut (shown by arrow) and install the selector so that the switch can be removed

4.5. Unscrew the nut (shown by arrow) and install the selector so that the switch can be removed


6. Loosen the bolts and disconnect the commutator (see illustration).
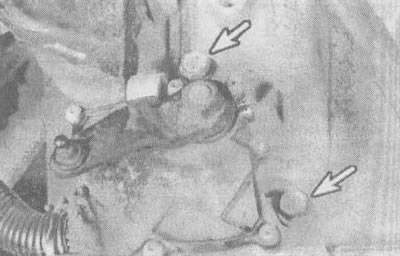
4.6. Bolts fixing the neutral switch (shown by arrows)

4.6. Bolts fixing the neutral switch (shown by arrows)


7. To install the new switch, align the flat surfaces of the shift rod with the flat surfaces of the switch and lower it onto the rod.

8. Replace the bolts (tighten). If the switch is new and the rod has not moved, tighten the bolts. If the switch needs adjustment, leave the bolts loose and follow the adjustment procedure below. The subsequent installation steps correspond to the disassembly steps, performed in reverse order.

Adjustment


9. Align the mark on the switch with the inner mark on the selector shaft and tighten the bolts (see illustration). Some later models have a special adjustment hole. On these models, rotate the switch to align the adjustment hole with the hole in the selector, insert the 3/32-inch head, and tighten the switch bolts.
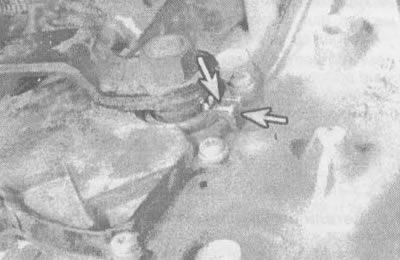
4.9. The outer mark must coincide with the inner mark located on the selector shaft

4.9. The outer mark must coincide with the inner mark located on the selector shaft


10. Connect the cable to the negative terminal of the battery and check the engine start in the "neutral" or "park" position.

The article was checked: Vladimir Romannikov
This article is available at russian, bulgarian, belarusian, ukrainian, serbian, croatian, romanian, polish, slovak, hungarian

Share information:

Previous articles
Lumina 1: Automatic gearbox
Next articles

Replacing and adjusting the throttle valve
General questions about checking automatic transmission
General information about automatic transmission
Automatic transmission technical data
Replacement and adjustment of the selector cable
Replacement and installation of the parking/lock cable
Replacing the differential oil seal
Checking and replacing the gearbox mount
Removal and installation of automatic transmission


See similar articles on the topic of Chevrolet cars:
Replacing the outside handle and front door lock switch Chevrolet Aveo T300 (2012-2018)
Adjusting the automatic transmission range switch Chevrolet Captiva 1 (2006-2018)
Replacing the electric window control switch unit Chevrolet Cruze 1 (2008-2016)
Replacing the contact group, immobilizer control unit and ignition switch Chevrolet Lacetti 1 (2002-2009)
Replacing the contact group and cylinder mechanism of the ignition switch Chevrolet Lanos T150 (2002-2009)
Adjusting the position of the brake light switch Chevrolet Niva 1 (2002-2016)
Checking, adjusting and replacing drive belts of attachments Chevrolet Tahoe 1 (1992-2000)
Link in different formats to this page


Visitor comments

No comments yet


How much will 46 + 10 =


Orlando 1 (2010-2018) 
  • General information
  • Introduction to manual
  • User manual
  • Maintenance
  • Troubleshooting
  • Power unit
  • Engine repair
  • Fuel and control system
  • Cooling and lubrication system
  • Ignition system
  • Transmission
  • Clutch
  • Gearbox
  • Drive shafts
  • Chassis
  • Car suspension
  • Steering
  • Brake system
  • Body
  • Exterior (external elements)
  • Doors, locks and windows
  • Electrical equipment
  • Equipment and devices
  • Windscreen wipers
  • Power devices
  • Electrical diagrams


Trailblazer 1 (2001-2008) 
  • General information
  • User manual
  • Troubleshooting
  • Maintenance
  • Power unit
  • Engine in a car
  • Engine overhaul
  • Cooling and heating
  • Fuel and exhaust system
  • Engine electrical equipment
  • Engine control
  • Transmission
  • Automatic gearbox
  • Transfer case
  • Drive shafts and cardan
  • Chassis
  • Brake system
  • Car suspension
  • Steering
  • Body
  • Exterior (external elements)
  • Interior (internal elements)
  • Doors, locks and windows
  • Electrical equipment
  • Equipment and devices
  • Electrical circuits


Lumina 1 (1989-1994) 
  • General information
  • Maintenance
  • Power unit
  • Engine 3.1L V6
  • Engine 3.8L V6
  • Engine overhaul
  • Cooling system
  • Power and exhaust system
  • Fuel injection
  • Engine electrical equipment
  • Reduced exhaust gas toxicity
  • Transmission
  • Automatic gearbox
  • Drive shafts
  • Chassis
  • Brake system
  • Car suspension
  • Steering
  • Body
  • Heating and air conditioning
  • Repair of body elements
  • Doors, covers and windows
  • Interior (internal elements)
  • Electrical equipment
  • Equipment and devices
  • Electrical circuits


ChevyMan.ru © 2017-2026 · Mobile version · Feedback · Site search · Interesting to read · Sitemap: EN BG BY UA RS HR RO PL SK HU

Aveo 2003-2008 · Aveo 2006-2011 · Aveo 2012-2018 · Captiva 2006-2018 · Cruze 2008-2016 · Lacetti 2002-2009 · Lanos 2002-2009 · Niva 2002-2016 · Tahoe 1992-2000 · Tahoe 2000-2014 · Lumina 1 1989-1994 · Trailblazer 1 2001-2008 · Orlando 1 2010-2018 ·
🛡️ For your security and to improve our service, this site uses cookies. You can disable them in your browser.