ChevyMan.ru
Mazda Mitsubishi Toyota Land Rover Honda Kia Nissan
English Русский
Български
Беларускі
Український
Српски
Hrvatski
Română
Polski
Slovenský
Magyar
|
Articles | Sitemap | Contacts |


Home   Aveo   Captiva   Cruze   Lacetti   Lanos   Niva   Tahoe   Others  
Orlando 1 (2010-2018) Trailblazer 1 (2001-2008, petrol) Lumina 1 (1989-1994)
  • Home
  • Chevrolet
  • Trailblazer 1
  • Chassis
  • Steering
  • Power steering pump — removal and installation

Power steering pump — removal and installation (Chevrolet Trailblazer 1)

            0

1. Disconnect the negative battery cable.

2. Remove the upper radiator fan shroud (see chapter 3), as well as a serpentine drive belt (see chapter 1).

3. Place a drain pan under the power steering pump. Using a spanner, unscrew the supply hose nipple from the pump (see illustration). Loosen the clamp and disconnect the coolant hose from the pump. Plug the hoses to prevent clogging of the system.

22.3. Disconnect the fluid supply hose from the power steering pump (right arrow), as well as a…

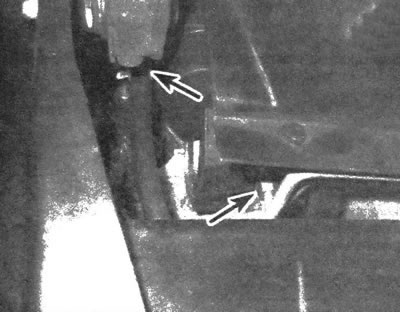
22.3. Disconnect the fluid supply hose from the power steering pump (right arrow), as well as a liquid drain hose (left arrow)


4. Disconnect the wiring harness from the retainer located on the pump.

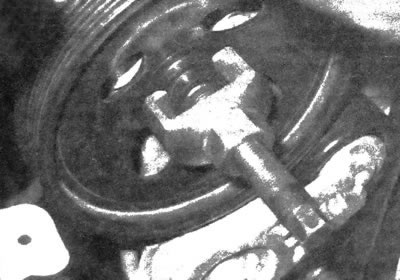
5. Unscrew the fasteners (see illustration) and remove the pump from the vehicle, avoiding any liquid spillage on painted body surfaces.

22.5. Access to the pump mounting bolts is through its pulley

22.5. Access to the pump mounting bolts is through its pulley


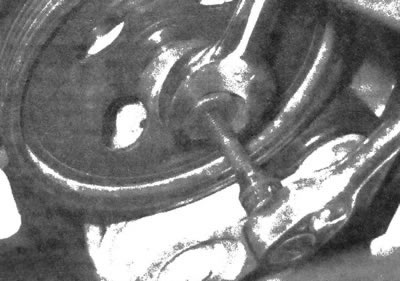
6. If necessary, use a special puller to remove the pulley from the pump (see illustration).

22.6. Using a special puller, remove the pulley from the pump

22.6. Using a special puller, remove the pulley from the pump


Installation


7. Using a special tool, press the pulley onto the pump shaft (see illustration). The device can be made independently from a long bolt, nut, washer and socket head with a diameter equal to the diameter of the pulley hub. Press the pulley on until the front of the hub is flush with the shaft, but no further.

22.7. Press on the pulley using a special tool; do not install the pulley using a hammer or…

22.7. Press on the pulley using a special tool; do not install the pulley using a hammer or conventional press


8. Place the pump on the bracket and install the mounting bolts or nuts. Tighten the fasteners to the required torque.


9. Connect the hoses to the pump. Tighten the fittings securely.

10. Install the drive belt and fan shroud.

11. Fill the power steering reservoir with the appropriate fluid (see chapter 1) and bleed the system as described in the next subsection.

The article was checked: Vladimir Romannikov
This article is available at russian, bulgarian, belarusian, ukrainian, serbian, croatian, romanian, polish, slovak, hungarian

Share information:

Previous articles
Trailblazer 1: Steering
Next articles

Steering gear — removal and installation
Steering Gear Covers — Replacement
Tie rod ends — removal and installation
Intermediate shaft — removal and installation
Steering column — removal and installation
Power Steering Fluid Cooler — Removal and Installation
Power steering hydraulic system — bleeding


See similar articles on the topic of Chevrolet cars:
Replacing the power steering pump Chevrolet Aveo T300 (2012-2018)
Power Steering Pump Diagnostics Chevrolet Captiva 1 (2006-2018)
Checking and replacing the power steering pump drive belt Chevrolet Cruze 1 (2008-2016)
Removal the power steering pump Chevrolet Lacetti 1 (2002-2009)
Removal the power steering pump Chevrolet Lanos T150 (2002-2009)
Adjusting the tension of the water pump drive belt and the power steering pump drive belt Chevrolet Niva 1 (2002-2016)
Power steering pump pulley Chevrolet Tahoe 2 and 3 (2000-2014)
Link in different formats to this page


Visitor comments

No comments yet


How much will 35 + 44 =


Orlando 1 (2010-2018) 
  • General information
  • Introduction to manual
  • User manual
  • Maintenance
  • Troubleshooting
  • Power unit
  • Engine repair
  • Fuel and control system
  • Cooling and lubrication system
  • Ignition system
  • Transmission
  • Clutch
  • Gearbox
  • Drive shafts
  • Chassis
  • Car suspension
  • Steering
  • Brake system
  • Body
  • Exterior (external elements)
  • Doors, locks and windows
  • Electrical equipment
  • Equipment and devices
  • Windscreen wipers
  • Power devices
  • Electrical diagrams


Trailblazer 1 (2001-2008) 
  • General information
  • User manual
  • Troubleshooting
  • Maintenance
  • Power unit
  • Engine in a car
  • Engine overhaul
  • Cooling and heating
  • Fuel and exhaust system
  • Engine electrical equipment
  • Engine control
  • Transmission
  • Automatic gearbox
  • Transfer case
  • Drive shafts and cardan
  • Chassis
  • Brake system
  • Car suspension
  • Steering
  • Body
  • Exterior (external elements)
  • Interior (internal elements)
  • Doors, locks and windows
  • Electrical equipment
  • Equipment and devices
  • Electrical circuits


Lumina 1 (1989-1994) 
  • General information
  • Maintenance
  • Power unit
  • Engine 3.1L V6
  • Engine 3.8L V6
  • Engine overhaul
  • Cooling system
  • Power and exhaust system
  • Fuel injection
  • Engine electrical equipment
  • Reduced exhaust gas toxicity
  • Transmission
  • Automatic gearbox
  • Drive shafts
  • Chassis
  • Brake system
  • Car suspension
  • Steering
  • Body
  • Heating and air conditioning
  • Repair of body elements
  • Doors, covers and windows
  • Interior (internal elements)
  • Electrical equipment
  • Equipment and devices
  • Electrical circuits


ChevyMan.ru © 2017-2026 · Mobile version · Feedback · Site search · Interesting to read · Sitemap: EN BG BY UA RS HR RO PL SK HU

Aveo 2003-2008 · Aveo 2006-2011 · Aveo 2012-2018 · Captiva 2006-2018 · Cruze 2008-2016 · Lacetti 2002-2009 · Lanos 2002-2009 · Niva 2002-2016 · Tahoe 1992-2000 · Tahoe 2000-2014 · Lumina 1 1989-1994 · Trailblazer 1 2001-2008 · Orlando 1 2010-2018 ·
🛡️ For your security and to improve our service, this site uses cookies. You can disable them in your browser.