ChevyMan.ru
Mazda Mitsubishi Toyota Land Rover Honda Kia Nissan
English Русский
Български
Беларускі
Український
Српски
Hrvatski
Română
Polski
Slovenský
Magyar
|
Articles | Sitemap | Contacts |


Home   Aveo   Captiva   Cruze   Lacetti   Lanos   Niva   Tahoe   Others  
Orlando 1 (2010-2018) Trailblazer 1 (2001-2008, petrol) Lumina 1 (1989-1994)
  • Home
  • Chevrolet
  • Trailblazer 1
  • Chassis
  • Steering
  • Intermediate shaft — removal and installation

Intermediate shaft — removal and installation (Chevrolet Trailblazer 1)

            0

1. Park the car with its wheels facing straight ahead. Disconnect the negative battery cable. Disable the SRS system (see chapter 12).

2. Turn the ignition switch to the LOCK position to lock the steering column shaft.

Caution: Failure to comply with this requirement may result in damage to the spring mechanism.


3. When performing the procedure in the engine compartment, mark the original relative positions of the upper and lower intermediate steering shafts (see illustration). Loosen the nut of the tie rod and remove the bolt that holds the upper and lower intermediate shafts together. Mark the direction of bolt insertion (when installing, the bolt should be inserted in the original direction).

18.3. Mark the initial relative positions of the upper and lower sections of the intermediate…

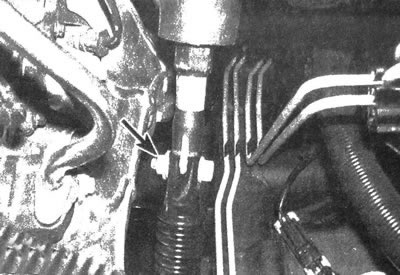
18.3. Mark the initial relative positions of the upper and lower sections of the intermediate shaft, then unscrew the nut and remove the tightening bolt


4. Mark the relative positions of the lower intermediate shaft and the primary shaft of the steering gear, then remove the tie bolt that holds these shafts together (see illustration 21.3).

5. Pull down the lower section of the intermediate shaft and disconnect it from the upper intermediate shaft. After this, disconnect the lower shaft from the steering gear.


6. If it is necessary to remove the upper intermediate shaft, perform the procedure as described in paragraph. 7 in subsection 17.

7. Installation is carried out in the reverse order of removal. Align the alignment marks and tighten the nut/bolt of the turnbuckle and the tie rod bolt to the steering gear to the required torques.

The article was checked: Vladimir Romannikov
This article is available at russian, bulgarian, belarusian, ukrainian, serbian, croatian, romanian, polish, slovak, hungarian

Share information:

Previous articles
Trailblazer 1: Steering
Next articles

Steering column — removal and installation
Steering wheel — removal and installation
Tie rod ends — removal and installation
Steering Gear Covers — Replacement
Steering gear — removal and installation
Power steering pump — removal and installation
Power Steering Fluid Cooler — Removal and Installation


See similar articles on the topic of Chevrolet cars:
Replacing the wheel drive shaft seal Chevrolet Aveo T250 (2006-2011)
Disassembling the intermediate drive shaft Chevrolet Captiva 1 (2006-2018)
Secondary shaft repair Chevrolet Cruze 1 (2008-2016)
Removal the intermediate steering shaft Chevrolet Lacetti 1 (2002-2009)
Removal the intermediate pipe Chevrolet Lanos T150 (2002-2009)
Oil pump drive shaft and gears Chevrolet Niva 1 (2002-2016)
Lower intermediate steering shaft Chevrolet Tahoe 2 and 3 (2000-2014)
Link in different formats to this page


Visitor comments

No comments yet


How much will 27 + 36 =


Orlando 1 (2010-2018) 
  • General information
  • Introduction to manual
  • User manual
  • Maintenance
  • Troubleshooting
  • Power unit
  • Engine repair
  • Fuel and control system
  • Cooling and lubrication system
  • Ignition system
  • Transmission
  • Clutch
  • Gearbox
  • Drive shafts
  • Chassis
  • Car suspension
  • Steering
  • Brake system
  • Body
  • Exterior (external elements)
  • Doors, locks and windows
  • Electrical equipment
  • Equipment and devices
  • Windscreen wipers
  • Power devices
  • Electrical diagrams


Trailblazer 1 (2001-2008) 
  • General information
  • User manual
  • Troubleshooting
  • Maintenance
  • Power unit
  • Engine in a car
  • Engine overhaul
  • Cooling and heating
  • Fuel and exhaust system
  • Engine electrical equipment
  • Engine control
  • Transmission
  • Automatic gearbox
  • Transfer case
  • Drive shafts and cardan
  • Chassis
  • Brake system
  • Car suspension
  • Steering
  • Body
  • Exterior (external elements)
  • Interior (internal elements)
  • Doors, locks and windows
  • Electrical equipment
  • Equipment and devices
  • Electrical circuits


Lumina 1 (1989-1994) 
  • General information
  • Maintenance
  • Power unit
  • Engine 3.1L V6
  • Engine 3.8L V6
  • Engine overhaul
  • Cooling system
  • Power and exhaust system
  • Fuel injection
  • Engine electrical equipment
  • Reduced exhaust gas toxicity
  • Transmission
  • Automatic gearbox
  • Drive shafts
  • Chassis
  • Brake system
  • Car suspension
  • Steering
  • Body
  • Heating and air conditioning
  • Repair of body elements
  • Doors, covers and windows
  • Interior (internal elements)
  • Electrical equipment
  • Equipment and devices
  • Electrical circuits


ChevyMan.ru © 2017-2026 · Mobile version · Feedback · Site search · Interesting to read · Sitemap: EN BG BY UA RS HR RO PL SK HU

Aveo 2003-2008 · Aveo 2006-2011 · Aveo 2012-2018 · Captiva 2006-2018 · Cruze 2008-2016 · Lacetti 2002-2009 · Lanos 2002-2009 · Niva 2002-2016 · Tahoe 1992-2000 · Tahoe 2000-2014 · Lumina 1 1989-1994 · Trailblazer 1 2001-2008 · Orlando 1 2010-2018 ·
🛡️ For your security and to improve our service, this site uses cookies. You can disable them in your browser.