


Contents: Turning the audio system on/off ↧ Mute sound ↧ Low frequency adjustment ↧ Adjusting mid frequencies ↧ High frequency adjustment ↧ Adjusting the speaker volume… ↧ Adjusting the speaker volume balance… ↧ Setting up the equalizer ↧ Turning on the radio ↧ Function "REG" ↧ "AF" function ↧ "PS Freeze" function ↧ Setting up a radio station ↧ Scan mode ↧ Saving radio stations manually ↧ Saving radio stations automatically ↧ Listening to saved radio stations ↧ PTY function ↧ Receiving information about the… ↧ Play CD ↧ Audio system with CD changer ↧ Selecting folders for playback ↧ Selecting a track to play ↧ Shuffle Playback ↧ Displaying CD information ↧ Playlist (MP3/WMA) ↧ Sort tracks by album title or artist… ↧ Ejecting the disc ↧ Connecting external audio devices ↧
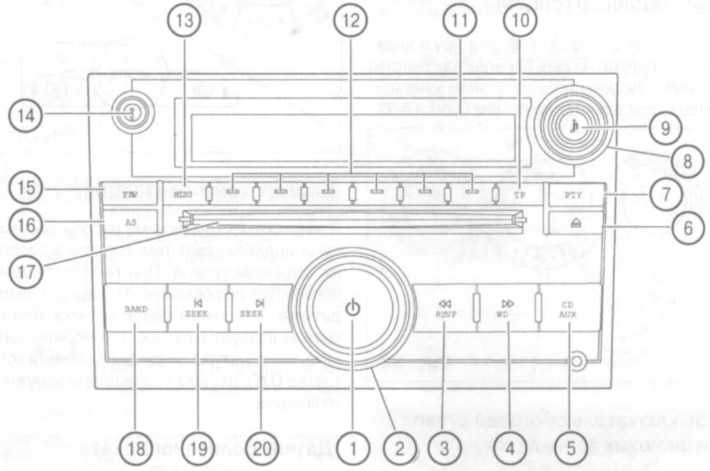
- 1. Power button
- 2. Volume control
- 3. Radio station selection button in descending frequency/CD track in reverse order (REV)
- 4. Radio station selection button in ascending frequency/CD track order in forward order (FWD)
- 5. CD/AUX mode selection button
- 6. CD Eject Button (EJECT)
- 7. Radio wave range/CD recording format selection button (RTU)
- 8. Button for changing radio stations/CD tracks/speaker balance
- 9. Equalizer button
- 10. Road information settings button
- 11. Information display
- 12. Function settings button
- 13. Menu setting button (MENU)
- 14. Radio wave/CD information output button (i)
- 15. Button for selecting a group of tuned radio waves (FAV)
- 16. Automatic radio tuning button (AS)
- 17. Slot for installing CD
- 18. Radio wave range selection button (BAND)
- 19. Radio station search button
- 20. CD tracks in direct order (SEEK)
Turning the audio system on/off
To turn on the audio system, press button (1) once. To turn it off completely, press and hold button (1) for a few seconds.
Mute sound
To turn off the sound, press button (1) once. Pressing button (1) again will restore the sound.
Low frequency adjustment
Press the button (9), then press the "Bass" button (12) and, turning the knob (8), set the desired level of low frequencies. After 5 seconds, the settings will be automatically saved. To reset the low frequency settings, press and hold the "Bass" button (12) for several seconds.
Adjusting mid frequencies
Press the button (9), then press the "Mid" button (12) and, turning the knob (8), set the desired midrange level. After 5 seconds, the settings will be automatically saved. To reset the midrange settings, press and hold the "Bass" button (12) for a few seconds.
High frequency adjustment
Press the button (9), then press the "Treb" button (12) and, turning the knob (8), set the desired high frequency level. After 5 seconds, the settings will be automatically saved. To reset the high frequency settings, press and hold the "Bass" button (12) for several seconds.
Adjusting the speaker volume balance(left/right)
Press the button (9), then press the "Bal" button (12) and, turning the knob (8), set the desired system sound balance. After 5 seconds, the settings will be automatically saved. To reset the balance settings, press and hold the "Bal" button (12) for several seconds.
Adjusting the speaker volume balance (front/rear)
Press the button (9), then press the "Fade" button (12) and, turning the knob (8), set the desired system sound balance. After 5 seconds, the settings will be automatically saved. To reset the balance settings, press and hold the "Fade" button (12) for several seconds.
Setting up the equalizer
To select one of the EQ presets, press the button (9), then press the "AUTO EQ" button (12). The following inscriptions will appear on the display: "Roar" (Pop), "Rock" (Rock), "Ctry" (Country), "Talk" (Speech), "Jazz" (Jazz) and "Clas" (Classical). Press the button (12) located under the desired equalizer mode.
Turning on the radio
If the audio system is in CD mode, press button (18) to turn on the radio.
Function "REG"
If the vehicle leaves the coverage area of the radio station you are listening to, the audio system may automatically switch to a different version of the same radio station in the new region. When the "REG" function is turned on, this automatic switching is blocked.
To turn on the "REG" function, press the button (13), then press the "RDS" button (12). Press the "REG" button (12). The display will show "REG".
"AF" function
If the "AF" function is enabled, when the reception quality of the radio station you are listening to deteriorates, the audio system switches to an alternative frequency with better reception quality.
To turn on the "AF" function, press the button (13), then press the "RDS" button (12). Press the "AF" button (12). The display will show "AF".
"PS Freeze" function
If the "PS Freeze" function is enabled, when you select a radio station from the preset channel list, only the name of that station is displayed on the display.
To activate the "PS Freeze" function, press the button (13), then press the "RDS" button (12). Press the "PS Freeze" button (12). The display will show "PS Freeze".
Setting up a radio station
The radio receiver wave is adjusted manually by pressing buttons (3), (4) or (8). To adjust the wave in automatic scanning mode, press button (19/20).
Scan mode
To scan the range, press the button (18), then press and hold the button (19/20). The display will show "Scanning". To finish scanning, press the button (19/20) again.
Saving radio stations manually
The radio station frequency can be saved in one of two groups ("AUTO P1", "AUTO P2"), each of which contains 6 channels. Set the frequency of the required radio station and use the "FAV" button (15) to select the group to save. Press and hold the button (12) to save the radio station frequency in one of the channels. After saving is complete, a beep sounds.
Saving radio stations automatically
To enable/disable the automatic saving function of radio stations, press the AS button (16), then press the button "ON" / "OFF" (12) To start the automatic saving procedure, press the "AS" button (16), then press the "Rese" button (12). After saving is complete, press the i button (12).
Listening to saved radio stations
To listen to a saved radio station, press the FAV button (15) and select one of the groups ("AUTO P1", "AUTO P2"). Using the button (12), select the channel in which the desired radio station is saved.
PTY function
In addition to the station name, FM radio programs contain information about the program category. The radio, audio function can display the station name and program category on the display. Possible categories include "CULTURE", "TRAVEL" (trips), "JAZZ", "SPORT", "NEWS", "EPOP", "ROCK" and "CLASSICS".
To select a category, press the "RTU" button (7), which selects between groups of categories (10 groups, 3 categories in each). Press the button (12) corresponding to the desired category.
Manual tuning of radio waves in the selected category is performed using the "REV" (3) and "FWD" (4) buttons. For automatic tuning, use the "SEEK" (19/20) buttons. To activate the automatic scanning mode, press and hold one of the "SEEK" (19/20) buttons.
To display information about the radio station, press the i button (14).
Receiving information about the situation on the roads
This audio system is equipped with an RDS-EON receiver EON is an abbreviation for Enhanced Other Network (extended network reception). When a traffic announcement is broadcast, the car radio automatically switches from a radio station that does not provide traffic information to a station within the same radio broadcasting network that does provide such information. After the traffic announcement has been received, the radio returns to the program that was being listened to before the announcement was received.
To activate the function, press the TP button (10).
Play CD
When a CD is inserted into the audio system, playback begins automatically. Switching to CD playback mode is done by pressing the CD/AUX button (5). Switching between CD or MP3/WMA modes is done automatically. If the media contains recordings in different formats, switching between CD or MP3/WMA modes is done manually by pressing the PTY button (7) and the button (12) corresponding to the desired format.
Audio system with CD changer
The multi-disc CD player of this audio system can play recordings from CD-R, CD-R/W and CD-DA discs. You can also listen to recordings in MP3/WMA and CD-DA formats (only musical data). The audio system automatically switches between CD and MP3/WMA formats, with the current setting shown on the display. The multi-disc CD player can hold up to 6 discs.
To install one disc, press the "LOAD" button (16) briefly. The display will show "Load Disc". When the display shows "Insert CD", install the disc.
To load all discs, press and hold the "LOAD" button (16) until the display shows "Load AP". When the display shows "Insert CD" and a beep sounds, insert the discs one by one. Playback will begin with the last disc loaded.
To select a disk, press the button (12).
Selecting folders for playback
If there are several folders with recordings on the media, the choice between them is made by pressing the button (12) corresponding to the desired folder.
Selecting a track to play
The track is selected by pressing the "SEEK" buttons (19/20). To rewind the track forward/backward, use the buttons "REV" (3)/ "FWD" (4).
Shuffle Playback
To turn on the random playback mode, press the "RDM" button (12). The display will show the message "Randomize Current CD". To deactivate the mode, press the RDM button (12) again. The display will show "Random OFF".
Displaying CD information
To display information about the CD, press the i button (14). Use the button (12) to select the desired category.
Playlist (MP3/WMA)
The audio system can process and play files from a playlist (files in "m³u" or "pis" format).
Sort tracks by album title or artist name
Press the button (12), press the "Sort" button (12), then select the sort type "by album title (By Album)" or "by artist title (By Artist)". After sorting is complete, press the i button (12).
Ejecting the disc
To eject the disc, press the EJECT button (6).
Connecting external audio devices
To connect external audio devices, use a special cable and the AUX mode. To turn on the AUX mode, press the CD/AUX button (5). The display will show the message "Aux Input Device".