


Car steering Chevrolet Aveo 1.5 (T250)

Description of the car steering
The vehicle uses a rack and pinion steering system equipped with a hydraulic booster. The steering system consists of the following elements: a steering...
The vehicle uses a rack and pinion steering system equipped with a hydraulic booster. The steering system consists of the following elements: a steering...

Steering elements of a car
1. Tank lid 2. Foam insert 3. Insert 4. Nut 5. Expansion tank 6. Clamp 7. Pipeline fastening clamp 8. Feed pipeline 9. Pressure pipeline 10. Return pipeline...
1. Tank lid 2. Foam insert 3. Insert 4. Nut 5. Expansion tank 6. Clamp 7. Pipeline fastening clamp 8. Feed pipeline 9. Pressure pipeline 10. Return pipeline...

Steering gear diagram
1. Tie rod end 2. Lock nut 3. Dust cover clamp 4. Dust cover 5. Dust cover clamp 6. Steering rod 7. Rack guide bushing 8. Retaining ring 9 Bushing 10. Sealing...
1. Tie rod end 2. Lock nut 3. Dust cover clamp 4. Dust cover 5. Dust cover clamp 6. Steering rod 7. Rack guide bushing 8. Retaining ring 9 Bushing 10. Sealing...

Removal and installation the steering wheel
Attention! Before removing the airbag, you must turn off the power supply to the vehicle's electrical system and then wait at least 1 minute. Special care...
Attention! Before removing the airbag, you must turn off the power supply to the vehicle's electrical system and then wait at least 1 minute. Special care...

Turn signal switch
1. Disconnect the negative battery cable. 2. Unscrew the screws (2) securing the lower trim panel (1) of the steering column and remove it. 3. Turn the...
1. Disconnect the negative battery cable. 2. Unscrew the screws (2) securing the lower trim panel (1) of the steering column and remove it. 3. Turn the...

Windscreen wiper switch
1. Disconnect the negative battery cable. 2. Remove the lower and upper steering column trim panels. 3. Remove the windshield wiper switch by pressing the tabs...
1. Disconnect the negative battery cable. 2. Remove the lower and upper steering column trim panels. 3. Remove the windshield wiper switch by pressing the tabs...

Ignition switch illumination
1. Disconnect the negative battery cable. 2. Remove the lower steering column cover panel by unscrewing the screws. 3. Loosen the lock slot illumination screw...
1. Disconnect the negative battery cable. 2. Remove the lower steering column cover panel by unscrewing the screws. 3. Loosen the lock slot illumination screw...

Forgotten Key Indicator
1. Disconnect the negative cable from the battery. 2. Remove the lower steering column trim panel. 3. Remove the steering wheel. 4. Loosen the screws of the...
1. Disconnect the negative cable from the battery. 2. Remove the lower steering column trim panel. 3. Remove the steering wheel. 4. Loosen the screws of the...

Removal and installation the ignition switch
1. Disconnect the negative cable from the battery. 2. Remove the lower steering column trim panel by unscrewing the screws. 3. Set the ignition key to the...
1. Disconnect the negative cable from the battery. 2. Remove the lower steering column trim panel by unscrewing the screws. 3. Set the ignition key to the...

Removal and installation of the rotating contact joint (RCJ)
Attention! Before removing the airbag, you must turn off the power supply to the vehicle's electrical system and then wait at least 1 minute. Special care...
Attention! Before removing the airbag, you must turn off the power supply to the vehicle's electrical system and then wait at least 1 minute. Special care...
Removal and installation the steering rod end
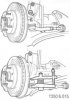
1. Turn the steering wheel all the way towards the joint being removed. 2. Loosen the tie rod end ball joint mounting nut. Tighten to 45 Nm when installing. 3....
1. Turn the steering wheel all the way towards the joint being removed. 2. Loosen the tie rod end ball joint mounting nut. Tighten to 45 Nm when installing. 3....
Removal and installation the steering rod
1. Disconnect the tie rod end from the steering knuckle. 2. Loosen the lock nut and unscrew the tie rod end, holding the tie rod from turning with a wrench. 3....
1. Disconnect the tie rod end from the steering knuckle. 2. Loosen the lock nut and unscrew the tie rod end, holding the tie rod from turning with a wrench. 3....

Removal and installation the steering gear
1. Raise the vehicle. 2. Set the wheels to the straight-ahead position. 3. Remove the wheels. 4. Disconnect the power steering supply and return lines and plug...
1. Raise the vehicle. 2. Set the wheels to the straight-ahead position. 3. Remove the wheels. 4. Disconnect the power steering supply and return lines and plug...

Adjusting the clearance of the gear engagement in the steering mechanism
1. Clean the adjusting plug (3) and lock nut (4) from dirt. 2. Apply marks to the adjusting plug (3) and to the steering gear housing. Apply a new mark to the...
1. Clean the adjusting plug (3) and lock nut (4) from dirt. 2. Apply marks to the adjusting plug (3) and to the steering gear housing. Apply a new mark to the...

Removal and installation the steering column
1. Disconnect the negative cable from the battery. 2. Remove the steering column switches. 3. Remove the lower instrument panel trim panel. 4. Remove the upper...
1. Disconnect the negative cable from the battery. 2. Remove the steering column switches. 3. Remove the lower instrument panel trim panel. 4. Remove the upper...
Checking the power steering oil level
It is recommended to use DEXRON®-ll D fluid for filling the hydraulic power steering system. The fluid level is determined either by the marks on the expansion...
It is recommended to use DEXRON®-ll D fluid for filling the hydraulic power steering system. The fluid level is determined either by the marks on the expansion...
Bleeding air from the hydraulic system
It is recommended to use DEXRON®-ll D fluid for filling the hydraulic power steering system. 1. Turn the steering wheel all the way to the left and fill the...
It is recommended to use DEXRON®-ll D fluid for filling the hydraulic power steering system. 1. Turn the steering wheel all the way to the left and fill the...

Removal and installation the expansion tank
1. Pump out the liquid from the expansion tank (1). 2. Loosen the hose clamps and remove both hoses. Plug the hoses to keep out dirt. 3. Unscrew the fastening...
1. Pump out the liquid from the expansion tank (1). 2. Loosen the hose clamps and remove both hoses. Plug the hoses to keep out dirt. 3. Unscrew the fastening...

Removal and installation the hydraulic pump
Pump assembly - engine FAM11.4 and 1.5 Removal procedure 1. Remove the auxiliary drive poly V-belt. This operation is described in the section " Maintenance "....
Pump assembly - engine FAM11.4 and 1.5 Removal procedure 1. Remove the auxiliary drive poly V-belt. This operation is described in the section " Maintenance "....
This section is available at russian, bulgarian, belarusian, ukrainian, serbian, croatian, romanian, polish, slovak, hungarian
See similar sections on Chevrolet cars:
Chassis: Steering Chevrolet Captiva 1 (2006-2018)
Chassis: Steering Chevrolet Cruze 1 (2008-2016)
Chassis: Steering Chevrolet Lacetti 1 (2002-2009)
Chassis: Steering Chevrolet Lanos T150 (2002-2009)
Chassis: Steering Chevrolet Niva 1 (2002-2016)
Chassis: Steering Chevrolet Tahoe 2 and 3 (2000-2014)
Chassis: Steering Chevrolet Orlando 1 (2010-2018)
Chassis: Steering Chevrolet Captiva 1 (2006-2018)
Chassis: Steering Chevrolet Cruze 1 (2008-2016)
Chassis: Steering Chevrolet Lacetti 1 (2002-2009)
Chassis: Steering Chevrolet Lanos T150 (2002-2009)
Chassis: Steering Chevrolet Niva 1 (2002-2016)
Chassis: Steering Chevrolet Tahoe 2 and 3 (2000-2014)
Chassis: Steering Chevrolet Orlando 1 (2010-2018)
Share information:
- General information
- Vehicle device
- User manual
- Main malfunctions
- Maintenance
- Power unit
- Engine
- Lubrication system
- Cooling system
- Supply system
- Exhaust system
- Transmission
- Clutch
- Manual gearbox
- Automatic gearbox
- Front wheel drives
- Chassis
- Front suspension
- Rear suspension
- Steering
- Brake system
- Body
- Exterior
- Interior
- Doors and trunk
- Security systems
- Electrical equipment
- Engine electrics
- Equipment and devices
- Heating and air conditioning
- Electrical circuits
- Manual
- Driver's workplace
- Salon equipment
- Vehicle characteristics
- Maintenance
- Engine 1.5 SOHC
- Engine repair
- Fuel supply system
- Control system
- Cooling system
- Engine 1.6 DOHC
- Engine repair
- Control system
- Transmission
- Clutch
- Manual gearbox
- Automatic gearbox
- Wheel drive
- Chassis
- Wheel suspension
- Steering
- Brake system
- Body
- Exterior
- Interior
- General information
- User manual
- Power unit
- Engine repair 1.5L SOHC
- Fuel system
- Control system
- Cooling system
- Transmission
- Clutch
- Manual gearbox
- Automatic gearbox
- Drive shafts
- Chassis
- Front suspension
- Rear suspension
- Steering
- Brake system
- Body
- Exterior (external elements)
- Interior (internal elements)
- Electrical equipment
- Equipment and devices
- Electrical circuits