
ChevyMan.ru
Mazda Mitsubishi Toyota Land Rover Honda Kia Nissan
English Русский
Български
Беларускі
Український
Српски
Hrvatski
Română
Polski
Slovenský
Magyar
|
Articles | Sitemap | Contacts |


Home   Aveo   Captiva   Cruze   Lacetti   Lanos   Niva   Tahoe   Others  
Aveo T300 (2012-2018) Aveo T250 (2006-2011) Aveo T200 (2003-2008)
  • Home
  • Aveo
  • T250 (2006-2011)
  • Chassis
  • Steering
  • Removal and installation of the rotating contact joint (RCJ)

Removal and installation of the rotating contact joint (RCJ) (Chevrolet Aveo T250)

            0

Contents: Removal ↧ Installation ↧
Attention!
  • Before removing the airbag, you must turn off the power supply to the vehicle's electrical system and then wait at least 1 minute.
  • Special care should be taken when removing the driver's airbag.
  • Disassembling and reassembling the airbag may impair the system's functionality, which could result in serious injury or death.
  • Incorrect connection of airbag wiring may cause airbag deployment. If fault is found in connecting elements, replace the wiring harness.
  • Do not use an ohmmeter to check the airbag - this may cause it to deploy. For this, you need to use the on-board diagnostics system at a service station.
  • When carrying the airbag, hold it so that the operating side is not facing you.
  • Do not place the pillow with the working side down, as if it is accidentally activated, the pillow body may be thrown away by the pillow unfolding in a random direction and cause injury.


Removal


1. Disconnect the negative battery cable.

2. Remove the driver's airbag module.

3. Remove the steering wheel.

4. Remove the upper and lower steering column cover panels.

5. Remove the driver's knee bolster.

6. Disconnect the driver airbag and horn connectors from the lower part of the steering column.

7. Remove the screws and discard them.
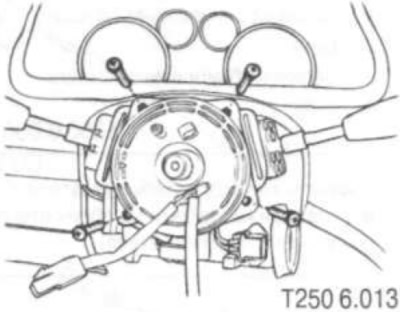
7. Remove the screws and discard them.


8. Remove the clock spring from the steering shaft.


Installation


1. Set the front wheels to the straight-ahead position.

2. Secure the VKS with screws.

3. Turn the VKS petal clockwise until it stops (without any effort).

4. Then turn the VKS petal counterclockwise approximately three turns to the neutral position.

5. Align the marks on the VKS body
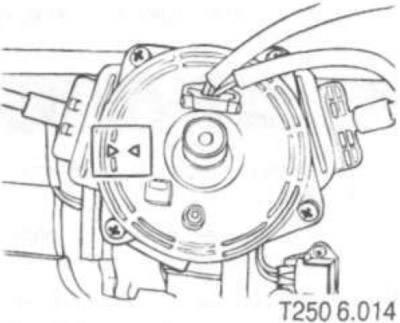
5. Align the marks on the VKS body


6. Connect the connectors to the bottom of the steering column.

7. Install the driver's knee bolster.

8. Install the upper and lower steering column trim panels.

9. Install the steering wheel.

10. Install the driver airbag module.

11. Connect the cable to the negative terminal of the battery.

The article was checked: Vladimir Romannikov
This article is available at russian, bulgarian, belarusian, ukrainian, serbian, croatian, romanian, polish, slovak, hungarian

Share information:

Previous articles
Aveo T250: Steering
Next articles

Removal and installation the ignition switch
Forgotten Key Indicator
Ignition switch illumination
Windscreen wiper switch
Turn signal switch
Removal and installation the steering rod end
Removal and installation the steering rod
Removal and installation the steering gear
Adjusting the clearance of the gear engagement in the steering mechanism
Removal and installation the steering column


See similar articles on the topic of Chevrolet cars:
Ball joint of the front suspension arm Chevrolet Captiva 1 (2006-2018)
Removal and installation the gearbox control lever joint Chevrolet Cruze 1 (2008-2016)
Removal the inner joint Chevrolet Lacetti 1 (2002-2009)
Removal and disassembling the inner joint Chevrolet Lanos T150 (2002-2009)
Checking the contact of the working surface of the gear teeth of the main transmission of the reducer Chevrolet Niva 1 (2002-2016)
Cardan joint — disassembly and assembly Chevrolet Tahoe 2 and 3 (2000-2014)
Internal constant velocity joint Chevrolet Lumina 1 (1989-1994)
Link in different formats to this page


Visitor comments

No comments yet


How much will 15 + 29 =


Aveo T300 (2012-2018) 
  • General information
  • Vehicle device
  • User manual
  • Main malfunctions
  • Maintenance
  • Power unit
  • Engine
  • Lubrication system
  • Cooling system
  • Supply system
  • Exhaust system
  • Transmission
  • Clutch
  • Manual gearbox
  • Automatic gearbox
  • Front wheel drives
  • Chassis
  • Front suspension
  • Rear suspension
  • Steering
  • Brake system
  • Body
  • Exterior
  • Interior
  • Doors and trunk
  • Security systems
  • Electrical equipment
  • Engine electrics
  • Equipment and devices
  • Heating and air conditioning
  • Electrical circuits


Aveo T250 (2006-2011) 
  • Manual
  • Driver's workplace
  • Salon equipment
  • Vehicle characteristics
  • Maintenance
  • Engine 1.5 SOHC
  • Engine repair
  • Fuel supply system
  • Control system
  • Cooling system
  • Engine 1.6 DOHC
  • Engine repair
  • Control system
  • Transmission
  • Clutch
  • Manual gearbox
  • Automatic gearbox
  • Wheel drive
  • Chassis
  • Wheel suspension
  • Steering
  • Brake system
  • Body
  • Exterior
  • Interior


Aveo T200 (2003-2008) 
  • General information
  • User manual
  • Power unit
  • Engine repair 1.5L SOHC
  • Fuel system
  • Control system
  • Cooling system
  • Transmission
  • Clutch
  • Manual gearbox
  • Automatic gearbox
  • Drive shafts
  • Chassis
  • Front suspension
  • Rear suspension
  • Steering
  • Brake system
  • Body
  • Exterior (external elements)
  • Interior (internal elements)
  • Electrical equipment
  • Equipment and devices
  • Electrical circuits


ChevyMan.ru © 2017-2026 · Mobile version · Feedback · Site search · Interesting to read · Sitemap: EN BG BY UA RS HR RO PL SK HU

Aveo 2003-2008 · Aveo 2006-2011 · Aveo 2012-2018 · Captiva 2006-2018 · Cruze 2008-2016 · Lacetti 2002-2009 · Lanos 2002-2009 · Niva 2002-2016 · Tahoe 1992-2000 · Tahoe 2000-2014 · Lumina 1 1989-1994 · Trailblazer 1 2001-2008 · Orlando 1 2010-2018 ·
🛡️ For your security and to improve our service, this site uses cookies. You can disable them in your browser.