
ChevyMan.ru
Mazda Mitsubishi Toyota Land Rover Honda Kia Nissan
English Русский
Български
Беларускі
Український
Српски
Hrvatski
Română
Polski
Slovenský
Magyar
|
Articles | Sitemap | Contacts |


Home   Aveo   Captiva   Cruze   Lacetti   Lanos   Niva   Tahoe   Others  
Orlando 1 (2010-2018) Trailblazer 1 (2001-2008, petrol) Lumina 1 (1989-1994)
  • Home
  • Chevrolet
  • Orlando 1
  • Chassis
  • Car suspension
  • Front suspension strut

Front suspension strut (Chevrolet Orlando 1)

            0

The front suspension strut is an assembly unit consisting of a shock absorber spring, upper support and spring support cups.

We remove the front suspension strut if the technical condition check of the front suspension reveals a malfunction of its elements.

Warning: Shock absorbers and springs should be replaced in pairs, even if only one is faulty.


To perform the work you will need wheel chocks, a stand for the car, a jack, and a special device for unscrewing the shock absorber rod nut (instead of the device, you can use a TORX T50 key and a 24 mm Z-key).

We carry out the work in the following order:

1. Preparing the car for maintenance and repair

2. Remove the front windshield wiper arms and both parts of the ventilation grille.

3. Using a 10 mm wrench, unscrew the engine compartment cross member mounting bolts (one on the right and one on the left side).
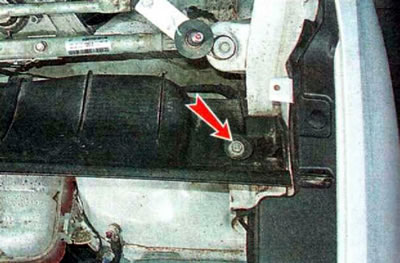
3. Using a 10 mm wrench, unscrew the engine compartment cross member mounting bolts (one on the…


4. Using a slotted screwdriver, remove the two holders and remove the jumper in the central part.
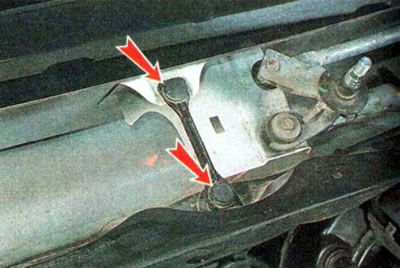
4. Using a slotted screwdriver, remove the two holders and remove the jumper in the central part.


5. Similarly, we disconnect the holders from the right...
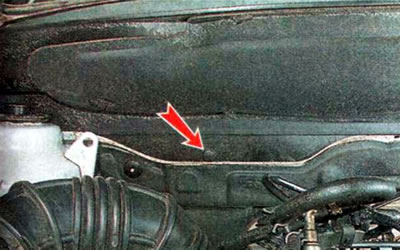


5. Similarly, we disconnect the holders from the right...


...and the left side.
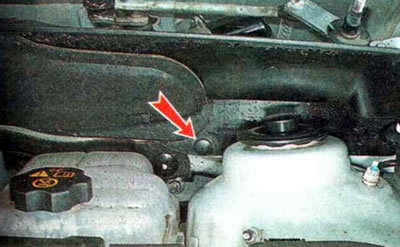
...and the left side.


6. Remove the engine compartment cross member.
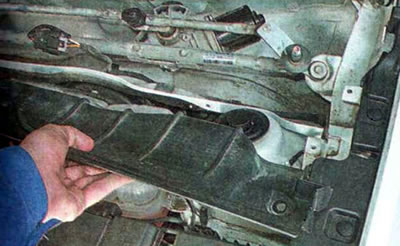
6. Remove the engine compartment cross member.


7. Using a slotted screwdriver, pry up and remove the protective cover of the upper shock absorber mount nut.
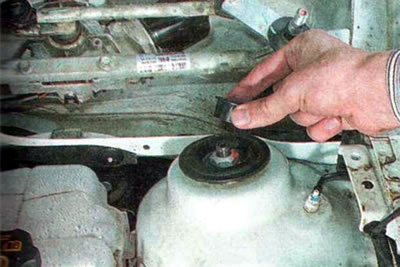
7. Using a slotted screwdriver, pry up and remove the protective cover of the upper shock absorber…


8. Using a 24 mm wrench, loosen the nut of the upper shock absorber mount. If necessary, hold the rod from turning with a TORX T50 key.
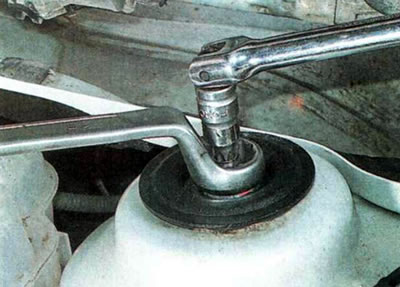


8. Using a 24 mm wrench, loosen the nut of the upper shock absorber mount. If necessary, hold the…


9. Place chocks under the rear wheels and lift the front of the car.

10. Remove the front wheel.

11. Disconnect the anti-roll bar from the shock absorber bracket.

12. Disconnect the brake hose from the shock absorber bracket.
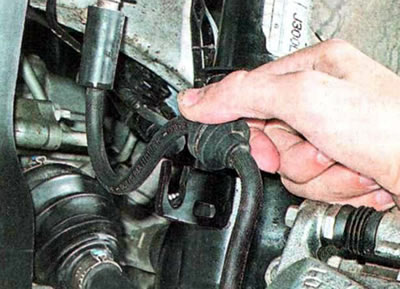
12. Disconnect the brake hose from the shock absorber bracket.


13. Clean the nuts of the bolts that secure the steering knuckle to the shock absorber strut from dirt and treat them with penetrating lubricant.
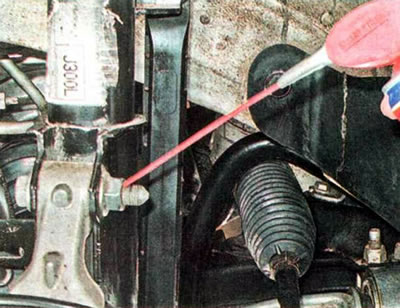
13. Clean the nuts of the bolts that secure the steering knuckle to the shock absorber strut from…


14. Using an 18 mm wrench, unscrew the two nuts...
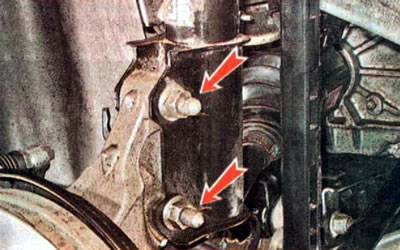


14. Using an 18 mm wrench, unscrew the two nuts...


...and using a hammer we knock out the bolts.
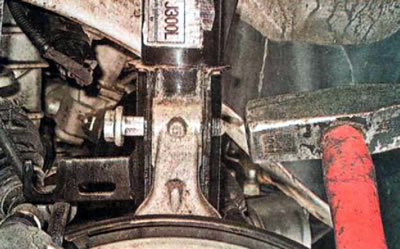
...and using a hammer we knock out the bolts.


Note: The steering knuckle mounting bolts have a splined section, which prevents them from turning when the nut is screwed on and off.
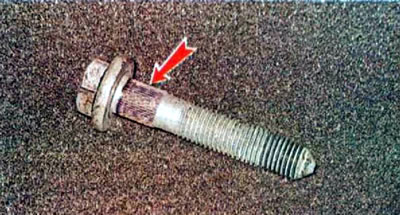
Note: The steering knuckle mounting bolts have a splined section, which prevents them from turning…


15. Disconnect the steering knuckle from the strut and secure it to the body.
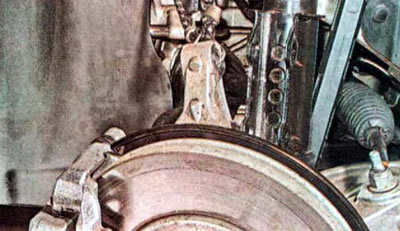
15. Disconnect the steering knuckle from the strut and secure it to the body.


16. Finally, unscrew the upper nut securing the shock absorber strut and remove the support washer.
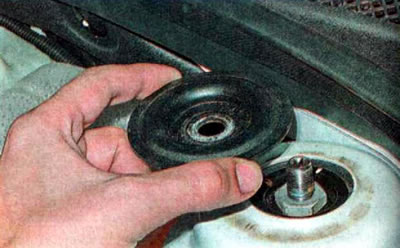


16. Finally, unscrew the upper nut securing the shock absorber strut and remove the support washer.


17. Remove the strut from the wheel arch and clamp it in a vice, placing wooden blocks underneath.

Warning! Be careful! The compressed spring has a lot of energy and when the tie breaks, it can straighten out and cause injury. Do not loosen the shock absorber rod nut until the spring is securely locked in place.


18. Install special spring clamps and tighten the spring evenly on both sides until the load is removed from the upper spring cup.
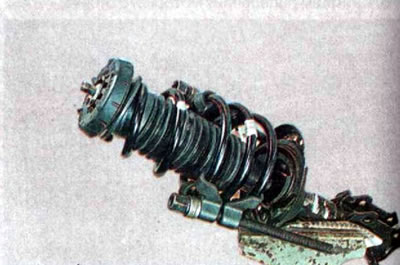
18. Install special spring clamps and tighten the spring evenly on both sides until the load is…


19. Using a 24 mm wrench, unscrew the shock absorber rod nut, holding the rod from turning with a TORX T50 wrench.
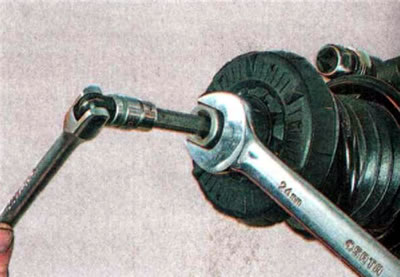
19. Using a 24 mm wrench, unscrew the shock absorber rod nut, holding the rod from turning with a…


20. Remove the upper support of the strut assembly with the thrust bearing.
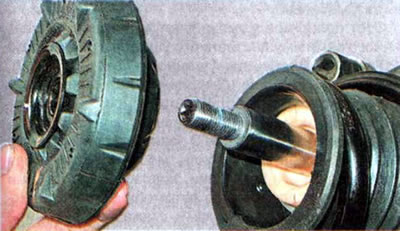


20. Remove the upper support of the strut assembly with the thrust bearing.


21. Carefully remove the spring from the shock absorber rod (without removing the tie from it).
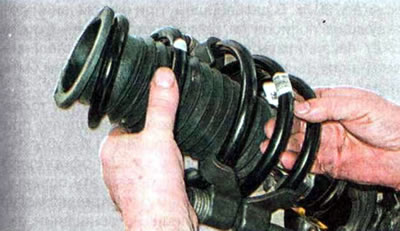
21. Carefully remove the spring from the shock absorber rod (without removing the tie from it).


22. Remove the protective cover of the rod.

23. Remove the compression stroke buffer from the rod.
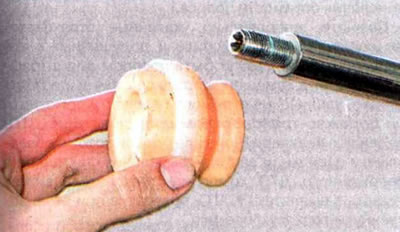
23. Remove the compression stroke buffer from the rod.


24. By fully extending and retracting the rod, we make sure that the shock absorber is in good working order. If you feel dips, jerks, or hear extraneous sounds when moving the rod, replace the shock absorber.
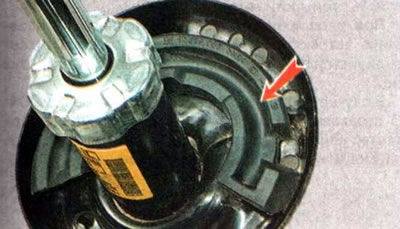
24. By fully extending and retracting the rod, we make sure that the shock absorber is in good…


25. We check the integrity and serviceability of all elements of the shock absorber strut - the gasket of the lower support cup of the spring, the coil spring,
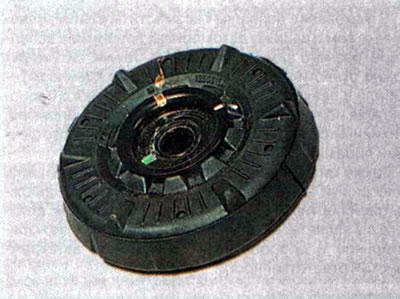
25. We check the integrity and serviceability of all elements of the shock absorber strut - the…


...we pay special attention to the condition of the upper support and its bearing.

We replace damaged or badly worn parts.

26. When assembling, we rest the lower coil of the spring against a special protrusion of the lower cup.
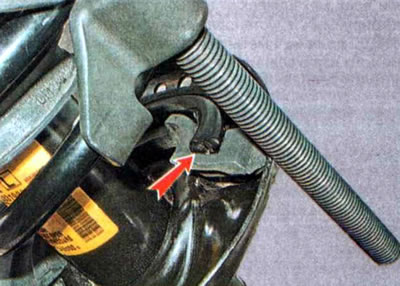
26. When assembling, we rest the lower coil of the spring against a special protrusion of the lower…


27. Assemble the shock absorber strut in reverse order. Tighten the rod nut to the prescribed torque, indicated in the reference data.

28. Install the stand on the car. Tighten the upper strut mount nut, steering knuckle mount nuts and anti-roll bar mount nut to the specified torques.

29. We repair the second shock absorber strut in a similar manner.

(Information taken from the official website CHEVYMAN)

The article was checked: Vladimir Romannikov
This article is available at russian, bulgarian, belarusian, ukrainian, serbian, croatian, romanian, polish, slovak, hungarian

Share information:

Previous articles
Orlando 1: Car suspension
Next articles

Stabilizer bar
Front suspension arm
Replacing rear and front suspension springs
Front suspension — design and testing
Rear suspension
Wheel alignment angles
Chassis — design description


See similar articles on the topic of Chevrolet cars:
Replacing the upper support of the front suspension shock absorber strut Chevrolet Aveo T300 (2012-2018)
Telescopic front suspension strut Chevrolet Captiva 1 (2006-2018)
Replacing the upper support of the front suspension shock absorber strut Chevrolet Cruze 1 (2008-2016)
Front suspension device Chevrolet Lacetti 1 (2002-2009)
Replacing the silent block and cushion of the front suspension arm Chevrolet Lanos T150 (2002-2009)
Front suspension device Chevrolet Niva 1 (2002-2016)
Front suspension strut Chevrolet Tahoe 2 and 3 (2000-2014)
Link in different formats to this page


Visitor comments

No comments yet


How much will 38 + 34 =


Orlando 1 (2010-2018) 
  • General information
  • Introduction to manual
  • User manual
  • Maintenance
  • Troubleshooting
  • Power unit
  • Engine repair
  • Fuel and control system
  • Cooling and lubrication system
  • Ignition system
  • Transmission
  • Clutch
  • Gearbox
  • Drive shafts
  • Chassis
  • Car suspension
  • Steering
  • Brake system
  • Body
  • Exterior (external elements)
  • Doors, locks and windows
  • Electrical equipment
  • Equipment and devices
  • Windscreen wipers
  • Power devices
  • Electrical diagrams


Trailblazer 1 (2001-2008) 
  • General information
  • User manual
  • Troubleshooting
  • Maintenance
  • Power unit
  • Engine in a car
  • Engine overhaul
  • Cooling and heating
  • Fuel and exhaust system
  • Engine electrical equipment
  • Engine control
  • Transmission
  • Automatic gearbox
  • Transfer case
  • Drive shafts and cardan
  • Chassis
  • Brake system
  • Car suspension
  • Steering
  • Body
  • Exterior (external elements)
  • Interior (internal elements)
  • Doors, locks and windows
  • Electrical equipment
  • Equipment and devices
  • Electrical circuits


Lumina 1 (1989-1994) 
  • General information
  • Maintenance
  • Power unit
  • Engine 3.1L V6
  • Engine 3.8L V6
  • Engine overhaul
  • Cooling system
  • Power and exhaust system
  • Fuel injection
  • Engine electrical equipment
  • Reduced exhaust gas toxicity
  • Transmission
  • Automatic gearbox
  • Drive shafts
  • Chassis
  • Brake system
  • Car suspension
  • Steering
  • Body
  • Heating and air conditioning
  • Repair of body elements
  • Doors, covers and windows
  • Interior (internal elements)
  • Electrical equipment
  • Equipment and devices
  • Electrical circuits


ChevyMan.ru © 2017-2026 · Mobile version · Feedback · Site search · Interesting to read · Sitemap: EN BG BY UA RS HR RO PL SK HU

Aveo 2003-2008 · Aveo 2006-2011 · Aveo 2012-2018 · Captiva 2006-2018 · Cruze 2008-2016 · Lacetti 2002-2009 · Lanos 2002-2009 · Niva 2002-2016 · Tahoe 1992-2000 · Tahoe 2000-2014 · Lumina 1 1989-1994 · Trailblazer 1 2001-2008 · Orlando 1 2010-2018 ·
🛡️ For your security and to improve our service, this site uses cookies. You can disable them in your browser.