
ChevyMan.ru
Mazda Mitsubishi Toyota Land Rover Honda Kia Nissan
English Русский
Български
Беларускі
Український
Српски
Hrvatski
Română
Polski
Slovenský
Magyar
|
Articles | Sitemap | Contacts |


Home   Aveo   Captiva   Cruze   Lacetti   Lanos   Niva   Tahoe   Others  
Orlando 1 (2010-2018) Trailblazer 1 (2001-2008, petrol) Lumina 1 (1989-1994)
  • Home
  • Chevrolet
  • Orlando 1
  • General information
  • User manual
  • Headlight polishing

Headlight polishing (Chevrolet Orlando 1)

            0

Plastic headlight caps become covered with micro-scratches after prolonged use, their outer surface becomes cloudy and transmits light worse. Wiping dirty caps with a dry cloth can contribute to the formation of scratches. Scratched headlight caps not only illuminate the road worse, but also scatter light in all directions, blinding oncoming drivers. To restore transparency and a beautiful appearance to the caps, they must be polished.

For polishing, use special abrasive polishing pastes for old or weathered paintwork. If you use non-abrasive pastes, the polishing effect of which is based on filling micro-scratches with natural and synthetic waxes or polyurethane, the effect will be very short-lived. After one to three months, wax and its analogues will wash out of the micro scratches and the headlight caps will become cloudy again.

Polishing can be done either manually or using a polishing machine or a drill with a polishing wheel. The drill must have a speed controller.

We polish the headlights in the following sequence:

1. Wash the headlights (see car care section)

2. To avoid damaging the paintwork during polishing, seal the body parts around the headlights with masking tape.
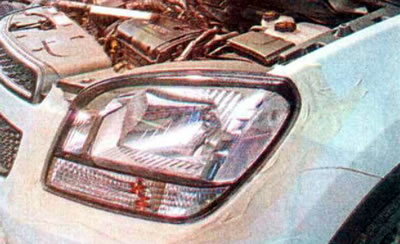
2. To avoid damaging the paintwork during polishing, seal the body parts around the headlights with…


3. Apply the polish to a special napkin or clean cloth and apply the polish evenly, without pressing hard, in a circular motion to the headlight cap.
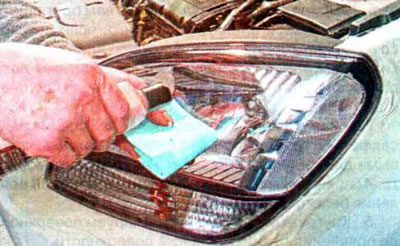


3. Apply the polish to a special napkin or clean cloth and apply the polish evenly, without…


4. After the applied composition has completely dried, use a special polishing cloth or a soft cloth folded in several layers to polish the surface in a circular motion until the polish is completely used up and the surface becomes shiny.
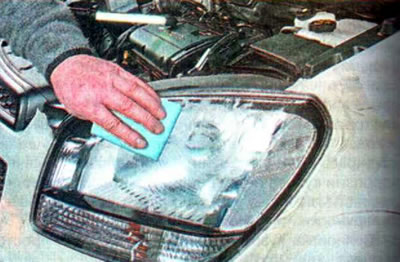
4. After the applied composition has completely dried, use a special polishing cloth or a soft…


Headlight caps are made of durable, wear-resistant material and manually polishing heavily scratched headlights will require a lot of effort and time. Therefore, it is advisable to use a polishing machine or drill for polishing.
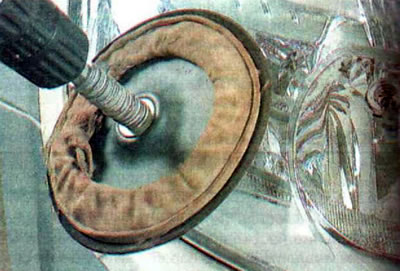
Headlight caps are made of durable, wear-resistant material and manually polishing heavily…


Note: Scratches on the surface of the headlight cap are removed with a polishing disc installed in a drill chuck at a low rotation speed - no more than 800 min⁻¹ and adding water. At the same time, you need to be prepared for splashes to fly in all directions. Anything that can get dirty should be covered and the car should be washed after polishing is complete.


To clean the plastic rear light lenses, also use special cleaning and polishing agents. But since these lights are made of a much softer plastic, it makes sense to polish them by hand.

Recommendation. When using a power tool to polish tail lights, to avoid overheating and damaging the soft plastic, use a lower speed, do not press the wheel too hard, and add more water.


[The original source of the article is the website CHEVYMAN.ru]

The article was checked: Vladimir Romannikov
This article is available at russian, bulgarian, belarusian, ukrainian, serbian, croatian, romanian, polish, slovak, hungarian

Share information:

Previous articles
Orlando 1: User manual
Next articles

Body polishing
Long distance travel
Transportation of pets
Transporting children in a car
Lighting and light signaling
Adjusting the seat and steering wheel position
Car seats
Electronic stability control system
Glass tinting
Traction device


See similar articles on the topic of Chevrolet cars:
Replacing the bulbs in the headlight Chevrolet Aveo T300 (2012-2018)
Headlight washers Chevrolet Captiva 1 (2006-2018)
Headlight range adjuster Chevrolet Cruze 1 (2008-2016)
Adjusting the direction of the headlight beams Chevrolet Lacetti 1 (2002-2009)
Headlight beam direction regulator Chevrolet Lanos T150 (2002-2009)
Polishing of paintwork Chevrolet Niva 1 (2002-2016)
Removal and installation the headlight corrector switch Chevrolet Tahoe 2 and 3 (2000-2014)
Link in different formats to this page


Visitor comments

No comments yet


How much will 48 + 20 =


Orlando 1 (2010-2018) 
  • General information
  • Introduction to manual
  • User manual
  • Maintenance
  • Troubleshooting
  • Power unit
  • Engine repair
  • Fuel and control system
  • Cooling and lubrication system
  • Ignition system
  • Transmission
  • Clutch
  • Gearbox
  • Drive shafts
  • Chassis
  • Car suspension
  • Steering
  • Brake system
  • Body
  • Exterior (external elements)
  • Doors, locks and windows
  • Electrical equipment
  • Equipment and devices
  • Windscreen wipers
  • Power devices
  • Electrical diagrams


Trailblazer 1 (2001-2008) 
  • General information
  • User manual
  • Troubleshooting
  • Maintenance
  • Power unit
  • Engine in a car
  • Engine overhaul
  • Cooling and heating
  • Fuel and exhaust system
  • Engine electrical equipment
  • Engine control
  • Transmission
  • Automatic gearbox
  • Transfer case
  • Drive shafts and cardan
  • Chassis
  • Brake system
  • Car suspension
  • Steering
  • Body
  • Exterior (external elements)
  • Interior (internal elements)
  • Doors, locks and windows
  • Electrical equipment
  • Equipment and devices
  • Electrical circuits


Lumina 1 (1989-1994) 
  • General information
  • Maintenance
  • Power unit
  • Engine 3.1L V6
  • Engine 3.8L V6
  • Engine overhaul
  • Cooling system
  • Power and exhaust system
  • Fuel injection
  • Engine electrical equipment
  • Reduced exhaust gas toxicity
  • Transmission
  • Automatic gearbox
  • Drive shafts
  • Chassis
  • Brake system
  • Car suspension
  • Steering
  • Body
  • Heating and air conditioning
  • Repair of body elements
  • Doors, covers and windows
  • Interior (internal elements)
  • Electrical equipment
  • Equipment and devices
  • Electrical circuits


ChevyMan.ru © 2017-2026 · Mobile version · Feedback · Site search · Interesting to read · Sitemap: EN BG BY UA RS HR RO PL SK HU

Aveo 2003-2008 · Aveo 2006-2011 · Aveo 2012-2018 · Captiva 2006-2018 · Cruze 2008-2016 · Lacetti 2002-2009 · Lanos 2002-2009 · Niva 2002-2016 · Tahoe 1992-2000 · Tahoe 2000-2014 · Lumina 1 1989-1994 · Trailblazer 1 2001-2008 · Orlando 1 2010-2018 ·
🛡️ For your security and to improve our service, this site uses cookies. You can disable them in your browser.