ChevyMan.ru
Mazda Mitsubishi Toyota Land Rover Honda Kia Nissan
English Русский
Български
Беларускі
Український
Српски
Hrvatski
Română
Polski
Slovenský
Magyar
|
Articles | Sitemap | Contacts |


Home   Aveo   Captiva   Cruze   Lacetti   Lanos   Niva   Tahoe   Others  
Orlando 1 (2010-2018) Trailblazer 1 (2001-2008, petrol) Lumina 1 (1989-1994)
  • Home
  • Chevrolet
  • Orlando 1
  • Transmission
  • Clutch
  • Checking and replacing the clutch

Checking and replacing the clutch (Chevrolet Orlando 1)

            0

As a rule, the car is not disassembled specifically to check the clutch discs. Removing the clutch discs requires a lot of effort and time, so the need to replace them should be determined during the inspection of the technical condition of the clutch, (see above). The condition of the clutch components should be checked if for any reason it was necessary to remove the gearbox or dismantle the engine from the vehicle.

Recommendation. When replacing the driven clutch disc, it is advisable to also replace the pressure plate (basket), even if there are no noticeable signs of wear on its working surface. The fact is that during operation its working surface wears out and the rigidity of the diaphragm spring decreases.


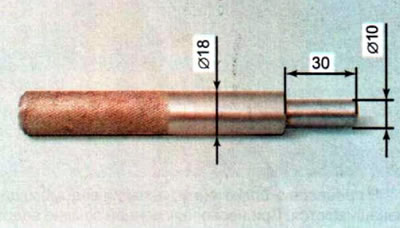
To perform the work, you will need a mandrel for centering the driven clutch disc. We carry out the work in the following order:

1. We prepare the car for maintenance and repair.

2. Remove the manual gearbox.

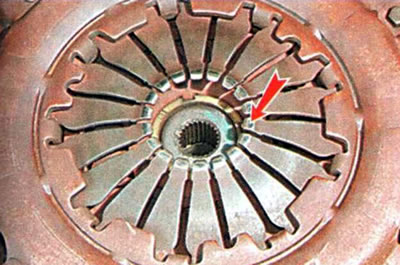
3. The presence of deep grooves on the ends of the central spring petals is the first sign that the clutch needs to be replaced.

3. The presence of deep grooves on the ends of the central spring petals is the first sign that the…


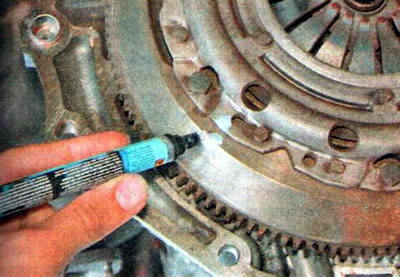
4. If the clutch will not be removed for replacement, use a center punch or marker to mark the position of the clutch basket relative to the flywheel.


4. If the clutch will not be removed for replacement, use a center punch or marker to mark the…


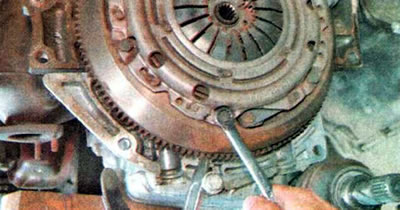
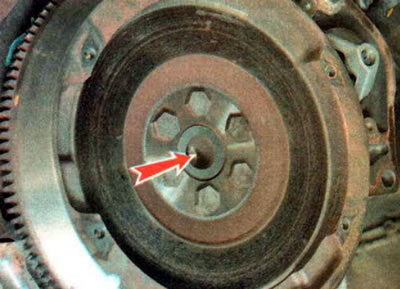
5. Screw in one of the bolts securing the gearbox to the engine and, holding the flywheel from turning with a mounting blade or a wide slotted screwdriver, use an 11 mm socket or open-end wrench to unscrew the six bolts securing the basket to the flywheel.

5. Screw in one of the bolts securing the gearbox to the engine and, holding the flywheel from…


6. Remove the basket and driven disk.

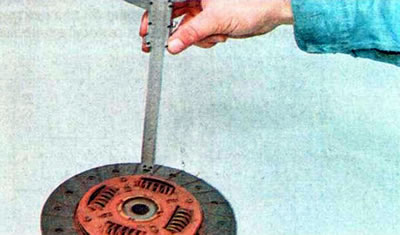
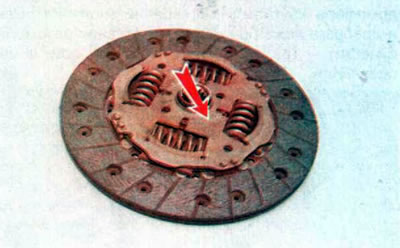
7. Rivets that fasten the friction linings of the driven disk are sunken by less than 0.3 mm relative to the disk surface - this is the second sign that the clutch needs to be replaced.

7. Rivets that fasten the friction linings of the driven disk are sunken by less than 0.3 mm…


During operation, the driven disk linings wear out. If the driven clutch disc is not replaced in a timely manner, the metal rivets securing the friction linings may come into contact with the working surfaces of the pressure plate and flywheel (if, as a result of wear, the rivets are recessed less than the permissible value, see above), leaving furrows on them.


If such grooves are found, it is necessary to replace the basket along with the driven disk. And if deep grooves remain on the surface of the flywheel, then the flywheel will have to be replaced. Otherwise, jerking and twitching of the car is possible even when the clutch is smoothly engaged.

8. Loose, cracked torsional vibration damper springs (the reason for jerking and rattling even when the car starts moving smoothly) — the third sign that the clutch needs to be replaced.

8. Loose, cracked torsional vibration damper springs (the reason for jerking and rattling even when…


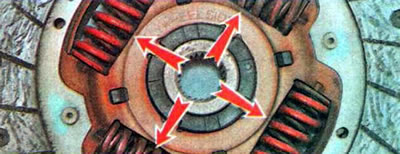
9. The amount of wear on the clutch pressure plate is more than 0.2 mm - the fourth sign that the clutch needs to be replaced.

9. The amount of wear on the clutch pressure plate is more than 0.2 mm - the fourth sign that the…


10. Clean the flywheel surface from wear products and degrease it.

11. Check the clutch slave cylinder.


Comment.
  • In addition to the universal mandrel for centering the driven clutch disc relative to the clutch basket, you can use a mandrel for centering the driven clutch disc relative to the flywheel.
  • In addition to the universal mandrel for centering the driven clutch disc relative to the clutch…
  • The following is the sequence of operations when using this mandrel. When using a universal drift to center the driven disc relative to the clutch basket, install the clutch according to the instructions included with the drift.


12. Place the driven clutch disc on the mandrel so that when installing the disc on the flywheel, the Flywheel inscription on the driven disc is on the flywheel side.

12. Place the driven clutch disc on the mandrel so that when installing the disc on the flywheel,…


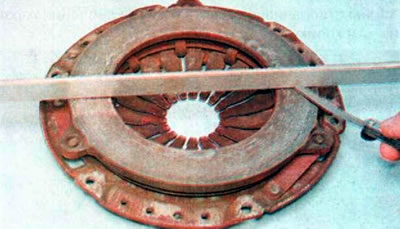
13. Insert the centering mandrel together with the driven clutch disc into the central hole of the flywheel.

13. Insert the centering mandrel together with the driven clutch disc into the central hole of the…


14. Install the clutch basket on the flywheel and tighten its mounting bolts step by step to a torque of 15 Nm. If necessary, hold the flywheel from turning with a mounting blade or a wide slotted screwdriver (see above).


14. Install the clutch basket on the flywheel and tighten its mounting bolts step by step to a…


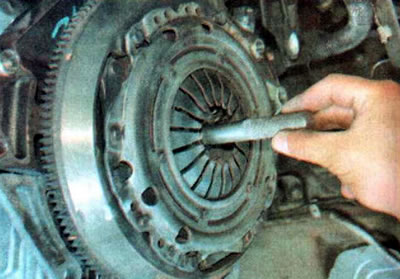
15. Remove the centering mandrel.

16. Install the remaining parts in reverse order.

Warning: When installing the gearbox, do not rest the end of the input shaft on the petals of the clutch basket spring. This may result in clutch failure.

The article was checked: Vladimir Romannikov
This article is available at russian, bulgarian, belarusian, ukrainian, serbian, croatian, romanian, polish, slovak, hungarian

Share information:

Previous articles
Orlando 1: Clutch
Next articles

Replacing the clutch slave cylinder
Bleeding the clutch release hydraulic drive
Checking the technical condition of the clutch
Clutch — General Description
Clutch Pedal Position Sensor


See similar articles on the topic of Chevrolet cars:
Checking the level and adding brake fluid to the brake system and clutch reservoir Chevrolet Aveo T300 (2012-2018)
Checking the operation of overrunning clutch No. 2 (F2) Chevrolet Captiva 1 (2006-2018)
Checking and replacing engine management system sensors Chevrolet Cruze 1 (2008-2016)
Checking the condition and replacing the timing belt Chevrolet Lacetti 1 (2002-2009)
Replacing fluid in hydraulic brake and clutch drives Chevrolet Lanos T150 (2002-2009)
Checking the technical condition and checking the clutch Chevrolet Niva 1 (2002-2016)
Checking and replacing windshield wiper blades Chevrolet Tahoe 1 (1992-2000)
Link in different formats to this page


Visitor comments

No comments yet


How much will 35 + 28 =


Orlando 1 (2010-2018) 
  • General information
  • Introduction to manual
  • User manual
  • Maintenance
  • Troubleshooting
  • Power unit
  • Engine repair
  • Fuel and control system
  • Cooling and lubrication system
  • Ignition system
  • Transmission
  • Clutch
  • Gearbox
  • Drive shafts
  • Chassis
  • Car suspension
  • Steering
  • Brake system
  • Body
  • Exterior (external elements)
  • Doors, locks and windows
  • Electrical equipment
  • Equipment and devices
  • Windscreen wipers
  • Power devices
  • Electrical diagrams


Trailblazer 1 (2001-2008) 
  • General information
  • User manual
  • Troubleshooting
  • Maintenance
  • Power unit
  • Engine in a car
  • Engine overhaul
  • Cooling and heating
  • Fuel and exhaust system
  • Engine electrical equipment
  • Engine control
  • Transmission
  • Automatic gearbox
  • Transfer case
  • Drive shafts and cardan
  • Chassis
  • Brake system
  • Car suspension
  • Steering
  • Body
  • Exterior (external elements)
  • Interior (internal elements)
  • Doors, locks and windows
  • Electrical equipment
  • Equipment and devices
  • Electrical circuits


Lumina 1 (1989-1994) 
  • General information
  • Maintenance
  • Power unit
  • Engine 3.1L V6
  • Engine 3.8L V6
  • Engine overhaul
  • Cooling system
  • Power and exhaust system
  • Fuel injection
  • Engine electrical equipment
  • Reduced exhaust gas toxicity
  • Transmission
  • Automatic gearbox
  • Drive shafts
  • Chassis
  • Brake system
  • Car suspension
  • Steering
  • Body
  • Heating and air conditioning
  • Repair of body elements
  • Doors, covers and windows
  • Interior (internal elements)
  • Electrical equipment
  • Equipment and devices
  • Electrical circuits


ChevyMan.ru © 2017-2026 · Mobile version · Feedback · Site search · Interesting to read · Sitemap: EN BG BY UA RS HR RO PL SK HU

Aveo 2003-2008 · Aveo 2006-2011 · Aveo 2012-2018 · Captiva 2006-2018 · Cruze 2008-2016 · Lacetti 2002-2009 · Lanos 2002-2009 · Niva 2002-2016 · Tahoe 1992-2000 · Tahoe 2000-2014 · Lumina 1 1989-1994 · Trailblazer 1 2001-2008 · Orlando 1 2010-2018 ·
🛡️ For your security and to improve our service, this site uses cookies. You can disable them in your browser.