
Contents: Steel tubes ↧ Fuel hoses ↧
Warning: See warning in subsection 1
1. Before working on fuel lines or their connectors, it is necessary to relieve pressure in the system (see subsection 2)
2. The metal fuel supply line and fuel vapor circulation lines run from the fuel tank to the engine compartment. These tubes are attached to the body or frame elements with plastic clamps (see illustration). The metal tubes are connected to the tank, fuel filter and receiver with hoses. Fuel lines need to be inspected periodically for leaks or signs of damage.
4.2. The fuel lines are secured to the bottom of the vehicle with plastic clamps.
3. If damage to the fuel line is detected, it can be replaced with a steel tube of a similar diameter, onto which connectors of the appropriate type are installed. Fuel hoses should only be replaced with factory replacement parts as other hoses may not be able to withstand the fuel pressure that is generated in this system. It is prohibited to replace metal fuel lines with rubber hoses with clamps.
4. If the system or fuel filter is found to be clogged during disassembly, the fuel line must be disconnected and blown out. Check for signs of damage to the fuel pump intake.
5. Do not allow fuel lines to be located closer than 10 mm from exhaust system elements and 25 mm from the catalytic converter. The fuel lines must not rub against the engine, body or frame of the vehicle - the gap must be at least 6 mm.
6. When replacing the fuel line, it is necessary to remove all the fasteners with which it is attached to the body.
7. Since fuel lines are under high pressure, appropriate precautions must be taken when handling them.
Steel tubes
8. Replace steel fuel lines or fuel vapor lines only with original replacement parts or equivalent parts.
9. It is prohibited to replace steel fuel lines with copper or aluminum tubes, since such materials are destroyed by normal vehicle vibration.
10. Some fuel lines have threaded fittings with sealing rings. Sometimes fittings are loosened for servicing or replacing components.
- a) When loosening and disconnecting the coupling, it is necessary to use two keys: one (special) for the connecting nut, and the other for fixing the fixed element of the connection.
- b) To disconnect quick-release metal couplings, it is necessary to use a special GM device#J37088-A or equivalent (such devices are freely available).
- c) Inspect all O-rings for breaks or cracks. Replace hardened, worn or damaged rings.
- d) When replacing fuel lines, use only original equipment or their equivalent.
Fuel hoses
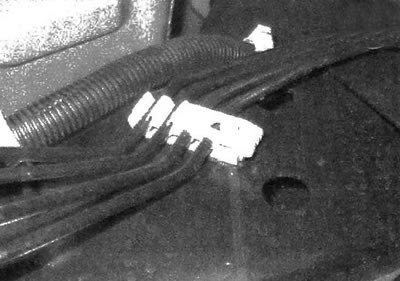
11. There are different methods for disconnecting quick-release couplings of fuel lines depending on their type (see illustrations). Clear the area. adjacent to the coupling. Disconnect the coupling and carefully remove the fuel line from the vehicle.
4.11a. To disconnect the plastic rings of the double-key coupling, squeeze the keys and pull the fuel lines in opposite directions
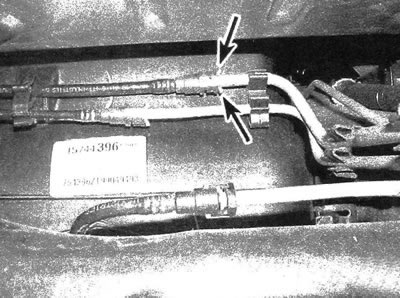
4.11b. To disconnect couplings with metal rings, it is necessary to use a special device (commercially available)

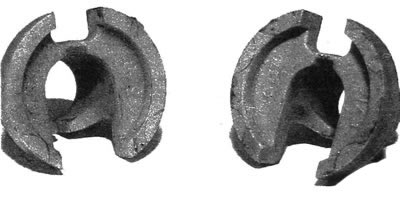
4.11c. To disconnect couplings with metal rings, it is necessary to first remove the retainer...
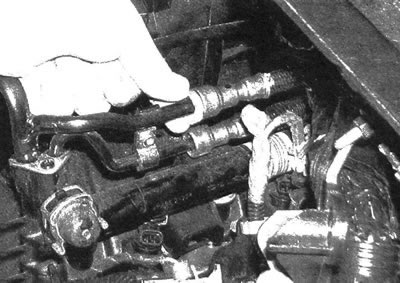
4.11d... place the device on the fuel line and insert it perpendicularly into the coupling, then stretch the sections in opposite directions (there is no need to use the device to connect the fuel lines
Warning: Damaged quick release couplings cannot be repaired. Do not attempt to repair a fuel line with a failed connector - in this case, replace the entire element.
12. Installation is carried out in the reverse order of removal, observing the following requirements.
- a) Clean the quick release connector with a lint-free cloth and lubricate it with clean engine oil.
- b) After connecting the quick-release coupling, check its reliability by trying to pull the connected sections in opposite directions.
- c) Install new threaded coupling sealing rings (if their presence is provided for by the design).
- d) Before starting the engine, turn the ignition key from the ON to the OFF position several times and check that there is no fuel leakage through the clutch.
The original text can be found on the website: ChevyMan.ru