
Warning: See warning in subsection 1.
Checking the performance of the fuel pump
1. If poor fuel supply is observed, first inspect all fuel lines to ensure that the problem is not due to a leak. Before performing this procedure, make sure that the tank is filled with the correct grade of fuel
2. Apply the parking brake. Have an assistant turn the ignition key to the ON position and listen for sounds coming from the fuel pump, which is located in the tank. A functioning pump should turn on to prime the system before starting the engine. To conclude that the pump is working, it is enough to hear a noise that lasts for two seconds. If the pump is confirmed to be operational, check the fuel system pressure.
3. If the pump does not make operating noise after the ignition is turned on, turn the key to the OFF position and remove the cover of the distribution block located in the engine compartment. Inspect the PCM "B" fuse for 20A, as well as the pump relay (see illustration) (to check, you can install a known good relay instead of the existing fuel pump relay). If the relay and fuse are OK, examine the relay control circuit from the distribution block to the PCM. If the circuit is OK, contact an authorized service station to diagnose the relay.
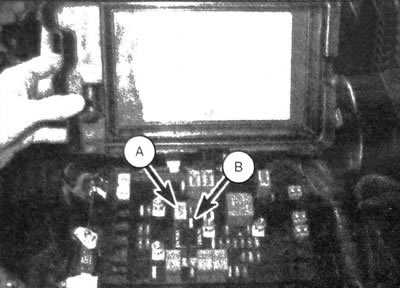
3.3. Location of fuel pump relay (A) and PCM fuse "B" (refer to the diagram located under the cover of the electrical distribution block)
4. If the pump does not turn on, disconnect the connector from the in-tank fuel pump (see subsection 5). Using a test lamp or voltmeter, make sure that voltage is supplied to the gray contact terminal of the connector. Using a continuity tester or ohmmeter, verify that there is continuity to ground at the black terminal of the connector. If there is no voltage on the gray contact terminal or an open circuit in the ground circuit is detected (on the black contact pin), replace the wiring harness.
5. If the presence of voltage on the gray contact terminal is confirmed, as well as the continuity of the ground circuit, but the fuel pump does not operate when turned on, it will have to be replaced (see subsection 7).
Checking the working fuel pressure
Note: To perform a fuel pressure test, you must use a high pressure fuel pressure gauge. The pressure gauge must have a suitable coupling for connection to the system service port. To check the functionality of the fuel pressure regulator, it is necessary to install a fuel shut-off valve in the return fuel line using the appropriate adapters.
6. Relieve the pressure in the fuel system (see subsection 2). Remove the service nipple cap and connect the pressure gauge (see illustrations). If the fuel tank has a protective panel, you need to find a service hole in it.
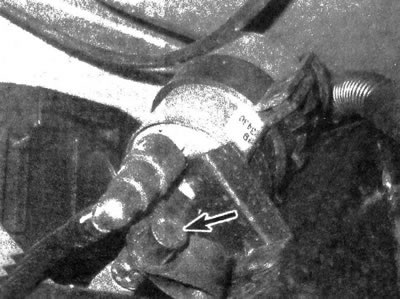
3.6. Location of the service nipple for checking fuel pressure
7. Turn the ignition key to the ON position. The pump should turn on for two seconds and then turn off. Take the pressure gauge reading and compare it with the value given in the specifications in this chapter. To obtain the highest reading, turn the key from ON to OFF several times if necessary.
8. If the fuel operating pressure is low, turn the ignition switch to the OFF position and relieve the pressure in the fuel system (see subsection 2). Install in the fuel return line and close the fuel shut-off valve.
Caution: Do not pinch the flexible section of the fuel line, otherwise it may be damaged.
Turn the ignition switch to the ON position and measure the fuel pressure.
Warning: Do not allow the fuel pressure to rise above 5 atm, otherwise damage to the fuel system components may occur
If it is now determined that the fuel pressure is higher than normal, replace the pressure regulator (see subsection 13). If the pressure is low, make sure that the fuel lines and fuel filter are not restricted. If no restriction is found, remove the fuel pump (see subsection 7) and inspect the fuel intake for blockages. Check for fuel leaks through the pump flexible tube. Make sure the pump wires do not have excessively high electrical resistance. If the inspection does not reveal any problems, replace the pump.
9. If the fuel pressure, the definition of which is described in paragraph. 7, above normal, make sure that the flow of the return fuel line is not restricted. If the fuel line is not clogged, replace the fuel pressure regulator (see subsection 13).
10. If the pressure is normal, start the engine. When the engine is running, the fuel pressure should be 0.2-0.7 atm. lower than the value defined in paragraph. 7. If this condition is not met, disconnect the vacuum hose of the pressure regulator and make sure that the vacuum in the hose is 305 - 355 mm Hg. If a vacuum is not created in the hose, inspect it for blockage or rupture. If vacuum is confirmed, connect the hose to the pressure regulator. If creating a vacuum does not reduce the fuel pressure in the regulator, replace this element.
11. Turn off the engine and observe the pressure change for 5 minutes. During this time period, there should be no pressure drop to less than 0.34 atm. If such a drop occurs, there is a fuel leak through the fuel line, injector, or pressure regulator diaphragm. The cause may also be a failure of the fuel pump control valve. The first check for internal fuel leakage is carried out on the pressure regulator - disconnect the vacuum hose and inspect it for fuel inside. The walls of the hose may be wet with fuel, or fuel may begin to leak out. Turn the ignition key from the ON to the OFF position several times and inspect the pressure regulator nipple for any fuel drips. If there is fuel in the regulator or its hose, replace this element. To check the injectors for leaks, cycle the ignition switch from ON to OFF several times to obtain the maximum pressure reading, then immediately close the forward and return fuel lines. If the pressure drops below 0.34 atm within 5 minutes, it means that fuel is leaking through one or more injectors. The leak may also occur through the fuel line or receiver, but in this case its signs will be obvious. If the injectors do not pass fuel when pressure is created, then the leak is through the main fuel line, or the fuel pump is faulty.
12. Before disconnecting the pressure gauge, the fuel pressure must be released (see subsection 2).
(Information taken from the official website «ChevyMan»)