
ChevyMan.ru
Mazda Mitsubishi Toyota Land Rover Honda Kia Nissan
English Русский
Български
Беларускі
Український
Српски
Hrvatski
Română
Polski
Slovenský
Magyar
|
Articles | Sitemap | Contacts |


Home   Aveo   Captiva   Cruze   Lacetti   Lanos   Niva   Tahoe   Others  
Captiva 1 (2006-2018)
  • Home
  • Captiva
  • 1 (2006-2018)
  • Body
  • Airbags
  • Clock spring — removal and installation

Clock spring — removal and installation (Chevrolet Captiva 1)

            0

Contents: Removal procedure ↧ Installation procedure ↧

Removal procedure


Attention! The Sensor and Diagnostic Module (SDM) can maintain sufficient voltage to activate the airbags and tensioners for 1 minute after turning off the ignition and removing the fuse. If the airbags and tensioners are not disconnected, do not start maintenance until one minute after the SDM power is disconnected. If the airbags are disconnected, maintenance can be started immediately, without a one-minute waiting period. Failure to temporarily disable the airbag system (SIR) may result in unexpected activation of the airbags, personal injury, and unnecessary maintenance of the airbag system.

Attention! The Sensor and Diagnostic Module (SDM) can maintain sufficient voltage to activate the…


1. Disconnect the cable from the negative battery terminal.

2. Remove the driver's airbag module. See "Driver Airbag Module" in this section.

3. Remove the steering wheel. See Section 6E, Steering Wheel and Steering Column.

4. Remove the upper and lower steering column cover panels. See Section 6E, Steering Wheel and Steering Column.

5. Remove the driver's knee bolster. See section 9E, Instruments/Driver Information.


6. Disconnect the connectors near the steering column.

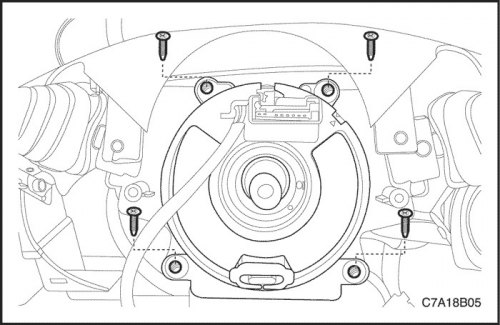
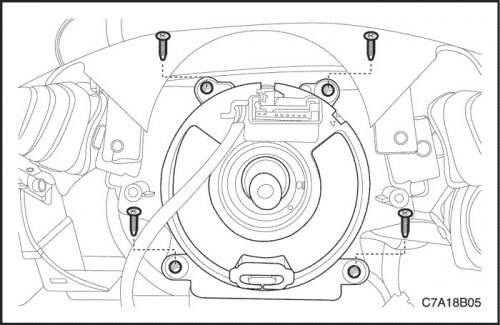
7. Unscrew the screws.

8. Remove the clock spring from the steering shaft.
8. Remove the clock spring from the steering shaft.


Installation procedure


Attention! An incorrectly adjusted watch spring may prevent the steering wheel from turning completely during the turn. Limiting the steering wheel rotation may cause the vehicle to crash. Incorrect adjustment of the watch spring can also cause the airbag inflator system (SIR) to become inoperable, and as a result, it will not work in the event of an accident. Both situations can lead to personal injury.


Note: If the clock spring is turned more than three turns clockwise or counterclockwise, the clock spring may be damaged.


1. Set the front wheels straight ahead.

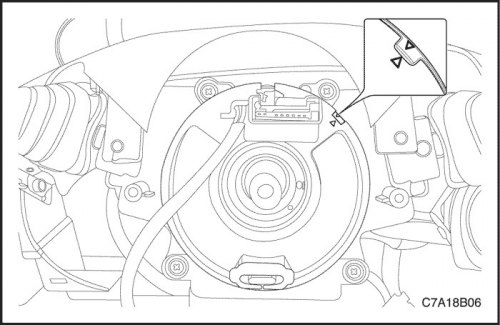
2. Secure the clock spring with screws.

Tighten

Tighten the clock spring mounting screws to 1.25 N·m (11 lb-in).
Tighten the clock spring mounting screws to 1.25 N·m (11 lb-in).


3. Turn the clock spring petal clockwise until it stops (don't use force).


4. Then turn the clock spring petal counterclockwise approximately 2.5 turns to the neutral position with the front wheels pointed straight ahead.

5. Align the pointers on the clock spring components properly.

6. Connect the connectors near the steering column.

7. Install the driver's knee bolster. See section 9E, Instruments/Driver Information.

8. Install the upper and lower steering column cover panels. See Section 6E, Steering Wheel and Steering Column.

9. Install the steering wheel. See Section 6E, Steering Wheel and Steering Column.

10. Install the driver airbag module. See "Driver Airbag Module" in this section.

11. Connect the cable to the negative terminal of the battery.

The original text can be found on the website: «chevyman.ru»

The article was checked: Vladimir Romannikov
This article is available at russian, bulgarian, belarusian, ukrainian, serbian, croatian, romanian, polish, slovak, hungarian

Share information:

Previous articles
Captiva 1: Airbags
Next articles

Driver airbag module
Sensor and Diagnostic Module (SDM)
Safety rules for servicing airbags
Diagnostic Trouble Codes (DTC)
Checking the integrity of the sensor and diagnostic module (SDM)
Passenger airbag module
Longitudinal roof beam airbag module
Side airbag sensor
Airbag module deployment (inside the vehicle)
Airbag module deployment (outside the vehicle)


See similar articles on the topic of Chevrolet cars:
Replacing the rear suspension spring Chevrolet Aveo T300 (2012-2018)
Replacing the rear suspension spring Chevrolet Cruze 1 (2008-2016)
Wiring diagram for instrument cluster illumination, switches, ashtray, clock and audio system Chevrolet Lacetti 1 (2002-2009)
Removal the spring Chevrolet Lanos T150 (2002-2009)
Setting the clock Chevrolet Tahoe 1 (1992-2000)
Replacing the gas spring Chevrolet Lumina 1 (1989-1994)
Link in different formats to this page


Visitor comments

No comments yet


How much will 34 + 16 =


Captiva 1 (2006-2018) 
  • Manual
  • Before leaving
  • Keys, doors and windows
  • Seats, protection systems
  • Instruments and controls
  • Lighting system
  • Information and entertainment
  • Navigation system
  • Climate control
  • Driving a car
  • Car care
  • Maintenance
  • Engine 2.0 l (diesel)
  • Engine device
  • Troubleshooting
  • Engine repair
  • Cooling system
  • Engine electrical equipment
  • Control and power systems
  • Exhaust system
  • Engine FAM II 2.4D
  • Engine device
  • Troubleshooting
  • Engine repair
  • Cooling system
  • Engine electrical equipment
  • Control and power systems
  • Exhaust system
  • Engine HFV6 3.2L
  • Engine device
  • Troubleshooting
  • Engine repair
  • Cooling system
  • Engine electrical equipment
  • Control and power systems
  • Exhaust system
  • Transmission
  • Front drive axle
  • Rear drive axle
  • Automatic gearbox - device
  • Automatic gearbox - service
  • Automatic gearbox - repair
  • Manual gearbox - device
  • Manual gearbox - service and repair
  • Clutch
  • Transfer case
  • Chassis
  • Car suspension
  • Brake system
  • Steering
  • Body
  • Heating and ventilation
  • Air conditioning (manual)
  • Air conditioning (automatic)
  • Seat belts
  • Airbags
  • Car seat
  • Interior (internal elements)
  • Exterior (external elements)
  • Doors and windows
  • Electrical equipment
  • Equipment and devices
  • Lighting and lamps
  • Windshield wipers and washers
  • Electrical circuits


ChevyMan.ru © 2017-2026 · Mobile version · Feedback · Site search · Interesting to read · Sitemap: EN BG BY UA RS HR RO PL SK HU

Aveo 2003-2008 · Aveo 2006-2011 · Aveo 2012-2018 · Captiva 2006-2018 · Cruze 2008-2016 · Lacetti 2002-2009 · Lanos 2002-2009 · Niva 2002-2016 · Tahoe 1992-2000 · Tahoe 2000-2014 · Lumina 1 1989-1994 · Trailblazer 1 2001-2008 · Orlando 1 2010-2018 ·
🛡️ For your security and to improve our service, this site uses cookies. You can disable them in your browser.