
ChevyMan.ru
Mazda Mitsubishi Toyota Land Rover Honda Kia Nissan
English Русский
Български
Беларускі
Український
Српски
Hrvatski
Română
Polski
Slovenský
Magyar
|
Articles | Sitemap | Contacts |


Home   Aveo   Captiva   Cruze   Lacetti   Lanos   Niva   Tahoe   Others  
Captiva 1 (2006-2018)
  • Home
  • Captiva
  • 1 (2006-2018)
  • Body
  • Airbags
  • Checking the integrity of the sensor and diagnostic module (SDM)

Checking the integrity of the sensor and diagnostic module (SDM) (Chevrolet Captiva 1)

            0

Contents: Checking the integrity of the sensor… ↧ Connected to power during operation… ↧
Use the following diagnostic chart if all circuits outside the sensing and diagnostic module (SDM) are normal as a result of running the appropriate diagnostic trouble code chart. This chart helps determine if the SDM needs to be replaced.

Description of the scheme


When the SDM detects a battery voltage greater than 9 V at SDM terminal 31, the air bag indicator lamp flashes seven times to confirm normal operation. At this time, the SDM performs initial checks, then measures resistances and switches to continuous monitoring.

When a malfunction is detected, the sensing and diagnostic module (SDM) stores a corresponding diagnostic trouble code (DTC) and illuminates the air bag warning lamp.

If the fault is no longer present and/or the ignition is switched off and on again, the SDM clears the current fault codes and writes them to the archive file, with the exception of codes B0052, B0053, B0055, B1000, B1001, B1019. The diagnostic tool does not clear these codes because they require replacement of the SDM. The SDM is replaced only after the fault that caused these fault codes to be stored has been corrected.

Checking the integrity of the sensor and diagnostic module (SDM)


Caution! The sensing and diagnostic module (SDM) can retain sufficient voltage to deploy the air bags and pretensioners for 1 minute after the ignition is turned off and the fuse is removed. If the air bags and pretensioners are not disconnected, do not begin servicing until one minute has passed after disconnecting power from the SDM. Failure to do so could result in personal injury.


Attention! Handle the Sensor and Diagnostic module (SDM) very carefully during maintenance. Do not hit or shake the SDM. Never connect power to the Airbag Inflator system (SIR) unless the SDM is rigidly connected to the vehicle. In order for the Airbag Inflator system (SIR) to work correctly, all the mounting bolts of the SDM sensor and diagnostic module must be carefully tightened, and the arrow on the SDM must point towards the front of the vehicle. If the SDM module is not firmly attached to the vehicle, the included module may trigger, causing the airbags to release unexpectedly and causing injury.


Step Operation Values Yes No
1
  1. Turn the ignition key to the LOCK position and remove it.
  2. Connect all components of the airbag system and ensure that all components are installed correctly.
  3. Make sure the ignition key is in the off position for at least 30 seconds.
  4. When you turn on the ignition, watch the airbag indicator light. Did the light flash seven times?
-
Delete the diagnostic trouble codes for the Inflatable Airbag system (SIR) and go to "Checking the diagnostic system"
Go to Step 2
2
  1. Turn the ignition key to the LOCK position and remove it.
  2. Connect the scan tool to the data link connector (DLC).
  3. Turn the ignition to the ON position.
  4. Read the diagnostic trouble codes of the inflatable airbag system using the diagnostic device. Is the same diagnostic fault code displayed as when the inflatable Airbag diagnostic system (SIR) was previously checked?
-
Go to Step 3.
Go to the table for the indicated diagnostic trouble code (DTC).
3
  1. Clear diagnostic trouble codes for the airbag system.
  2. Turn off the ignition for at least 30 seconds.
  3. When you turn on the ignition, watch the airbag indicator light. Did the light flash seven times?
-
The system is normal
Go to Step 4
4
  1. Turn the ignition key to the LOCK position and remove it.
  2. Disconnect the sensing and diagnostic module (SDM) connector.
  3. Replace the SDM module.
  4. Connect the sensing and diagnostic module (SDM) connector and make sure all components are installed correctly. Is the repair complete?
-
Go to item "Checking the diagnostic system".
-


Connected to power during operation and start-up
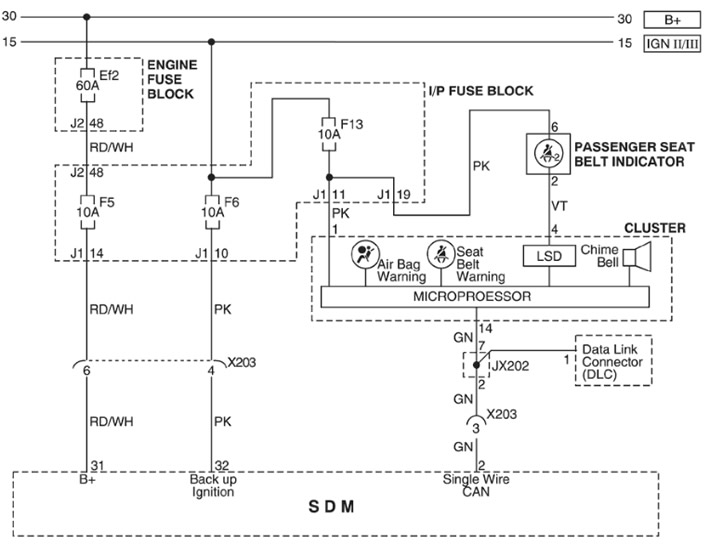


Connected to power during operation and start-up


(The article was reprinted from the website «ChevyMan.ru»)

The article was checked: Vladimir Romannikov
This article is available at russian, bulgarian, belarusian, ukrainian, serbian, croatian, romanian, polish, slovak, hungarian

Share information:

Previous articles
Captiva 1: Airbags
Next articles

Diagnostics using a diagnostic device
Location of Airbag System components (SIR)
Electrical diagram of the airbag system
Technical characteristics of airbags
General description and operation of airbags
Diagnostic Trouble Codes (DTC)
Safety rules for servicing airbags
Sensor and Diagnostic Module (SDM)
Driver airbag module
Clock spring — removal and installation


See similar articles on the topic of Chevrolet cars:
Oxygen Concentration Diagnostic Sensor Chevrolet Aveo T300 (2012-2018)
Checking the electrical connector of the front passenger airbag module Chevrolet Cruze 1 (2008-2016)
Removal the Oxygen Diagnostic Sensor Chevrolet Lacetti 1 (2002-2009)
Checking the crankshaft position sensor and its circuits Chevrolet Lanos T150 (2002-2009)
Checking the engine on a car after repair Chevrolet Niva 1 (2002-2016)
Induction ignition sensor (before 1995) — checking and replacement Chevrolet Tahoe 1 (1992-2000)
Checking the integrity of the circuit Chevrolet Orlando 1 (2010-2018)
Link in different formats to this page


Visitor comments

No comments yet


How much will 25 + 37 =


Captiva 1 (2006-2018) 
  • Manual
  • Before leaving
  • Keys, doors and windows
  • Seats, protection systems
  • Instruments and controls
  • Lighting system
  • Information and entertainment
  • Navigation system
  • Climate control
  • Driving a car
  • Car care
  • Maintenance
  • Engine 2.0 l (diesel)
  • Engine device
  • Troubleshooting
  • Engine repair
  • Cooling system
  • Engine electrical equipment
  • Control and power systems
  • Exhaust system
  • Engine FAM II 2.4D
  • Engine device
  • Troubleshooting
  • Engine repair
  • Cooling system
  • Engine electrical equipment
  • Control and power systems
  • Exhaust system
  • Engine HFV6 3.2L
  • Engine device
  • Troubleshooting
  • Engine repair
  • Cooling system
  • Engine electrical equipment
  • Control and power systems
  • Exhaust system
  • Transmission
  • Front drive axle
  • Rear drive axle
  • Automatic gearbox - device
  • Automatic gearbox - service
  • Automatic gearbox - repair
  • Manual gearbox - device
  • Manual gearbox - service and repair
  • Clutch
  • Transfer case
  • Chassis
  • Car suspension
  • Brake system
  • Steering
  • Body
  • Heating and ventilation
  • Air conditioning (manual)
  • Air conditioning (automatic)
  • Seat belts
  • Airbags
  • Car seat
  • Interior (internal elements)
  • Exterior (external elements)
  • Doors and windows
  • Electrical equipment
  • Equipment and devices
  • Lighting and lamps
  • Windshield wipers and washers
  • Electrical circuits


ChevyMan.ru © 2017-2026 · Mobile version · Feedback · Site search · Interesting to read · Sitemap: EN BG BY UA RS HR RO PL SK HU

Aveo 2003-2008 · Aveo 2006-2011 · Aveo 2012-2018 · Captiva 2006-2018 · Cruze 2008-2016 · Lacetti 2002-2009 · Lanos 2002-2009 · Niva 2002-2016 · Tahoe 1992-2000 · Tahoe 2000-2014 · Lumina 1 1989-1994 · Trailblazer 1 2001-2008 · Orlando 1 2010-2018 ·
🛡️ For your security and to improve our service, this site uses cookies. You can disable them in your browser.