Contents: Checking the refrigeration system ↧ Quick check procedure for… ↧ Pressure versus temperature in… ↧ Checking for leaks in the… ↧ Liquid Leak Detectors ↧ Electronic Leak Detectors ↧ General Instructions for Verification ↧ Checking service ports/access valves ↧ Checking the evaporator heat… ↧ Checking the compressor shaft seal ↧ SP compressor/refrigeration system… ↧
Checking the refrigeration system
If you suspect a fault in the refrigeration system, the following checks must be performed:
1. Check the outside surfaces of the radiator and condenser heat exchangers to ensure that air flow is not obstructed by dirt, leaves, or other foreign material. Check between the condenser and radiator, as well as all outside surfaces.
2. Check for obstructions or kinks in the condenser heat exchanger, hoses and tubes.
3. Check the operation of the electric fan.
4. Check all air ducts for leaks or obstructions. Poor air flow may indicate a clogged evaporator coil.
5. Check compressor clutch slippage.
6. Check the drive belt tension.
Quick check procedure for insufficient cooling
Perform the following "hand feel" procedure to quickly check that your air conditioning system has the proper charge of R-134a refrigerant. The air temperature should be above 21°C (70°F) for most models,
1. Warm up the engine. Let the engine idle.
2. Open the hood and all doors.
3. Turn on the air conditioner.
4. Set the temperature control to the maximum cooling position.
5. Set the fan speed switch to the maximum speed position.
6. Manually feel the temperature of the evaporator outlet pipe. The pipe should be cold.
7. Check for other issues. See "Checking the refrigeration system" in this section.
8. Check the system for leaks. See "Checking for refrigeration system leaks" in this section. If a leak is detected, discharge the system and repair the leak. Once the repair is complete, evacuate the system and charge it.
9. If there is no leak, See "Diagnosing Insufficient Cooling" in this section.
Pressure versus temperature in R-134A system
|
TEMPERATURE°C (°F)*
|
PRESSURE kPa (psig)*
|
TEMPERATURE°C (°F)*
|
PRESSURE kPa (psig)*
|
|
-8 (17.6)
|
113.1 (16.4)
|
9 (48.2)
|
296.2 (43.0)
|
|
-7 (19.4)
|
121.5 (17.6)
|
10 (50.0)
|
309.6 (44.9)
|
|
-6 (21.2)
|
130.2 (18.9)
|
15 (59.0)
|
383.7 (55.7)
|
|
-5 (23.0)
|
139.1 (20.2)
|
20 (68.0)
|
467.7 (67.8)
|
|
-4 (24.8)
|
148.4 (21.5)
|
25 (77.0)
|
567.5 (82.3)
|
|
-3 (26.6)
|
157.9 (22.9)
|
30 (86.0)
|
667.8 (96.9)
|
|
-2 (28.4)
|
167.6 (24.3)
|
35 (95.0)
|
785.6 (113.9)
|
|
-1 (30.2)
|
177.8 (25.8)
|
40 (104.0)
|
916.4 (133.0)
|
|
0 (32.0)
|
188.2 (27.3)
|
45 (113.0)
|
1 062.2 (154.0)
|
|
1 (33.8)
|
198.8 (28.8)
|
50 (122.0)
|
1 222.1 (177.2)
|
|
2 (35.6)
|
209.9 (30.4)
|
55 (131.0)
|
1 398.2 (202.8)
|
|
3 (37.4)
|
221.2 (32.1)
|
60 (140.0)
|
1 589.6 (230.5)
|
|
4 (39.2)
|
232.9 (33.8)
|
65 (149.0)
|
1 799.0 (260.9)
|
|
5 (41.0)
|
245.0 (35.5)
|
70 (158.0)
|
2 026.6 (293.9)
|
|
6 (42.8)
|
257.4 (37.3)
|
75 (167.0)
|
2 272.2 (329.5)
|
|
7 (44.6)
|
269.8 (39.1)
|
80 (176.0)
|
2 544.0 (369.0)
|
|
8 (46.4)
|
282.9 (41.0)
|
-
|
-
|
* All calculated values are rounded to one decimal place.
Evaporator range: From -7 to 7°C (19.4 to 44.6°F), these values represent the temperature of the gas inside the coil, not at its surface. Add 2-6°C (4-11°F) to the temperature of the coil and the air around it.
Capacitor range: 45 to 70°C (113-158°F), this is not the ambient temperature. Add 19-22°C (34-40°F) to the ambient temperature to ensure normal heat transfer. Then see the pressure chart.
Example: 32°C (90°F) Outside temperature +22°C (40°F) = 54°C (130°F)
The condenser temperature at which a pressure of 1379 kPa (200 psig) is achieved, with an air flow of 50 km/h (31 mph).
Checking for leaks in the refrigeration system; Checking for refrigerant leaks
Check for leaks if you suspect that the system is leaking refrigerant. Also check for leaks after any maintenance work that involves disassembling pipes or connections. Leaks typically occur at refrigeration system fittings and connections. Leaks are usually caused by the following reasons:
- Incorrect tightening torque.
- Damage to sealing rings
- Dirt or fibers on the O-rings.
Liquid Leak Detectors
Liquid detector solutions are used to detect leaks on fittings. Apply the solution to the suspected leak location with the brush supplied with the solution. Watch for bubbles to appear. They indicate the presence and location of the leak.
For areas where this method is difficult to use, such as the evaporator and condenser sections, an electronic leak detector is more convenient.
Electronic Leak Detectors
Follow the manufacturer's instructions for calibration, operation, and maintenance of the electronic leak detector. Battery condition is especially important for the accuracy of the portable model. Set the detector to R-134a mode before testing.
Note: Electronic leak detectors are sensitive to windshield cleaning solutions, solvents and cleaners, and some types of automotive adhesive. To avoid false detections, it is important to keep the surface clean. To avoid damaging the detector, make sure all surfaces are dry.
General Instructions for Verification
1. Trace the entire contour of the refrigeration system.
2. Describe a full circle around each joint at a speed of 25-50 mm/s (1-2 inches/sec).
3. Hold the probe tip within 6 mm (1/4 in) of the surface.
4. Do not block the air intake.
5. The intermittent beep of 1-2 clicks per second will change to a continuous tone when a leak is detected. Adjust the balance control to maintain a frequency of 1-2 clicks per second.
6. Check all of the following areas even after a leak has been found and confirmed:
- Evaporator inlet and outlet.
- Inlet and outlet of the receiver-dryer.
- Condenser inlet and outlet.
- Soldering and welding points.
- Damage locations.
- Hose connections.
- Compressor rear cover
- All fittings and connections.
Checking service ports/access valves
The service ports are protected by sealing caps. Care must be taken to ensure that these caps do not unscrew or get lost. Each port has its own cap.
Checking the evaporator heat exchanger
Evaporator heat exchanger leaks are difficult to find. Check the evaporator heat exchanger by following this procedure:
1. Turn on the electric fan at maximum speed for at least 15 minutes.
2. Turn off the fan.
3. Wait 10 minutes.
4. Remove the electric fan resistor. See section 7A, "Heating and Ventilation System".
5. Insert the leak detector probe as close to the evaporator coil as possible. The detector will indicate a leak with a continuous beep.
6. To find compressor oil on the surface of the heat exchanger, use a flashlight.
Checking the compressor shaft seal
1. Blow compressed air behind and in front of the compressor clutch/pulley for at least 15 minutes.
2. Wait 1-2 minutes.
3. Check the area in front of the pulley. If the detector beeps continuously, there is a leak.
SP compressor/refrigeration system diagnostics
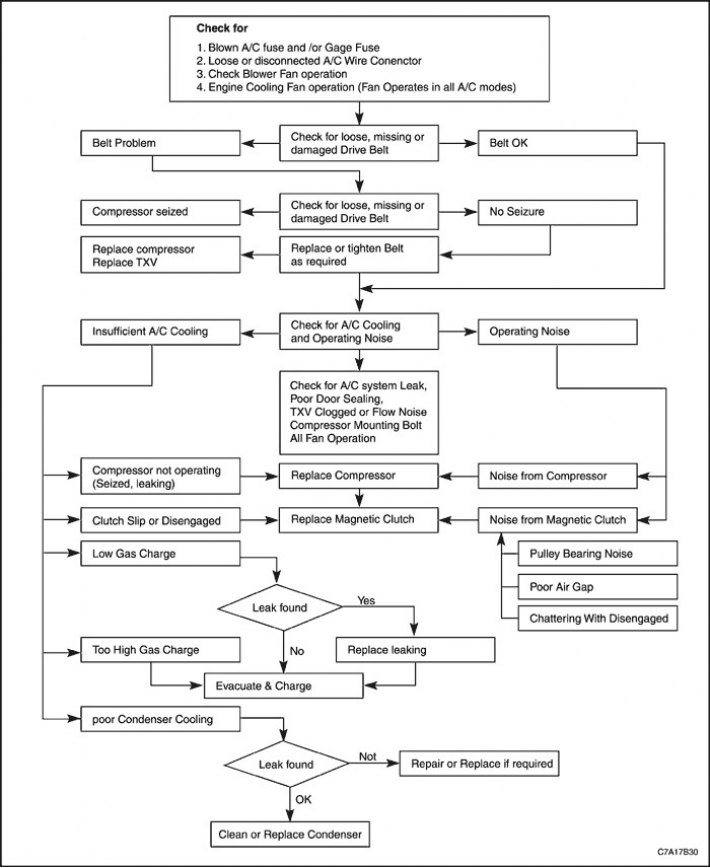
Air conditioning system complaints generally fall into three types: Refrigerant/oil leaks, operating noise, and insufficient cooling.
For information on proper maintenance of the air conditioning system, refer to the following diagnostic description.