
ChevyMan.ru
Mazda Mitsubishi Toyota Land Rover Honda Kia Nissan
English Русский
Български
Беларускі
Український
Српски
Hrvatski
Română
Polski
Slovenský
Magyar
|
Articles | Sitemap | Contacts |


Home   Aveo   Captiva   Cruze   Lacetti   Lanos   Niva   Tahoe   Others  
Tahoe 2 and 3 (2000-2014) Tahoe 1 (1992-2000)
  • Home
  • Tahoe
  • 2 (2000-2014)
  • Chassis
  • Brake system
  • Brake caliper repair

Brake caliper repair (Chevrolet Tahoe 2)

            0

Contents: Disassembly ↧ Assembly ↧

Disassembly


Note: Brake caliper repair shown using a 2500 series front caliper as an example.


1. Remove the brake caliper.

2. Drain the brake fluid from the caliper.

Caution: When pushing the piston out with compressed air, do not catch the piston with your hand, this will cause injury.


Note: The brake caliper pistons are made of phenolic plastic. The pistons have stainless steel inserts that come into contact with the brake pads.


3. Secure the caliper in a vice.

4. Place a wooden block between the pistons and the outer bridge of the caliper.
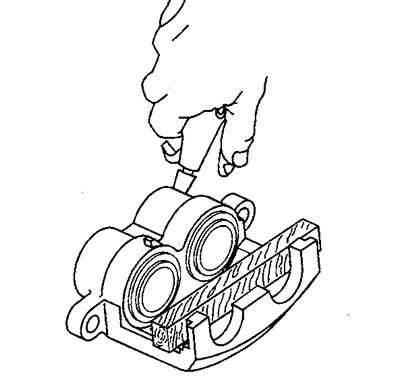
4. Place a wooden block between the pistons and the outer bridge of the caliper.


5. Cover the support with a towel.

6. Apply compressed air to the brake hose mounting hole and push out the pistons.

7. If one of the pistons cannot be removed in this way, perform the following operations.
  • a) Install the pressed out piston back into place.
  • b) Using a clamp and a small wooden block, insert the piston into the caliper to half the length of the piston.
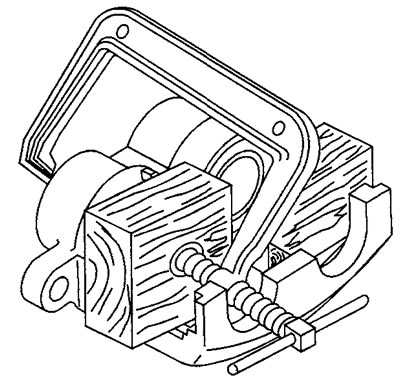
b) Using a clamp and a small wooden block, insert the piston into the caliper to half the length of…

  • c) Place the second plate in front of the other piston.
  • d) Cover the support with a towel.
  • d) Apply compressed air to the brake hose mounting hole and push out the piston.

8. Remove the pistons (3) from the caliper holes.
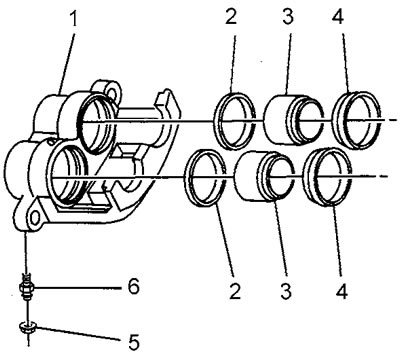


8. Remove the pistons (3) from the caliper holes.


9. Remove the dust boots (4) from the caliper. Do not scratch the dust boot seat in the caliper.

10. Using a plastic or wooden rod, remove the piston seals (2) from the caliper. _

11. Remove the cover (5) of the drain screw (6).

12. Remove the drain screw.

13. Wash all metal parts with denatured alcohol. Dry the parts with compressed air. Blow out the caliper channels.

14. Replace pistons or caliper if:
  • there are scratches or scoring on the caliper and/or piston;
  • there is corrosion or pitting in the caliper bores;
  • there is damage to the piston.

Assembly


Caution: When assembling the brake caliper, lubricate the parts to be installed with clean brake fluid immediately before installation. This will prevent accidental contamination.


1. Lubricate the piston, piston seal, and piston hole in the caliper with brake fluid (dOT-3 fluid).
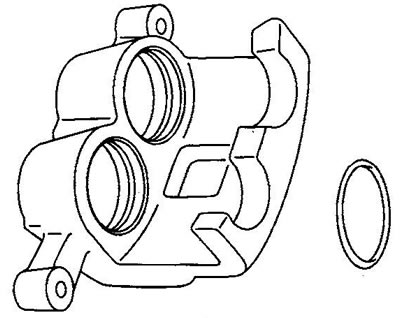
1. Lubricate the piston, piston seal, and piston hole in the caliper with brake fluid (dOT-3 fluid).


2. Install the rectangular piston seal into the bore groove in the caliper.


3. If the seal is twisted, straighten it out.

4. Install the dust cover on the piston so that the fold of the cover is directed towards the caliper body.
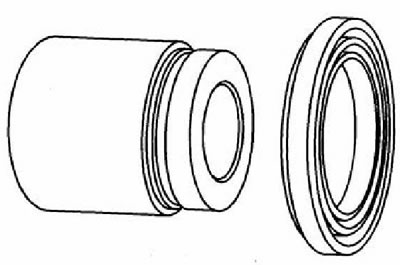
4. Install the dust cover on the piston so that the fold of the cover is directed towards the…


5. Install the piston into the caliper (without distortion) and insert the dust boot into the groove in the caliper hole.
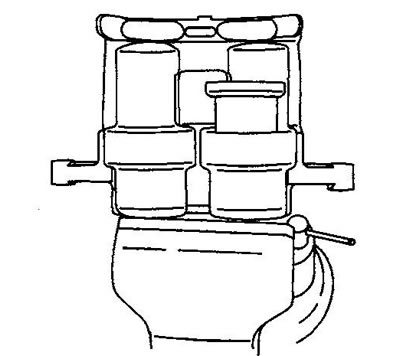
5. Install the piston into the caliper (without distortion) and insert the dust boot into the…


6. Place a wooden block on the piston.
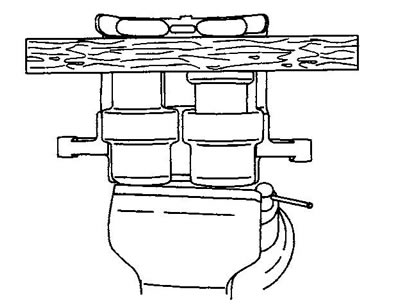
6. Place a wooden block on the piston.


7. Using uniform pressure from your hand, push the piston into the caliper.


8. Remove the plate.

9. Screw the drain screw into the caliper housing. Tightening torque 72 Nm.

10. Install the drain screw cap.

11. Install the caliper on the car.

The article was checked: Vladimir Romannikov
This article is available at russian, bulgarian, belarusian, ukrainian, serbian, croatian, romanian, polish, slovak, hungarian

Share information:

Previous articles
Tahoe 2 and 3: Brake system
Next articles

Brake caliper — removal and installation
Lapping in the brake pad and disc
Brake pads — replacement
Checking the brake caliper support
Checking the brake caliper
Replacing the disc brake mounting hardware
Brake disc — removal and installation
Front brake screen
Rear brake screen
Hydraulic part of the brake system — location of components


See similar articles on the topic of Chevrolet cars:
Front Disc Brake Caliper Repair Chevrolet Aveo T200 (2003-2008)
Parking brake Chevrolet Captiva 1 (2006-2018)
Replacing the front wheel brake caliper assembly Chevrolet Cruze 1 (2008-2016)
Checking the fluid level in the brake and clutch hydraulic reservoir Chevrolet Lacetti 1 (2002-2009)
Safety precautions during maintenance and repair Chevrolet Lanos T150 (2002-2009)
Brake system Chevrolet Niva 1 (2002-2016)
Removal, repair and installation of disc brake caliper Chevrolet Lumina 1 (1989-1994)
Link in different formats to this page


Visitor comments

No comments yet


How much will 34 + 31 =


Tahoe 2 and 3 (2000-2014) 
  • General information
  • Vehicle characteristics
  • Vehicle device
  • Manual
  • Maintenance
  • Power unit
  • Engine repair
  • Engine overhaul
  • Cooling system
  • Injection and control system
  • Exhaust system
  • Engine electrical equipment
  • Transmission
  • Automatic gearbox 4L60, 4L65, 4L70
  • Automatic gearbox 6L50, 6L80, 6L90
  • Transfer case
  • Drive shafts and cardan
  • Front drive axle
  • Rear drive axle
  • Chassis
  • Car suspension
  • Steering
  • Brake system
  • Body (until 2007)
  • Exterior (external elements)
  • Interior (internal elements)
  • Doors, locks and windows
  • Heating and air conditioning
  • Security System (SRS)
  • Body (since 2007)
  • Exterior (external elements)
  • Doors, locks and windows
  • Interior (internal elements)
  • Electrical equipment
  • Electrical appliances (until 2007)
  • Lighting and lamps (until 2007)
  • Audio system (until 2007)
  • Electrical appliances (since 2007)
  • Lighting and lamps (since 2007)
  • Audio system (since 2007)
  • Wiring diagrams (2000-2005)
  • Wiring diagrams (2005-2007)
  • Wiring diagrams (since 2007)


Tahoe 1 (1992-2000) 
  • General information
  • User manual
  • Maintenance
  • Power unit
  • Engine in a car
  • Engine removed
  • Cooling system
  • Heating and air conditioning
  • Fuel and exhaust systems
  • Decreased toxicity
  • Transmission
  • Manual gearbox
  • Automatic gearbox
  • Transfer case
  • Clutch and drive shafts
  • Chassis
  • Brake system
  • Car suspension
  • Steering
  • Body
  • Repair of body elements
  • Electrical equipment
  • Engine electrics
  • Equipment and devices
  • Electrical circuits


ChevyMan.ru © 2017-2026 · Mobile version · Feedback · Site search · Interesting to read · Sitemap: EN BG BY UA RS HR RO PL SK HU

Aveo 2003-2008 · Aveo 2006-2011 · Aveo 2012-2018 · Captiva 2006-2018 · Cruze 2008-2016 · Lacetti 2002-2009 · Lanos 2002-2009 · Niva 2002-2016 · Tahoe 1992-2000 · Tahoe 2000-2014 · Lumina 1 1989-1994 · Trailblazer 1 2001-2008 · Orlando 1 2010-2018 ·
🛡️ For your security and to improve our service, this site uses cookies. You can disable them in your browser.