ChevyMan.ru
Mazda Mitsubishi Toyota Land Rover Honda Kia Nissan
English Русский
Български
Беларускі
Український
Српски
Hrvatski
Română
Polski
Slovenský
Magyar
|
Articles | Sitemap | Contacts |


Home   Aveo   Captiva   Cruze   Lacetti   Lanos   Niva   Tahoe   Others  
Tahoe 2 and 3 (2000-2014) Tahoe 1 (1992-2000)
  • Home
  • Tahoe
  • 2 (2000-2014)
  • Power unit
  • Injection and control system
  • Servicing fuel line connectors

Servicing fuel line connectors (Chevrolet Tahoe 2)

            0

Contents: Disconnection ↧ Connection ↧
Note: A special tool is required to disconnect the fuel line connectors.


Disconnection


Metal connectors


1. Relieve pressure in the fuel system.

2. Remove the outer retainer of the fuel line connector.
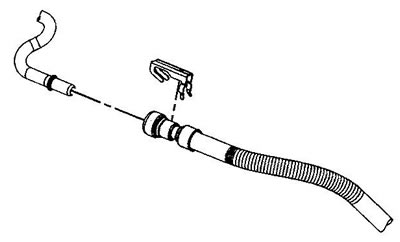
2. Remove the outer retainer of the fuel line connector.


3. Use compressed air to remove dirt from the fuel line connection area.
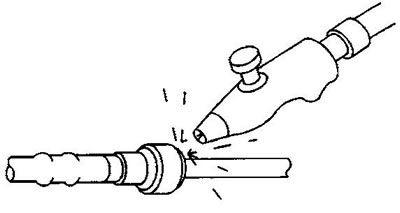
3. Use compressed air to remove dirt from the fuel line connection area.


Caution: Wear safety glasses when cleaning the connector with compressed air.


4. Insert the special tool into the connector of the inner half of the connector, then press the outer part of the connector to release the internal connector clips.
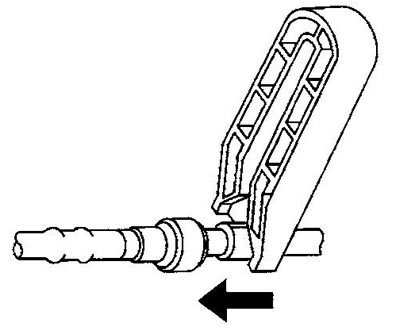
4. Insert the special tool into the connector of the inner half of the connector, then press the…


5. Pull the fuel lines until they are disconnected.
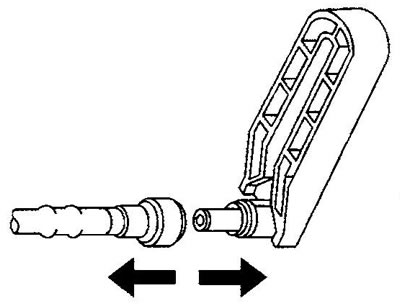


5. Pull the fuel lines until they are disconnected.


Note: If necessary, remove rust or burrs from the connector with emery cloth. Remove defects only with radial movements to avoid damaging the sealing surface of the rubber ring.


Plastic connectors


Please note: There may be several types of plastic fuel line connectors used on vehicles.
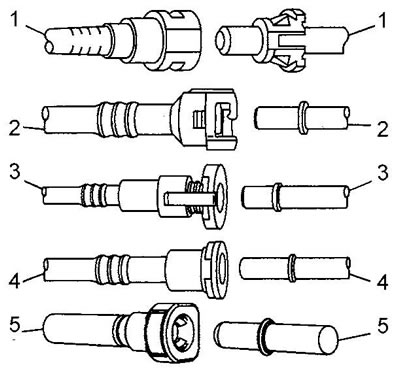

Connector types: 1 - Bartholomew connector, 2 - quick connector, 3 - compression lock, 4 - sliding…

Connector types: 1 - Bartholomew connector, 2 - quick connector, 3 - compression lock, 4 - sliding lock, 5 - pushing lock


1. Relieve pressure in the fuel system.

2. Use compressed air to remove dirt from the fuel line connection area.
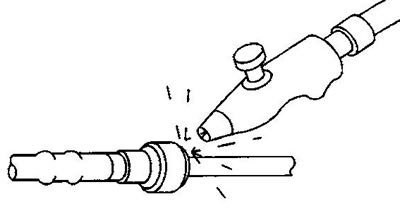
2. Use compressed air to remove dirt from the fuel line connection area.


Caution: Wear safety glasses when cleaning the connector with compressed air.


3. Disconnect the connector.
  • a) Type 1 - squeeze the clamps.

a) Type 1 - squeeze the clamps.

  • b) Type 2 - press the tab towards the slot of the connector.
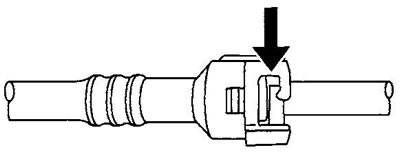
b) Type 2 - press the tab towards the slot of the connector.

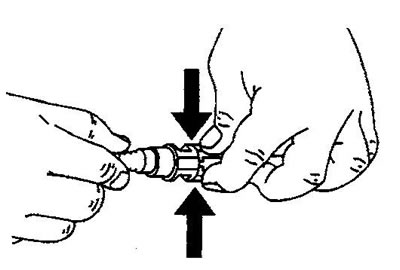
  • c) Type 3 - press on the places indicated by arrows on both sides of the plastic ring of the connector.
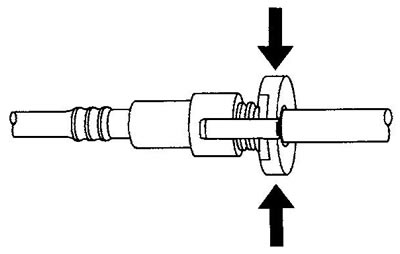
c) Type 3 - press on the places indicated by arrows on both sides of the plastic ring of the…

  • d) Type 4 - Press on one side of the release key. If the key does not move, press on the key from the opposite side (the key moves in one direction only).
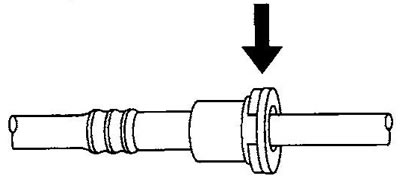
d) Type 4 - Press on one side of the release key. If the key does not move, press on the key from…

  • d) type 5 - press on the key indicated by the arrow.
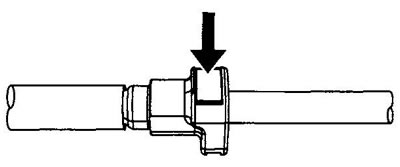
d) type 5 - press on the key indicated by the arrow.


4. Pull the fuel lines until they are disconnected.
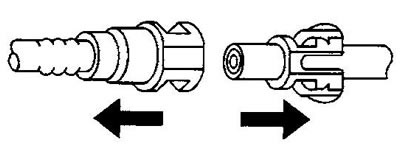


4. Pull the fuel lines until they are disconnected.


Connection


All connectors


Caution: To reduce the risk of fire, always lubricate the connector parts with a few drops of clean engine oil before connecting the fuel lines. This will ensure a tight seal.
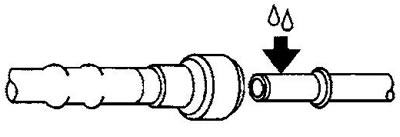

Caution: To reduce the risk of fire, always lubricate the connector parts with a few drops of clean…


1. Apply a few drops of clean motor oil to the inside of the fuel line connector.

2. Compress the outer and inner parts of the fuel lines until the clamps snap into place.
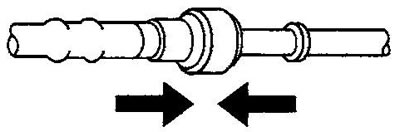
2. Compress the outer and inner parts of the fuel lines until the clamps snap into place.


3. Pull the fuel lines in both directions from the connector to check for a secure connection.
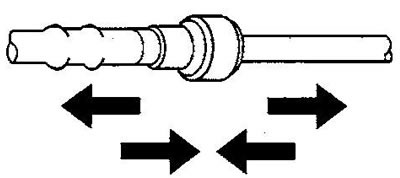


3. Pull the fuel lines in both directions from the connector to check for a secure connection.


4. Install the external fuel line retainer.

The article was checked: Vladimir Romannikov
This article is available at russian, bulgarian, belarusian, ukrainian, serbian, croatian, romanian, polish, slovak, hungarian

Share information:

Previous articles
Tahoe 2 and 3: Injection and control system
Next articles

Relieving pressure in the fuel system
Throttle body
Accelerator pedal position sensor
Oxygen sensor — removal and installation
Brake booster vacuum sensor
Draining the fuel tank
Fuel tank filler pipe
Fuel tank — removal and installation
Fuel tank pressure sensor
Fuel pump module


See similar articles on the topic of Chevrolet cars:
Checking the pressure in the fuel system Chevrolet Aveo T300 (2012-2018)
Visual inspection of fuel pressure (low pressure line) Chevrolet Captiva 1 (2006-2018)
Fuel injection system faults Chevrolet Cruze 1 (2008-2016)
Replacing the fuel filter Chevrolet Lacetti 1 (2002-2009)
Replacing the fuel filter Chevrolet Lanos T150 (2002-2009)
Fuel tank cap Chevrolet Niva 1 (2002-2016)
Fuel lines and their connectors — restoration and replacement Chevrolet Trailblazer 1 (2001-2008, petrol)
Link in different formats to this page


Visitor comments

No comments yet


How much will 45 + 17 =


Tahoe 2 and 3 (2000-2014) 
  • General information
  • Vehicle characteristics
  • Vehicle device
  • Manual
  • Maintenance
  • Power unit
  • Engine repair
  • Engine overhaul
  • Cooling system
  • Injection and control system
  • Exhaust system
  • Engine electrical equipment
  • Transmission
  • Automatic gearbox 4L60, 4L65, 4L70
  • Automatic gearbox 6L50, 6L80, 6L90
  • Transfer case
  • Drive shafts and cardan
  • Front drive axle
  • Rear drive axle
  • Chassis
  • Car suspension
  • Steering
  • Brake system
  • Body (until 2007)
  • Exterior (external elements)
  • Interior (internal elements)
  • Doors, locks and windows
  • Heating and air conditioning
  • Security System (SRS)
  • Body (since 2007)
  • Exterior (external elements)
  • Doors, locks and windows
  • Interior (internal elements)
  • Electrical equipment
  • Electrical appliances (until 2007)
  • Lighting and lamps (until 2007)
  • Audio system (until 2007)
  • Electrical appliances (since 2007)
  • Lighting and lamps (since 2007)
  • Audio system (since 2007)
  • Wiring diagrams (2000-2005)
  • Wiring diagrams (2005-2007)
  • Wiring diagrams (since 2007)


Tahoe 1 (1992-2000) 
  • General information
  • User manual
  • Maintenance
  • Power unit
  • Engine in a car
  • Engine removed
  • Cooling system
  • Heating and air conditioning
  • Fuel and exhaust systems
  • Decreased toxicity
  • Transmission
  • Manual gearbox
  • Automatic gearbox
  • Transfer case
  • Clutch and drive shafts
  • Chassis
  • Brake system
  • Car suspension
  • Steering
  • Body
  • Repair of body elements
  • Electrical equipment
  • Engine electrics
  • Equipment and devices
  • Electrical circuits


ChevyMan.ru © 2017-2026 · Mobile version · Feedback · Site search · Interesting to read · Sitemap: EN BG BY UA RS HR RO PL SK HU

Aveo 2003-2008 · Aveo 2006-2011 · Aveo 2012-2018 · Captiva 2006-2018 · Cruze 2008-2016 · Lacetti 2002-2009 · Lanos 2002-2009 · Niva 2002-2016 · Tahoe 1992-2000 · Tahoe 2000-2014 · Lumina 1 1989-1994 · Trailblazer 1 2001-2008 · Orlando 1 2010-2018 ·
🛡️ For your security and to improve our service, this site uses cookies. You can disable them in your browser.