


Removal
1. Disconnect the cable from the negative terminal of the battery.
2. Remove the air filter, adapter and gaskets (see chapter 4, section 8).
3. Disconnect the electrical connectors from the ignition distributor.
4. Remove the distributor cap and set it aside.
5. Scratch a mark on the distributor housing indicating the direction in which the distributor rotor points.
6. Mark the relative position of the distributor housing on the engine (see illustration).
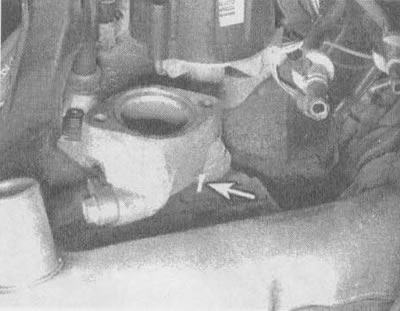
8.6. Before unscrewing the clamping bolt, mark it with marks (shown by arrow) location of the ignition distributor on the engine (for greater clarity, the thermostat housing has been removed)
7. Loosen the distributor mounting bolt and remove the clamp.
8. Remove the ignition distributor.
Caution! When removing the ignition distributor, do not allow the crankshaft to turn. When the crankshaft rotates, the rotor will turn, which will lead to a violation of the ignition timing setting and the need to adjust it.
Installation (after removing the ignition distributor, the crankshaft did not turn)
9. Install the ignition distributor rotor exactly in the position it occupied when the distributor was removed.
10. Insert the distributor into the engine. You may need to turn the distributor rotor slightly to ensure the drive gears engage. It may happen that the distributor does not fully enter the block due to the fact that the lower tail of its shaft is not correctly engaged with the oil pump shaft. After making sure that the distributor housing and its rotor are aligned with the previously made installation marks, use a wrench to turn the crankshaft by the bolt temporarily screwed into its end in the direction of normal rotation until the shafts engage and the distributor is fully installed in the cylinder block.
11. After installing the distributor on the cylinder block, turn the distributor housing until the alignment marks on the distributor housing and cylinder block are aligned.
12. After installing the clamp, tighten the clamp bolt.
13. Connect the ignition wire harness to the distributor.
14. Install the distributor cap.
15. Connect the electrical connector to the distributor housing.
16. After installing the distributor in its original position, tighten the clamp bolt.
17. Check that the ignition timing is set correctly (see chapter 1, section 34).
Installation (after removing the ignition distributor, the crankshaft turned)
18. Remove the spark plug from cylinder 1.
19. With your finger in the spark plug hole, use a wrench to rotate the crankshaft by the pulley bolt at the front of the engine.
20. Having felt the moment of compression, continue to slowly turn the crankshaft until the ignition timing mark on the anti-vibrator aligns with the zero mark on the ignition timing indicator.
21. Install the distributor rotor between the terminals of the ignition wires of the 1st and 6th cylinders in the distributor cap.
22. Insert the distributor into the engine. You may need to turn the distributor rotor slightly to ensure the drive gears engage. If the distributor does not fit into place because its shaft has not engaged with the oil pump shaft, turn the crankshaft by the bolt screwed into it in the direction of normal rotation until the distributor and oil pump shafts are mated and the distributor is installed.
23. After installing the distributor on the cylinder block, turn the distributor housing until the installation marks on the distributor base and the cylinder block are aligned.
24. After installing the clamp in place, tighten the clamp bolt.
25. Connect the connector to the distributor.
26. Install the distributor cap. If the wires were removed from the cover, reinstall them.
27. Connect the electrical connectors of the ignition coils to the base of the distributor.
28. After installing the distributor in its original position, tighten the clamping bolt and check the correct ignition timing.
[Original version of the article on the website chevyman]