
ChevyMan.ru
Mazda Mitsubishi Toyota Land Rover Honda Kia Nissan
English Русский
Български
Беларускі
Український
Српски
Hrvatski
Română
Polski
Slovenský
Magyar
|
Articles | Sitemap | Contacts |


Home   Aveo   Captiva   Cruze   Lacetti   Lanos   Niva   Tahoe   Others  
Orlando 1 (2010-2018) Trailblazer 1 (2001-2008, petrol) Lumina 1 (1989-1994)
  • Home
  • Chevrolet
  • Lumina 1
  • Power unit
  • Engine electrical equipment
  • Checking and replacing the inductive sensor (for 3.1L engines)

Checking and replacing the inductive sensor (for 3.1L engines) (Chevrolet Lumina 1)

            0

Contents: Examination ↧ Replacement ↧
1. Disconnect the cable from the negative terminal of the battery.

2. Remove the distributor cap and rotor.

3. Remove the ignition distributor from the engine (see section 8).

4. Disconnect the sensor leads from the ignition unit.

Examination


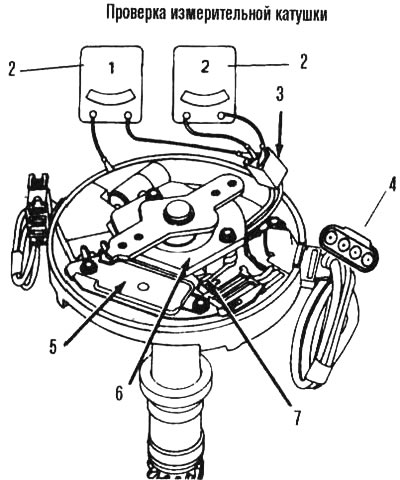
5. Connect one lead of the ohmmeter to the sensor terminal and the other to ground, as shown in the illustration. To check the wires for breaks, bend them with your hand. The ohmmeter should always show "infinity". If it does not, the sensor is faulty and should be replaced.
10.5. Checking the sensor on the ignition distributor of the NE system! (for 3.1L engines): 2 -…

10.5. Checking the sensor on the ignition distributor of the NE system! (for 3.1L engines): 2 - ohmmeter, 3 - sensor terminals disconnected from the ignition unit, 4 - 4-pin connector, 5 - ignition unit, 6 - sensor, 7 - contact "P"


6. Connect the ohmmeter leads to the terminals on the sensor terminals. To check the wires for breaks, bend them with your hand. When bending the wires, the ohmmeter should show a constant resistance value between 500 and 1500 ohms. If this is not the case, then the sensor is faulty and should be replaced.


Replacement


7. Remove the spring from the distributor shaft.

8. Mark the distributor drive and shaft so that they can be easily reassembled in the same position.

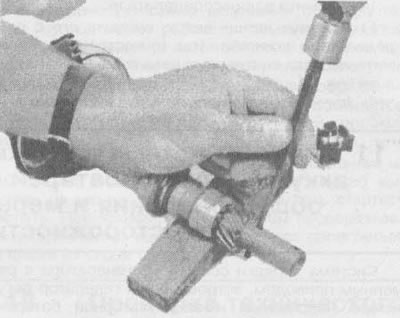
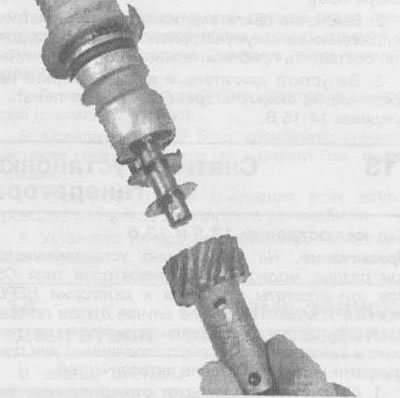
9. Carefully place the ignition distributor on a wooden block and use a hammer and punch to knock the pin out of the distributor shaft and gear (see illustrations).
10.9a. To remove the sensor, place the distributor shaft on a wooden block and use a punch and…

10.9a. To remove the sensor, place the distributor shaft on a wooden block and use a punch and hammer to knock out the pin

10.9b. Remove the driven gear with spacer washers from the shaft tailstock, paying attention to the…

10.9b. Remove the driven gear with spacer washers from the shaft tailstock, paying attention to the order of removing the washers


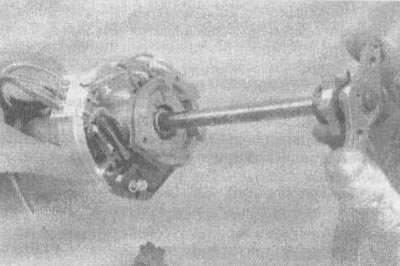
10. Remove the distributor shaft.
10.10. Remove the shaft from the ignition distributor

10.10. Remove the shaft from the ignition distributor


11. Pull the sensor up and remove it from the ignition distributor (see illustration). Remember the order in which these parts are removed.
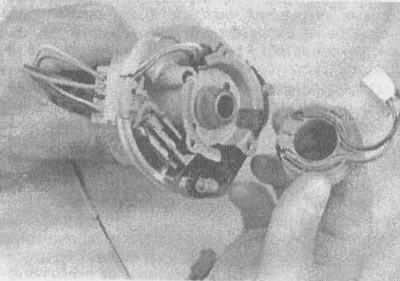
10.11 To remove the sensor from the ignition distributor of the 3.1L engine, unscrew the bolts from…

10.11 To remove the sensor from the ignition distributor of the 3.1L engine, unscrew the bolts from the pole pieces and pull the coil up


12. Assembly is carried out in reverse order.

(The original text can be found on the website: ChevyMan.ru)

The article was checked: Vladimir Romannikov
This article is available at russian, bulgarian, belarusian, ukrainian, serbian, croatian, romanian, polish, slovak, hungarian

Share information:

Previous articles
Lumina 1: Engine electrical equipment
Next articles

Checking and replacing the ignition unit
Removal and installation the ignition distributor (3.1L engine)
Checking, removing and installing the ignition coil
Checking the ignition system
Ignition system — general information
Battery Charging System — General Information and Precautions
Checking the charging circuit
Removal and installation the generator
Engine Starting System — General Information
Checking the technical condition of the starter on a car


See similar articles on the topic of Chevrolet cars:
Checking the level, topping up and replacing the working fluid Chevrolet Aveo T300 (2012-2018)
Checking the integrity of the sensor and diagnostic module (SDM) Chevrolet Captiva 1 (2006-2018)
Checking and replacing engine management system sensors Chevrolet Cruze 1 (2008-2016)
Checking the condition and replacing the timing belt Chevrolet Lacetti 1 (2002-2009)
Checking the condition and replacing the air conditioning compressor drive belt Chevrolet Lanos T150 (2002-2009)
Replacing fuses Chevrolet Niva 1 (2002-2016)
Checking and replacing windshield wiper blades Chevrolet Tahoe 1 (1992-2000)
Link in different formats to this page


Visitor comments

No comments yet


How much will 31 + 18 =


Orlando 1 (2010-2018) 
  • General information
  • Introduction to manual
  • User manual
  • Maintenance
  • Troubleshooting
  • Power unit
  • Engine repair
  • Fuel and control system
  • Cooling and lubrication system
  • Ignition system
  • Transmission
  • Clutch
  • Gearbox
  • Drive shafts
  • Chassis
  • Car suspension
  • Steering
  • Brake system
  • Body
  • Exterior (external elements)
  • Doors, locks and windows
  • Electrical equipment
  • Equipment and devices
  • Windscreen wipers
  • Power devices
  • Electrical diagrams


Trailblazer 1 (2001-2008) 
  • General information
  • User manual
  • Troubleshooting
  • Maintenance
  • Power unit
  • Engine in a car
  • Engine overhaul
  • Cooling and heating
  • Fuel and exhaust system
  • Engine electrical equipment
  • Engine control
  • Transmission
  • Automatic gearbox
  • Transfer case
  • Drive shafts and cardan
  • Chassis
  • Brake system
  • Car suspension
  • Steering
  • Body
  • Exterior (external elements)
  • Interior (internal elements)
  • Doors, locks and windows
  • Electrical equipment
  • Equipment and devices
  • Electrical circuits


Lumina 1 (1989-1994) 
  • General information
  • Maintenance
  • Power unit
  • Engine 3.1L V6
  • Engine 3.8L V6
  • Engine overhaul
  • Cooling system
  • Power and exhaust system
  • Fuel injection
  • Engine electrical equipment
  • Reduced exhaust gas toxicity
  • Transmission
  • Automatic gearbox
  • Drive shafts
  • Chassis
  • Brake system
  • Car suspension
  • Steering
  • Body
  • Heating and air conditioning
  • Repair of body elements
  • Doors, covers and windows
  • Interior (internal elements)
  • Electrical equipment
  • Equipment and devices
  • Electrical circuits


ChevyMan.ru © 2017-2026 · Mobile version · Feedback · Site search · Interesting to read · Sitemap: EN BG BY UA RS HR RO PL SK HU

Aveo 2003-2008 · Aveo 2006-2011 · Aveo 2012-2018 · Captiva 2006-2018 · Cruze 2008-2016 · Lacetti 2002-2009 · Lanos 2002-2009 · Niva 2002-2016 · Tahoe 1992-2000 · Tahoe 2000-2014 · Lumina 1 1989-1994 · Trailblazer 1 2001-2008 · Orlando 1 2010-2018 ·
🛡️ For your security and to improve our service, this site uses cookies. You can disable them in your browser.