


We check the technical condition of the engine during maintenance or when malfunctions occur in its operation.
Recommendation. The engine condition should be monitored regularly during vehicle operation.
The technical condition of the engine can be assessed with sufficient accuracy based on external signs and using available equipment: a compression gauge and a pressure gauge for checking the pressure in the engine lubrication system.
Checking by external signs
1. We prepare the car for maintenance and repair.
2. Check the engine oil level, making sure there is no emulsion in the engine oil pan (the oil on the level indicator should be without white streaks). The appearance of an emulsion indicates damage to the cylinder head or its gasket.
3. We make sure that there are no oil stains in the expansion tank of the cooling system and no bubbling of liquid when the engine is running at different speeds.
If the above phenomena are present, the cylinder head or its gasket may be damaged.
4. Remove the engine crankcase protection (if installed).
5. Check for oil leaks from under the oil filter, the drain plug of the oil pan, the front and rear crankshaft and engine oil pan oil seals, and from under the cylinder head cover gasket.
If oil leaks are detected, damaged seals must be replaced.
6. Check for breaks in the rubber-metal hinges of the power unit supports.
Damaged parts must be replaced.
7. Start the engine, and the oil pressure warning light on the instrument panel should go out.
If the lamp is constantly on, the engine lubrication system or the oil pressure sensor may be faulty. If the oil pressure warning light comes on at idle after the engine has warmed up and goes out after the crankshaft speed increases, then the following may be worn: oil pump gears, crankshaft journals, main and connecting rod bearing shells. A clicking, ringing sound under the cylinder head cover that appears immediately after starting the engine and does not disappear as the engine warms up usually indicates increased clearances in the valve drive.
Recommendation.
- To diagnose engine problems by ear, it is better to use a technical stethoscope.
- With its help, you can quite accurately determine the source of extraneous noise.
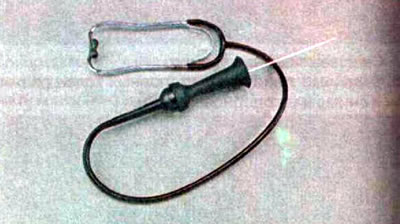
Some of the work is more conveniently performed on an inspection ditch or overpass.
8. Check for any noise or knocking in the engine.
The crankshaft knock is clearly audible in the lower part of the cylinder block, a dull metallic tone, increasing with increasing crankshaft speed. At idle, the sound has a low tone, and as the revs increase, its tone increases. The knock is caused by wear of the main bearings. In this case, as a rule, the oil pressure in the lubrication system is low.
Knocking of connecting rod bearings. A loud knock can be heard in the middle part of the cylinder block if the throttle valve is suddenly opened while the engine is idling.
The sound of pistons. A muffled knocking sound from the top of the cylinder block on an unheated engine that subsides and disappears as it warms up can be caused by worn pistons and cylinders.
Knocking of piston pins. A rhythmic metallic knock in the upper part of the cylinder block, audible in all engine operating modes and increasing under load, is caused by wear of the piston pins.
High-pitched knocking of intake and exhaust valves at regular intervals. It can be heard clearly when the engine is idling. Its frequency is lower than the frequency of any other knocking in the engine (see above).
To eliminate the above-mentioned knocks, it is necessary to adjust the thermal clearances of the valve drive. If it is not possible to eliminate the knock by adjustment, the engine cylinder block will need to be disassembled and inspected. It is better to entrust this work to a specialized service station.
9. Check for the absence of engine smoking under various operating modes.
Black smoke when revving the engine indicates that the mixture is too rich. This is most likely caused by a fault in the engine management system.
Blue smoke indicates that oil is entering the combustion chamber. If smoking occurs when releasing the gas, idling and when the engine is running at high speeds without load, but there is no smoking when driving smoothly, most likely the oil seals are worn out. If the smoke increases with increasing speed and load, and a bluish trail is left behind the car when driving at a steady pace, the cause is most likely wear of the oil scraper rings. To eliminate these faults, it is necessary to disassemble and repair the engine. It is better to entrust this work to a specialized service station.
Thick white smoke indicates coolant entering the combustion chamber. This may be caused by a warped cylinder head or a damaged cylinder head gasket.
10. By pressing and releasing the gas pedal, we check the engine operation at different crankshaft rotation speeds.
Unstable engine operation at idle may be due to air being sucked into the intake manifold, a faulty adsorber, a faulty throttle assembly, or a faulty spark plug. Incorrect engine response to pressing the gas pedal is caused by a malfunction of the engine management system.
Increased engine vibration may be caused by a faulty one or more powertrain mounts. The appearance of a metallic knock when the car starts moving (and on a car with an automatic transmission and when switching the selector lever to D or R mode), most likely caused by a faulty rear support.
Testing with instruments
1. Check the compression in the engine cylinders.
2. Check the oil pressure in the engine lubrication system using a pressure gauge.
Checking oil consumption
We check oil consumption in the following sequence:
1. Warm up the engine to operating temperature (before turning on the electric fan).
2. After the electric fan has completed its working cycle and stopped, turn off the engine.
3. Wait for 15 minutes until the oil drains into the oil pan.
4. Check the engine oil level using the indicator.
5. Add engine oil up to the MAX mark on the level indicator.
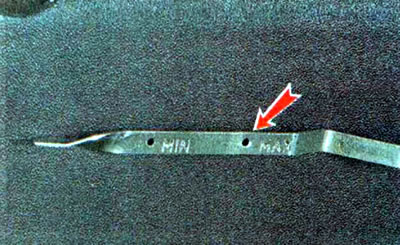
6. Regularly checking the oil level, operate the car until the car has traveled 2000 km or until the oil level drops to the minimum permissible value (mIN mark on the level gauge). In the second case, we record or remember the vehicle's mileage during the check.
7. After stopping the engine, warmed up to operating temperature (see above), wait 15 minutes.
Note: To perform the following operation, you must add oil from a measuring container to know the exact amount of oil poured in.
8. Add oil to the engine to the maximum permissible level. The amount of oil added will correspond to the oil consumption for the distance traveled.
9. We calculate oil consumption for 1000 km of mileage using the formula:

Note: If oil consumption exceeds 0.6 l per 1000 km, then the engine is most likely worn out and requires repair.