


Contents: Replacing the right support ↧ Replacing the left support ↧ Replacing the rear support ↧ Replacing the front support of a car… ↧ Replacing the front support (car… ↧
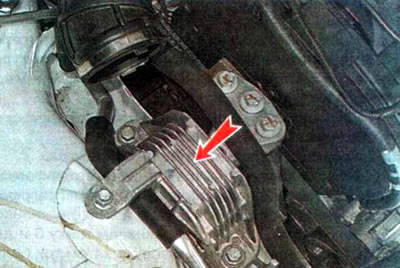
To reduce the transmission of vibration from the engine to the body, the power unit (engine assembly with gearbox) suspended on two supports, which are installed on the right (in the photo the air filter. under which it is located, removed)...
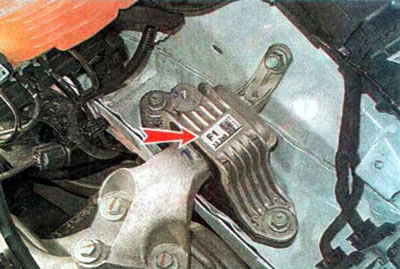
...and on the left side of the engine compartment (in the photo, the battery area under which it is located has been removed).
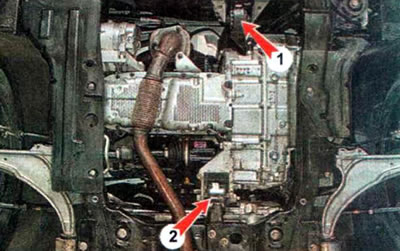
To reduce vibrations of the power unit when the engine is running and when the car is moving over uneven surfaces, additional lower supports are installed: front 1 and rear 2 (in the photo the engine crankcase protection is removed).
The supports cannot be repaired and if the rubber cracks or peels off, they are replaced. The support, which has fatigue cracks in the metal elements, also needs to be replaced.
Increased vibration and knocking when the engine load increases may indicate a fault in one or more supports (at the moment of starting or sudden acceleration of the car).
Replacing the right support
The need to replace the support is determined during the inspection of the technical condition of the engine. To complete the work you will need a height-adjustable stand or jack. We carry out the work in the following order:
1. We prepare the car for maintenance and repair.
2. Remove the air filter housing.
3. Place the jack under the engine crankcase. Having slightly lifted the engine with a jack, we unload the right support of the power unit.
4. Using a 15 mm wrench, unscrew nut 3 and two bolts 1 securing the support to the body, and then three bolts 2 securing the support to the engine bracket.
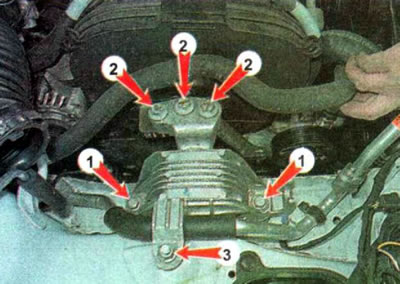
5. Remove the right support.
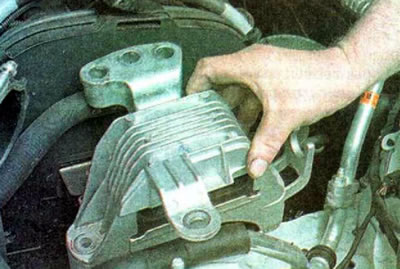
Warning! When installing the support, use only new bolts and nuts!
6. Install the new support in the reverse order. Tighten the bolts and nut that secure the support to the body to a torque of 62 Nm. Tighten the bolts that secure the support to the engine to a torque of 50 Nm, then turn them an additional 60°-75°
Replacing the left support
The need to perform work is determined during the inspection of the technical condition of the engine. To replace the support, you will need a height-adjustable stand or jack. We carry out the work in the following order:
1. We prepare the car for maintenance and repair.
2. Remove the battery platform.
3. Place the jack under the gearbox housing. Having slightly lifted the gearbox with a jack, we unload the left support of the power unit.
4. Using a 15 mm wrench, unscrew the two bolts 1 and nut 3 securing the support to the body, and then the three bolts 2 securing the support to the gearbox.
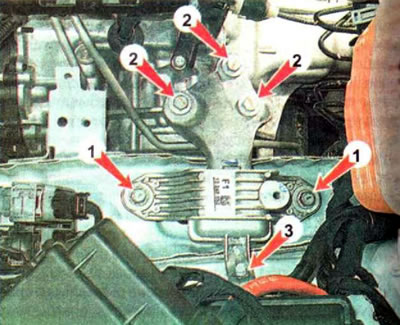
5. Remove the left support.
Warning! When installing the support, use only new bolts and nuts!
6. Install the new support in the reverse order. Tighten the bolts and nut that secure the support to the body to a torque of 62 Nm. Tighten the bolts that secure the support to the gearbox to a torque of 50 Nm, and then turn them an additional 60°-75°.
Replacing the rear support
The need to perform the work is determined during the inspection of the technical condition of the engine. To perform the work, an inspection pit or overpass will be required. We carry out the work in the following order:
1. We prepare the car for maintenance and repair, and install it on an inspection ditch or overpass.
2. Remove the engine crankcase protection.
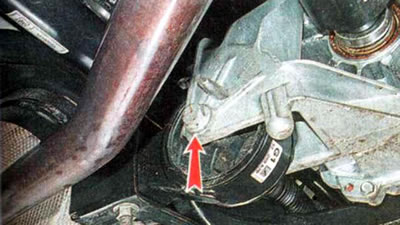
3. Using an 18 mm wrench, unscrew the bolt securing the support to the gearbox bracket and remove it from the hole.
4. Using an 18 mm wrench, unscrew the two nuts on the bolts securing the support to the subframe, holding the bolts from turning with a wrench of the same size. We remove the bolts from the holes.
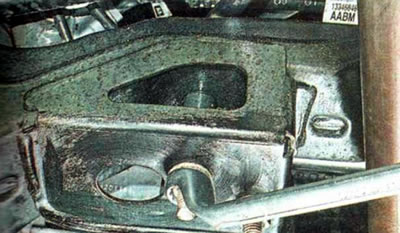
5. Remove the support.
Warning: When installing the support, only new bolts must be used.
6. Install the parts in reverse order. Tighten the bolt securing the rear support to the gearbox bracket to a torque of 100 Nm, and tighten the nuts securing the bolts securing the rear support to the subframe to a torque of 110 Nm.
Replacing the front support of a car with a manual transmission
The need to perform work is determined during the inspection of the technical condition of the engine. To carry out the work, you will need an inspection pit or overpass. We carry out the work in the following order:
1. We prepare the car for maintenance and repair, and install it on an inspection ditch or overpass.
2. Remove the engine crankcase protection.
3. Using an 18 mm wrench, unscrew the bolts securing the support to the manual transmission and the subframe bracket.
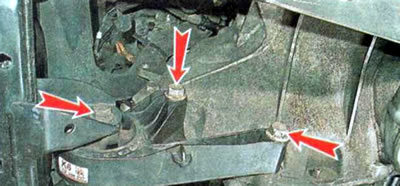
4. Remove the support.
Warning: When installing the support, only new bolts must be used.
5. Install the parts in reverse order. Tighten the bolt securing the front support to the subframe to a torque of 100 Nm, and the bolts securing the front support to the gearbox to a torque of 100 Nm.
Replacing the front support (car with automatic transmission)
The need to perform work is determined during the inspection of the technical condition of the engine. To carry out the work, you will need an inspection pit or overpass. We carry out the work in the following order:
1. We prepare the car for maintenance and repair, and install it on an inspection ditch or overpass.
2. Remove the engine crankcase protection.
3. Using a 18 mm wrench, unscrew the bolt securing the support to the subframe bracket 1. Using a 15 mm wrench, unscrew the three bolts 2 securing the support to the automatic transmission (the top bolt is not visible in the photo).
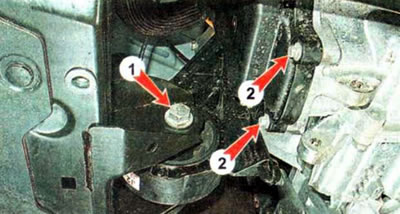
4. Remove the support.
Warning: When installing the support, only new bolts must be used.
5. Install the parts in reverse order. Tighten the bolt securing the front support to the subframe to a torque of 100 Nm, and the bolts securing the front support to the gearbox to a torque of 62 Nm.
[The article is reprinted from the website: «ChevyMan.ru»]