
Reference data
| Working fluid recommended by the manufacturer | DEXRON VI |
| Total volume of liquid, l | 8,0-8,5 |
| Volume of drained fluid during replacement, l | 4,0-6,0 |
| Tightening torque of the plugs of the inspection and drain holes, Nm | 12 |
Warning! For trouble-free operation of the automatic transmission, it is necessary that the working fluid level be normal. Moreover, not only a low level is harmful, but also an elevated level. Excessive amount of liquid can, at best, lead to oil leakage through the breather, at worst - to damage to the automatic transmission and expensive repairs!
Checking the working fluid level
In a properly functioning gearbox, the fluid level will be constant, since it is not consumed during operation. The level can only drop due to fluid leakage through worn seals or leaky connections. During vehicle maintenance (performed in accordance with the maintenance plan) it is necessary to visually ensure that there are no oil leaks on the automatic transmission housing. In addition, it is necessary to carefully inspect the transmission if oil stains are found where the car is parked. If the fluid level has dropped, further inspection of the automatic transmission is required to identify and replace faulty seals. If a leak is detected from the gearbox, it is not enough to simply add working fluid; it is necessary to eliminate the malfunction as soon as possible.
Checking the fluid level in the automatic transmission may be necessary after repairs related to a leak in the crankcase or if there is a suspicion that the level is not normal (for example, the car changed owner).
Check the level of the working fluid on a level surface with the engine running. In order for the amount of fluid in the gearbox to correspond to the calculated level, the temperature of the working fluid during the test should be close to 90°C (with an error of no more than ±5°C). Therefore, to perform the test, a special diagnostic device (scanner) is required that shows the temperature of the working fluid in the automatic transmission. If there is no device, it is advisable to perform the work at a specialized service station.
Note. If the fluid in the automatic transmission is cold, then before performing the check it is necessary to preheat the working fluid, for which it is necessary to drive the car 10-15 km. In the event that the temperature is higher than recommended, it is necessary to wait some time for the fluid to cool down a little.
To perform the work you will need an inspection pit or overpass, a diagnostic device (a scanner or laptop with an adapter and software that are used to diagnose the engine management system), a small clean container with a capacity of 1.5-2.0 l, an oil syringe.
Recommendation. If you don't have an oil syringe, you can use a funnel with a hose attached to it to add oil.

Warning! To determine the correct level, it is important that the temperature of the working fluid corresponds to the optimum value. Only special automatic transmission fluid recommended by the manufacturer may be added.
We check the level of the working fluid in the following order.
1. Warm up the working fluid in the automatic transmission to a temperature of 85-95°C (see above) and prepare the car for maintenance and repair.
2. Place the car on an inspection ditch or overpass and apply the parking brake. We move the selector lever to position P and turn off the engine.
3. Remove the engine crankcase protection. Wipe the gearbox inspection hole plug and the surrounding surface with a clean rag.
4. Start the engine. Press the brake pedal and smoothly move the selector lever from P to D, holding the lever in each of the intermediate positions for 3 seconds. Return it back to position P.
5. Let the engine run for two minutes at idle speed.
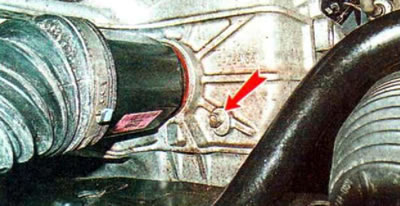
6. Without turning off the engine, place a container under the inspection hole.
7. Using an 11 mm socket wrench, unscrew the inspection hole plug.
8. If the working fluid starts dripping from the hole, the level is normal, immediately screw the plug into the hole and tighten it to the prescribed torque (see above). In the case when the fluid level is below the control hole, use an oil syringe (or through a funnel with a hose) add the working fluid recommended by the manufacturer to the gearbox housing until it starts to leak out. If the liquid flows out of the hole in separate drops, tighten the plug. If the liquid flows out in a continuous stream, then let it drain, and after it stops flowing out, screw on the cap.
Note: The appearance of a burnt oil smell indicates a malfunction in the gearbox.
9. After completing the check, make sure there is no fluid leakage from under the inspection hole plug; if necessary, check the tightening torque. We install engine crankcase protection.
Replacement of working fluid
We replace the working fluid in the automatic transmission in accordance with the maintenance plan.
During draining, it is necessary to pay attention to the condition of the working fluid. There should be no small particles in it. The liquid should not have the smell of burnt oil. Otherwise, there are serious faults in the gearbox, and for a more thorough check you should contact a specialized service station as soon as possible.
To perform the work you will need an inspection pit or overpass, a wide clean container for the waste liquid with a capacity of at least 5 liters, a measuring container, a special oil syringe (or a funnel with a hose, see. above). We perform the work in the following order:
1. We prepare the vehicle for maintenance and repair and install it on an inspection pit or overpass.
2. Remove the engine crankcase protection.
3. After waiting for the unit to cool down to a safe temperature (no higher than 45°C), place a container under the gearbox drain hole.
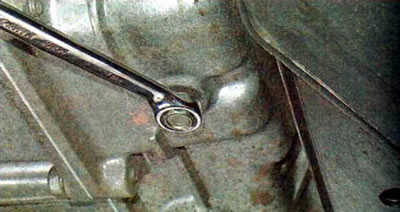
4. Using an 11 mm open-end wrench, unscrew the gearbox drain plug and drain the fluid into a container.
5. After the liquid stops flowing out, screw the plug into the drain hole and tighten it to the specified torque (see above).
6. Using a measuring container, we determine the amount of drained liquid and also check its condition (see above).
7. Using the filler hole, a syringe or a funnel with a hose attached, add the same amount of new working fluid to the gearbox (see above).
8. Start the engine.
9. Having warmed up the working fluid to a temperature of 85-95°C, we check its level in the gearbox (see above). If the fluid flows out of the hole in separate drops, we tighten the plug. If necessary, bring the liquid level up to normal.
10. After finishing the work, tighten the plug of the inspection hole. We make sure that there is no fluid leakage from under the plugs, and if necessary, we check the tightening torque.
11. Install the engine crankcase protection.