ChevyMan.ru
Mazda Mitsubishi Toyota Land Rover Honda Kia Nissan
English Русский
Български
Беларускі
Український
Српски
Hrvatski
Română
Polski
Slovenský
Magyar
|
Articles | Sitemap | Contacts |


Home   Aveo   Captiva   Cruze   Lacetti   Lanos   Niva   Tahoe   Others  
Orlando 1 (2010-2018) Trailblazer 1 (2001-2008, petrol) Lumina 1 (1989-1994)
  • Home
  • Chevrolet
  • Orlando 1
  • Transmission
  • Drive shafts
  • Front Wheel Drives — Checking Technical Condition

Front Wheel Drives — Checking Technical Condition (Chevrolet Orlando 1)

            0

It is necessary to check the technical condition of the drives in accordance with the maintenance plan.

The service life of the drive depends on the condition of its joints. Constant velocity joints are quite durable and, if the vehicle is used carefully, can last more than 100 thousand km. As a rule, the outer joints of the drives fail earlier than the inner ones. The service life of joints is reduced by: an active driving style, interference with the design of the car's suspension, but most of all - damage to their protective rubber covers. When the cover is torn, water and dirt get into the internal cavity of the hinge, wash out the lubricant and accelerate wear. Rupture of the protective cover may occur as a result of natural aging of the rubber or mechanical damage. For example, when a car is moving in a deep rut. When the front wheels of a car get stuck in the ground, sand or icy snow, the rubber can be torn by hardening clay or freezing water on the cover. And then, dirt, dust and snow can cause the joint to become unusable within a few tens of kilometers.

But if you detect a break before the hinge fails, you can limit yourself to just replacing the cover. But in this case it is necessary to disassemble the joint, thoroughly wash all the parts and add new grease.

You can tell that the outer joint is worn out by the characteristic clicking sounds in the area of the front wheel hub when turning sharply. As the joint wear increases, the clicking becomes louder and can quickly develop into a constant crunching sound even when driving in a straight line. If you do not replace the joint in a timely manner, it may break while driving.


We perform the check in the following order:

1. We prepare the car for maintenance and repair.

2. Hang the front wheels on stands. On vehicles with manual transmission, we engage neutral gear; on vehicles with automatic transmission, we move the selector to position N.

3. Visually check the integrity of the protective covers of the outer hinges 1...

3. Visually check the integrity of the protective covers of the outer hinges 1...


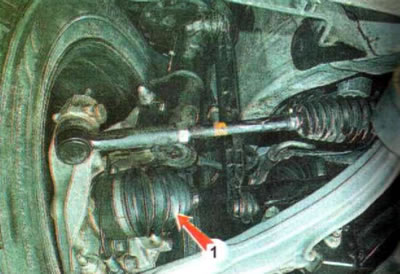
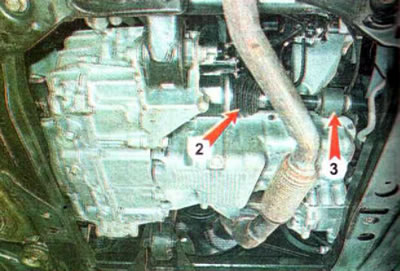
...and the inner 2 joints of the front wheel drives, we look for grease leaks from them (if you suspect something, you can slightly stretch the cover with your hands). We check whether the clamps of the covers and the damper mounts 3 have loosened.

...and the inner 2 joints of the front wheel drives, we look for grease leaks from them (if you…


4. Turn the steering wheel so that the wheels are pointing straight ahead. We hold the shaft with one hand and rotate the hinge housings back and forth with the other hand and make sure there is no play.


5. Rotating the front wheels by hand, we visually check the drive shafts for any wobble.

6. Alternately turning the front wheels first one way, then the other, and rotating them at the same time, we check if there are any extraneous sounds (knocks and crunches) in external and internal hinges. When checked in this way, serviceable joints operate silently. The faulty joint should be replaced (either separately or the entire drive assembly). You can limit yourself to replacing the damaged cover only if the hinge is in good condition.

The article was checked: Vladimir Romannikov
This article is available at russian, bulgarian, belarusian, ukrainian, serbian, croatian, romanian, polish, slovak, hungarian

Share information:

Previous articles
Orlando 1: Drive shafts
Next articles

Front Wheel Drives — General Information
Removal and installation the front wheel drive
Removal, replacing the protective cover and installing the outer drive joint
Removal, replacing the protective cover and installing the inner drive joint
Seals — replacement


See similar articles on the topic of Chevrolet cars:
Checking the technical condition of the front wheel drives Chevrolet Aveo T300 (2012-2018)
Front fender wheel opening molding Chevrolet Captiva 1 (2006-2018)
Checking the technical condition of the front suspension parts on the car Chevrolet Cruze 1 (2008-2016)
Removal the front wheel drives Chevrolet Lacetti 1 (2002-2009)
Removal the front wheel drives Chevrolet Lanos T150 (2002-2009)
Checking the technical condition of the front suspension Chevrolet Niva 1 (2002-2016)
Front Wheel Bearings — Checking, Greasing and Adjusting Chevrolet Tahoe 1 (1992-2000)
Link in different formats to this page


Visitor comments

No comments yet


How much will 15 + 11 =


Orlando 1 (2010-2018) 
  • General information
  • Introduction to manual
  • User manual
  • Maintenance
  • Troubleshooting
  • Power unit
  • Engine repair
  • Fuel and control system
  • Cooling and lubrication system
  • Ignition system
  • Transmission
  • Clutch
  • Gearbox
  • Drive shafts
  • Chassis
  • Car suspension
  • Steering
  • Brake system
  • Body
  • Exterior (external elements)
  • Doors, locks and windows
  • Electrical equipment
  • Equipment and devices
  • Windscreen wipers
  • Power devices
  • Electrical diagrams


Trailblazer 1 (2001-2008) 
  • General information
  • User manual
  • Troubleshooting
  • Maintenance
  • Power unit
  • Engine in a car
  • Engine overhaul
  • Cooling and heating
  • Fuel and exhaust system
  • Engine electrical equipment
  • Engine control
  • Transmission
  • Automatic gearbox
  • Transfer case
  • Drive shafts and cardan
  • Chassis
  • Brake system
  • Car suspension
  • Steering
  • Body
  • Exterior (external elements)
  • Interior (internal elements)
  • Doors, locks and windows
  • Electrical equipment
  • Equipment and devices
  • Electrical circuits


Lumina 1 (1989-1994) 
  • General information
  • Maintenance
  • Power unit
  • Engine 3.1L V6
  • Engine 3.8L V6
  • Engine overhaul
  • Cooling system
  • Power and exhaust system
  • Fuel injection
  • Engine electrical equipment
  • Reduced exhaust gas toxicity
  • Transmission
  • Automatic gearbox
  • Drive shafts
  • Chassis
  • Brake system
  • Car suspension
  • Steering
  • Body
  • Heating and air conditioning
  • Repair of body elements
  • Doors, covers and windows
  • Interior (internal elements)
  • Electrical equipment
  • Equipment and devices
  • Electrical circuits


ChevyMan.ru © 2017-2026 · Mobile version · Feedback · Site search · Interesting to read · Sitemap: EN BG BY UA RS HR RO PL SK HU

Aveo 2003-2008 · Aveo 2006-2011 · Aveo 2012-2018 · Captiva 2006-2018 · Cruze 2008-2016 · Lacetti 2002-2009 · Lanos 2002-2009 · Niva 2002-2016 · Tahoe 1992-2000 · Tahoe 2000-2014 · Lumina 1 1989-1994 · Trailblazer 1 2001-2008 · Orlando 1 2010-2018 ·
🛡️ For your security and to improve our service, this site uses cookies. You can disable them in your browser.