


To avoid confusion, in this book we will call cuffs rubber seals where the moving part does not rotate, but moves longitudinally (for example, pistons of cylinders in the brake system or hydraulic clutch release drive), and we will leave the name "oil seal" for the seals of the drive shafts, that is, the rotating parts. Depending on the unit and installation location, the seal can seal a container with oil or working fluid (for example, gearbox and engine housings), or prevent the lubricant from being squeezed out of the part (for example, wheel hub).
In a car, oil seals are used to seal: the crankshaft in the engine, the front wheel drives in the gearbox, the shaft of the cooling system pump, as well as in the air conditioning compressor, in the wheel hubs and in other devices where tightness is required.
The seals are not designed for high fluid pressure. Therefore, in units where excess pressure may occur during operation, the internal cavity is made ventilated. For example, in the gearbox housing, where the oil heats up during operation, a special ventilation hole is made - a breather. In the engine, where the oil not only heats up, but is also pressed by gases that have broken through from the combustion chambers, there is a whole crankcase ventilation system. To reduce the likelihood of leaks from under the seals, at each maintenance of the car, the condition of the breather in the gearbox should be checked and, if necessary, cleaned of dirt, and also the elements of the engine crankcase ventilation system should be checked.
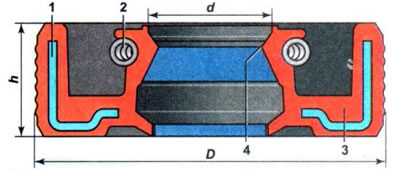
Seal: 1 - metal frame; 2 - spring ring; 3 - rubber body; 4 - working edge; D — outer diameter of the seal: d — hole diameter: h — thickness
For car units, seals are made from special oil- and petrol-resistant rubber. Inside there is a steel frame that determines its shape and provides rigidity. To increase reliability, a metal spring ring is placed on the working edge of the seal.
During operation, the working edge of the seals wears out. If there is severe wear or if a mechanical defect appears (cracks, cuts) the seal starts to leak liquid. The presence of leaks can be used to determine if the oil seal is faulty. During maintenance, as well as when the level of technical fluid drops, it is necessary to inspect the units in order to promptly detect the malfunction and replace the seal.
It is recommended to press the seals into the mounting hole using a mandrel that matches the outer diameter of the seal.
Replacing the wheel drive seals
The need to perform work is determined during the inspection of the technical condition of the gearbox.
Note: The sequence of execution is shown using the example of the left wheel drive oil seal. Replacing the right wheel drive oil seal is done in a similar manner.
We carry out the work in the following order.
1. We prepare the car for maintenance and repair.
2. Remove the front wheel drive from the side of the faulty seal.
3. Using a large slotted screwdriver or mounting blade, pry the oil seal out of the gearbox housing.
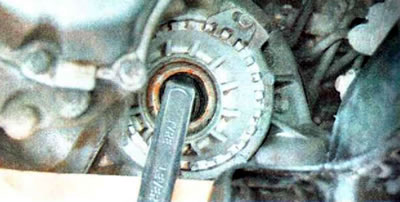
4. Lubricate the working edge of the new oil seal (depending on the vehicle configuration: with a manual transmission - with transmission oil, with an automatic transmission - with working fluid for automatic transmissions).
5. Press the seal into the gearbox housing hole using a 50 mm diameter mandrel.
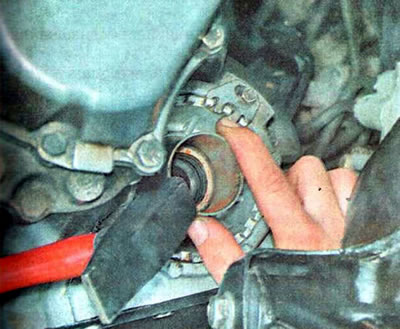
Recommendation. You can use the old front wheel drive oil seal as a mandrel.
6. Install the parts in reverse order. We check the level of transmission oil or automatic transmission fluid in the unit's crankcase and, if necessary, bring it up to normal.
Primary shaft seal of a manual transmission
The primary shaft seal of the gearbox is installed in the housing of the clutch slave cylinder. When the primary shaft seal wears out, oil from the gearbox enters the clutch housing. This can cause the clutch discs to become oily. The first sign of a malfunction is the presence of oil leaks at the bottom of the joint between the clutch housing and the engine cylinder block. However, a final judgement about the oil seal malfunction can only be made after removing the gearbox, in which case it is advisable to check the clutch slave cylinder and release bearing and, if they are found to be faulty, replace the oil seal assembly with the clutch release slave cylinder.
We carry out the work in the following order.
1. We prepare the car for maintenance and repair work.
2. Remove the clutch release slave cylinder.
3. Using a slotted screwdriver, remove the gearbox primary shaft seal.
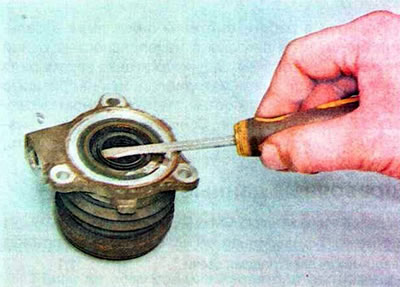
4. Cover the working edge of the new oil seal with transmission oil and press the oil seal in using a mandrel of a suitable diameter.
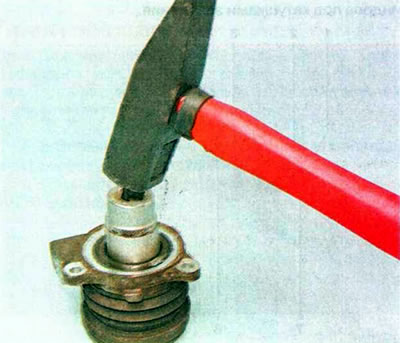
5. Install the parts in reverse order.
[The source of the article is available on the website «ChevyMan»]