ChevyMan.ru
Mazda Mitsubishi Toyota Land Rover Honda Kia Nissan
English Русский
Български
Беларускі
Український
Српски
Hrvatski
Română
Polski
Slovenský
Magyar
|
Articles | Sitemap | Contacts |


Home   Aveo   Captiva   Cruze   Lacetti   Lanos   Niva   Tahoe   Others  
Orlando 1 (2010-2018) Trailblazer 1 (2001-2008, petrol) Lumina 1 (1989-1994)
  • Home
  • Chevrolet
  • Orlando 1
  • Transmission
  • Drive shafts
  • Removal and installation the front wheel drive

Removal and installation the front wheel drive (Chevrolet Orlando 1)

            0

We perform the work to replace the outer or inner drive joints or their protective covers, replace the drive seal, and also when removing the gearbox.

To carry out the work, you will need an inspection pit or overpass (it is more convenient, but you can also do the work on a flat horizontal surface), new hub nut (usually supplied complete with the outer CV joint or as part of its repair kit).

With the help of an assistant, unscrew the front wheel hub nut.

We carry out the work in the following order:

1. We prepare the vehicle for maintenance and repair and install it on an inspection pit or overpass.

Note: Depending on the vehicle configuration, tires may be mounted on alloy or steel wheels. On a car with steel wheels, remove the decorative wheel cap.


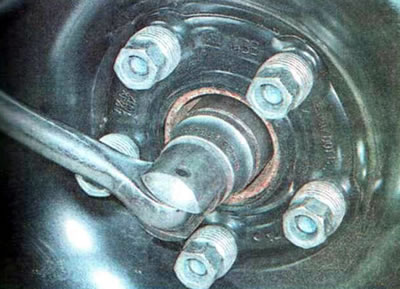
2. The assistant presses the brake pedal and holds it pressed. Using a 32 mm socket wrench, loosen the front wheel hub nut.

2. The assistant presses the brake pedal and holds it pressed. Using a 32 mm socket wrench, loosen…


3. Place the car on a secure stand and remove the front wheel.

4. On vehicles with manual transmission, drain the transmission oil. On cars with automatic transmission, we drain the working fluid of the automatic transmission.


Note: If you remove the drives for repair or replacement and do not plan to remove the gearbox, then you do not need to drain the fluid/oil. It will be enough to spread a rag under the gearbox.


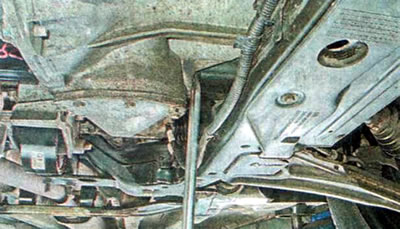
5. Disconnect the ball joint from the lever.

6. Finally, unscrew the wheel hub nut, remove the washer and treat the splined connection of the outer joint and the hub with penetrating lubricant.

Note: When removing the left drive, turn the steering wheel all the way to the right, and when removing the right drive, turn the steering wheel all the way to the left.


7. Using a hammer blow through a soft metal mandrel or a wooden block, knock the hinge tail out of the hub.

8. Pull the lower part of the strut outward, remove the splined tail of the outer joint from the hub and carefully lower the drive onto the suspension arm.

9. Using a mounting blade, pry up and move the hinge outward.

9. Using a mounting blade, pry up and move the hinge outward.


10. Carefully, trying not to damage the drive seal, remove the inner joint tailpiece from the gearbox.

10. Carefully, trying not to damage the drive seal, remove the inner joint tailpiece from the…


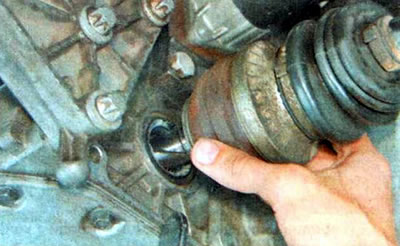
11. Remove the drive from the car.


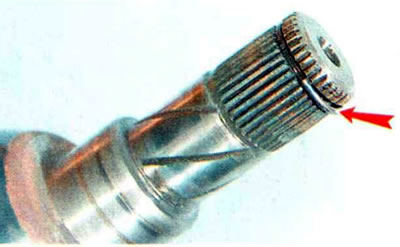
12. Install the parts in reverse order. Before assembly, replace the retaining ring of the splined tailpiece of the inner joint...

12. Install the parts in reverse order. Before assembly, replace the retaining ring of the splined…


... and lubricate the splines of the outer hinge with copper grease. When assembling, install a new hub nut and tighten it to a torque of 150 Nm, then unscrew it by 45° and tighten it again to a torque of 250 Nm.

13. Bring the level of transmission oil of the automatic transmission working fluid to the norm. Remove oily streaks from the gearbox housing with a rag.

(The source of the article is available on the website: CHEVYMAN.RU)

The article was checked: Vladimir Romannikov
This article is available at russian, bulgarian, belarusian, ukrainian, serbian, croatian, romanian, polish, slovak, hungarian

Share information:

Previous articles
Orlando 1: Drive shafts
Next articles

Front Wheel Drives — Checking Technical Condition
Front Wheel Drives — General Information
Removal, replacing the protective cover and installing the outer drive joint
Removal, replacing the protective cover and installing the inner drive joint
Seals — replacement


See similar articles on the topic of Chevrolet cars:
Removal the front wheel drive shaft Chevrolet Aveo T250 (2006-2011)
Permanent all-wheel drive system Chevrolet Captiva 1 (2006-2018)
Design features of front wheel drives Chevrolet Cruze 1 (2008-2016)
Replacing the front wheel drive oil seal Chevrolet Lacetti 1 (2002-2009)
Front wheel drive device Chevrolet Lanos T150 (2002-2009)
Possible faults of the front wheel drive, their causes and methods of elimination Chevrolet Niva 1 (2002-2016)
Front axle shaft with housing (all-wheel drive models) — removal and installation Chevrolet Tahoe 1 (1992-2000)
Link in different formats to this page


Visitor comments

No comments yet


How much will 31 + 21 =


Orlando 1 (2010-2018) 
  • General information
  • Introduction to manual
  • User manual
  • Maintenance
  • Troubleshooting
  • Power unit
  • Engine repair
  • Fuel and control system
  • Cooling and lubrication system
  • Ignition system
  • Transmission
  • Clutch
  • Gearbox
  • Drive shafts
  • Chassis
  • Car suspension
  • Steering
  • Brake system
  • Body
  • Exterior (external elements)
  • Doors, locks and windows
  • Electrical equipment
  • Equipment and devices
  • Windscreen wipers
  • Power devices
  • Electrical diagrams


Trailblazer 1 (2001-2008) 
  • General information
  • User manual
  • Troubleshooting
  • Maintenance
  • Power unit
  • Engine in a car
  • Engine overhaul
  • Cooling and heating
  • Fuel and exhaust system
  • Engine electrical equipment
  • Engine control
  • Transmission
  • Automatic gearbox
  • Transfer case
  • Drive shafts and cardan
  • Chassis
  • Brake system
  • Car suspension
  • Steering
  • Body
  • Exterior (external elements)
  • Interior (internal elements)
  • Doors, locks and windows
  • Electrical equipment
  • Equipment and devices
  • Electrical circuits


Lumina 1 (1989-1994) 
  • General information
  • Maintenance
  • Power unit
  • Engine 3.1L V6
  • Engine 3.8L V6
  • Engine overhaul
  • Cooling system
  • Power and exhaust system
  • Fuel injection
  • Engine electrical equipment
  • Reduced exhaust gas toxicity
  • Transmission
  • Automatic gearbox
  • Drive shafts
  • Chassis
  • Brake system
  • Car suspension
  • Steering
  • Body
  • Heating and air conditioning
  • Repair of body elements
  • Doors, covers and windows
  • Interior (internal elements)
  • Electrical equipment
  • Equipment and devices
  • Electrical circuits


ChevyMan.ru © 2017-2026 · Mobile version · Feedback · Site search · Interesting to read · Sitemap: EN BG BY UA RS HR RO PL SK HU

Aveo 2003-2008 · Aveo 2006-2011 · Aveo 2012-2018 · Captiva 2006-2018 · Cruze 2008-2016 · Lacetti 2002-2009 · Lanos 2002-2009 · Niva 2002-2016 · Tahoe 1992-2000 · Tahoe 2000-2014 · Lumina 1 1989-1994 · Trailblazer 1 2001-2008 · Orlando 1 2010-2018 ·
🛡️ For your security and to improve our service, this site uses cookies. You can disable them in your browser.