
Contents: Hinges with external snap ring ↧ Hinges with pressed plastic fillers… ↧ All types of hinges ↧
Note: first purchase a repair kit for the universal joints used on the vehicle modification being serviced. Before you begin, please read the full description of the upcoming procedure.
1. Remove the driveshaft (see subsection 3).
Hinges with external snap ring
2. Place the drive shaft on a work bench equipped with a vice.
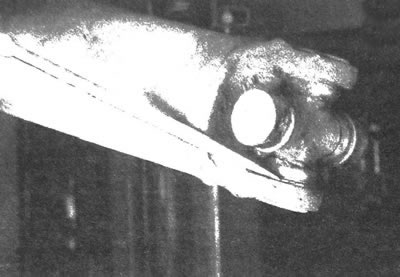
3. Remove the retaining rings using small special pliers (see illustration).
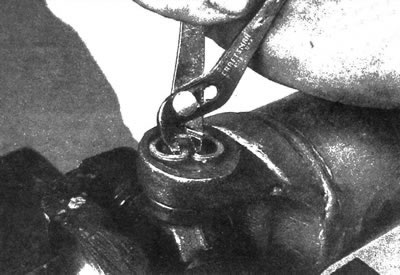
4.3 Using small pliers, remove the retaining rings located at the ends of the universal joint forks
4. Place a short section of pipe or a large diameter socket head against the crosspiece and, placing another socket head against the crosspiece, press it out by clamping it in a vice (see illustration).
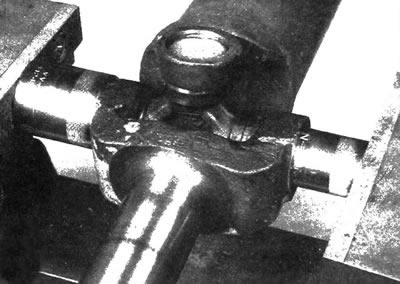
4.4. To disconnect the cardan joint from the shaft, use a vice as a press - by using a smaller diameter socket head, the bearing cap will be pressed into the larger diameter head
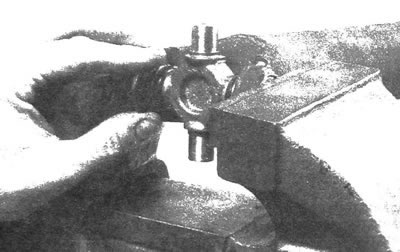
5. Press out the crosspiece as much as possible, then grab it with pliers and remove the bearing cover (see illustration).
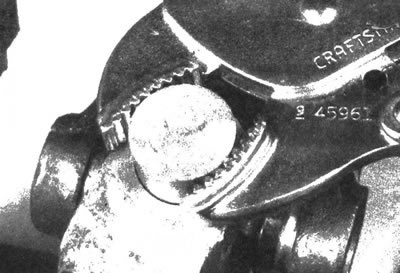
4.5. To remove the bearing caps from the fork, you can use a self-tightening wrench
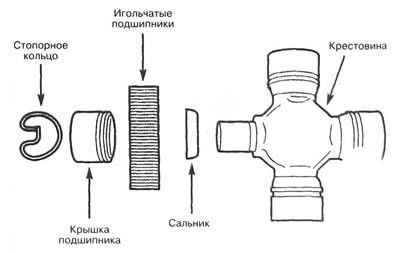
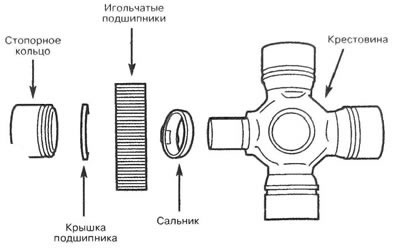
6. The universal joint repair kit contains a new crosspiece, seals, bearings, covers and retaining rings (see illustration).

4.6. Cardan joint with external retaining ring
7. Inspect the bearing cap bores in the forks for signs of wear or surface damage.
8. If the fork holes are worn to the point that the caps are loose, replace the driveshaft.
9. Make sure that the crosspiece dust boots are positioned correctly.
10. Press one of the bearing caps into the fork approximately 6 mm using a vice.
11. Using grease, secure the needle rollers into the covers.
12. Insert the crosspiece into the pre-installed bearing cover, without allowing the needle rollers to shift.
13. Maintaining the required crosspiece position, press in both bearing caps by slowly and carefully tightening the vice.
14. Using a socket head with a diameter slightly smaller than the diameter of the caps, press them into the fork. Press in the cover located on one side, install the retaining ring, then press in the cover located on the other side so that the crosspiece is pressed against the installed retaining ring. After this, install another retaining ring.
15. Perform the described operation on the remaining two bearing caps. Proceed to perform the operations described starting from item 22.
Hinges with pressed plastic fillers (with internal retaining ring)
16. If the joint was previously disassembled, remove the retaining rings (bearing holders), located on the inside of the bearing caps (see illustration).
4.16. Remove the internal retaining rings of the universal joint by knocking them out with a screwdriver and hammer
17. If the joint is being disassembled for the first time, there is no need to remove the retaining rings, as they are missing; bearing caps are pressed into plastic fillers.
Note: It may be necessary to heat the universal joint to a temperature exceeding 250°C before pressing out the crosspiece (to cause the plastic fillers to melt).
18. Press out the bearing caps as described in points 4 and 5.
19. Remove the crosspiece and clean the plastic fillers from the fork. Using a small punch, clean the plastic out of the holes through which the filler is poured.
20. The assembly of hinges of this type is carried out in the same way as the assembly of hinges with an external retaining ring, as described in paragraph. 9 - 15, with the difference that the retaining rings are located on the inside of the bearing caps (see illustration).
4.20. Cardan joint with internal retaining rings
21. When installing the bearing cap, it is necessary to press it in so that it is possible to install the retaining ring (see illustration).
4.21. Installing the inner retaining ring on the cardan joint
All types of hinges
22. If the joint movement is limited after assembly, tap the fork evenly with a hammer (see illustration). This will cause the fork to spring slightly and the hinge will become mobile.
4.22. Tap the fork evenly with a hammer - this will cause it to spring back and the hinge will become mobile
[Information taken from the official website CHEVYMAN.RU]